background image

Removing a microprocessor retention module

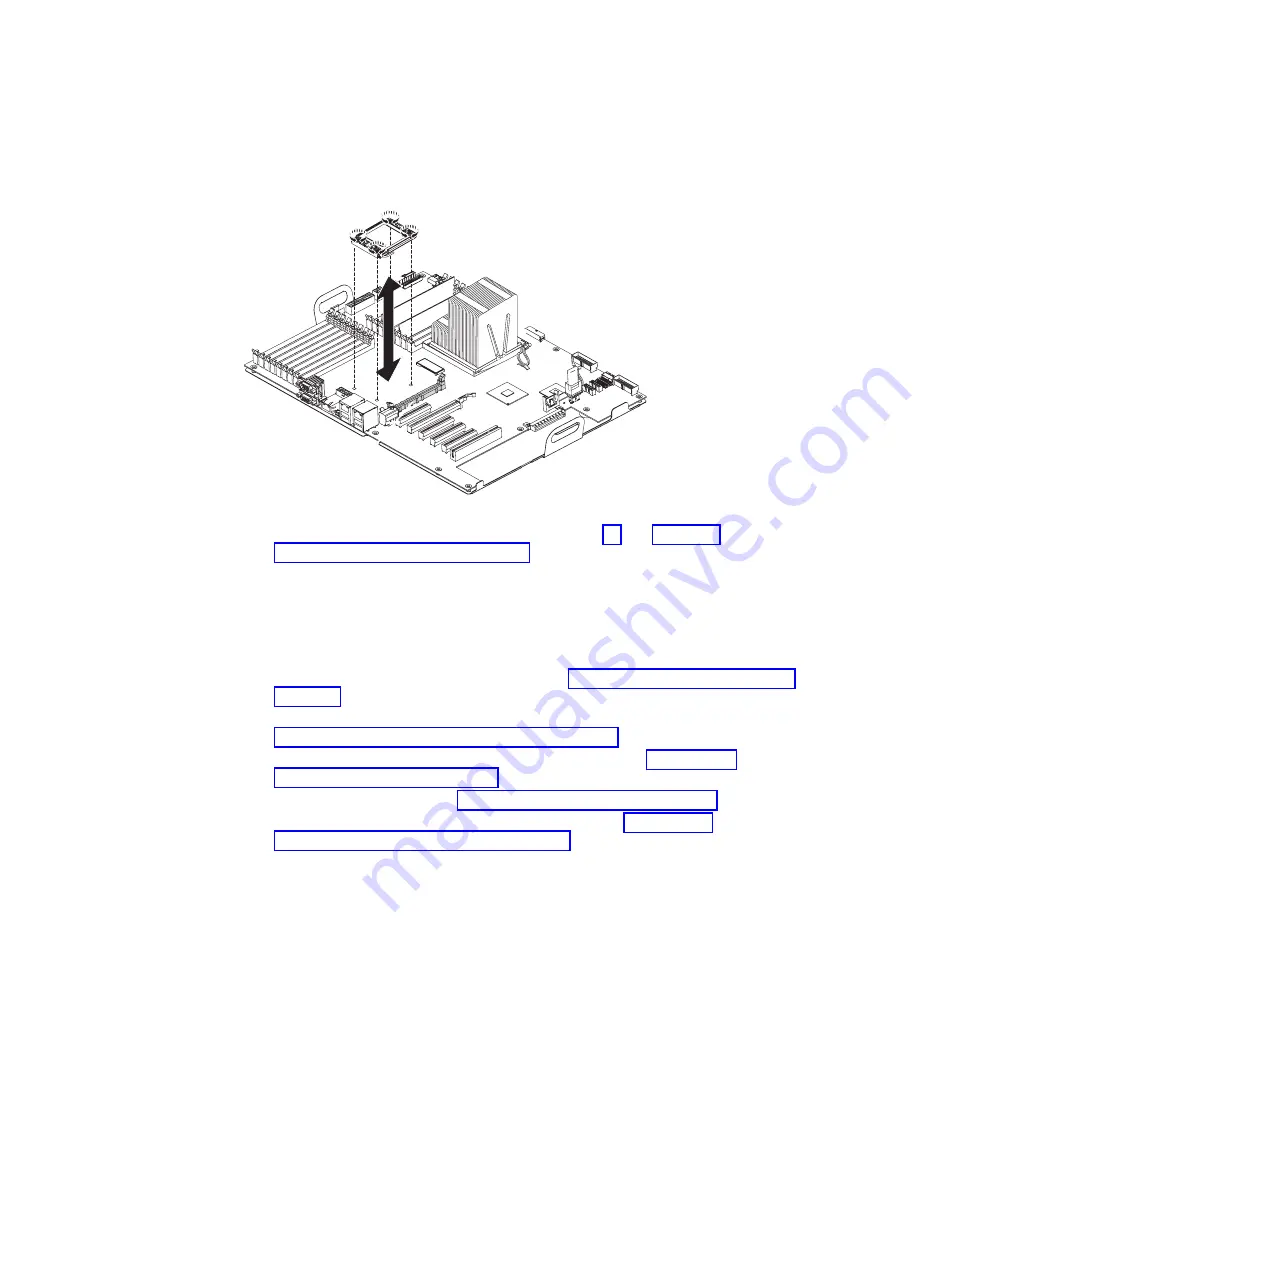
To remove a microprocessor retention module, complete the following steps:

1. Read the safety information that begins on page vii and “Handling

static-sensitive devices” on page 151.

2. Turn off the server and all attached devices; then, disconnect all power cords

and external cables.

3. Carefully turn the server on its side so that it is lying flat, with the cover facing

up.

Attention:

Do not allow the server to fall over.

4. Unlock and remove the left-side cover (see “Removing the left-side cover” on

page 181).

5. Remove the power supply or power supplies from the power-supply cage (see

“Removing a hot-swap power supply” on page 273).

6. Rotate the power-supply cage to its open position (see “Opening the

power-supply cage” on page 154).

7. Remove the air baffle (see “Removing the air baffle” on page 212).

8. Remove the heat sink and the microprocessor (see “Removing a

microprocessor and heat sink” on page 284).

9. Using a T8 Torx screwdriver, remove the four screws that secure the

microprocessor retention module to the system board; then, lift the
microprocessor retention module from the system board.

10. If you are instructed to return the microprocessor retention module, follow all

packaging instructions, and use any packaging materials for shipping that are
supplied to you.

294

IBM System x3400 M3 Types 7378 and 7379: Problem Determination and Service Guide

Summary of Contents for 7378

Page 1: ...IBM System x3400 M3 Types 7378 and 7379 Problem Determination and Service Guide...

Page 2: ......

Page 3: ...IBM System x3400 M3 Types 7378 and 7379 Problem Determination and Service Guide...

Page 4: ...afety Information Environmental Notices and User Guide documents on the IBM Documentation CD and the Warranty Information document that comes with the server Thirteenth Edition June 2014 Copyright IBM...

Page 5: ...nnectors 20 Chapter 3 Diagnostics 23 Diagnostic tools 23 Event logs 23 Viewing event logs through the Setup utility 24 Viewing event logs without restarting the server 24 POST error codes 26 System ev...

Page 6: ...alling a ServeRAID adapter battery 158 Removing the battery 160 Installing the battery 162 Internal cable routing and connectors 164 Tape drive cable connection 164 DVD drive cable connection 167 Oper...

Page 7: ...backplate 261 Installing the simple swap backplate 263 Removing the 2 5 inch disk drive cage 265 Installing the 2 5 inch disk drive cage 267 Removing and replacing FRUs 268 Removing the upper 3 5 inch...

Page 8: ...al assistance 325 Before you call 325 Using the documentation 325 Getting help and information from the World Wide Web 325 Software service and support 326 Hardware service and support 326 IBM Taiwan...

Page 9: ...ety Information Avant d installer ce produit lisez les consignes de s curit Vor der Installation dieses Produkts die Sicherheitshinweise lesen Prima di installare questo prodotto leggere le Informazio...

Page 10: ...s a damaged CRT face or a bulging capacitor v Mechanical hazards such as loose or missing hardware To inspect the product for potential unsafe conditions complete the following steps 1 Make sure that...

Page 11: ...anical inspection work near power supplies or remove or install main units v Before you work on the equipment disconnect the power cord If you cannot disconnect the power cord have the customer power...

Page 12: ...tement is labeled Statement 1 translations for that caution statement are in the Safety Information document under Statement 1 Be sure to read all caution and danger statements in this document before...

Page 13: ...quipment when there is evidence of fire water or structural damage v Disconnect the attached power cords telecommunications systems networks and modems before you open the device covers unless instruc...

Page 14: ...replace it only with the same module type made by the same manufacturer The battery contains lithium and can explode if not properly used handled or disposed of Do not v Throw or immerse into water v...

Page 15: ...e device v Use of controls or adjustments or performance of procedures other than those specified herein might result in hazardous radiation exposure DANGER Some laser products contain an embedded Cla...

Page 16: ...d the power switch on the power supply do not turn off the electrical current supplied to the device The device also might have more than one power cord To remove all electrical current from the devic...

Page 17: ...resent inside any component that has this label attached There are no serviceable parts inside these components If you suspect a problem with one of these parts contact a service technician Statement...

Page 18: ...pecifications Statement 15 CAUTION Make sure that the rack is secured properly to avoid tipping when the server unit is extended Statement 17 CAUTION The following label indicates moving parts nearby...

Page 19: ...ollection is necessary for diagnosing hardware and software problems a Document error codes and system board LEDs v System error codes See Viewing the test log on page 98 for information about error c...

Page 20: ...c code levels or coordinated code updates If the device is part of a cluster solution verify that the latest level of code is supported for the cluster solution before you update the code 1 Determine...

Page 21: ...configured correctly Many configuration problems are caused by loose power or signal cables or incorrectly seated adapters You might be able to solve the problem by turning off the server reconnecting...

Page 22: ...ot diagnose the problem use the procedure for another symptom if possible If the problem remains contact IBM or an approved warranty service provider for assistance with additional problem determinati...

Page 23: ...n document Related documentation In addition to this document the following documentation also comes with the server v Environmental Notices and User s Guide This document is in PDF on the IBM Documen...

Page 24: ...described in this document 1 Go to http www ibm com support 2 Under Product support click System x 3 Under Popular links click Publications lookup 4 From the Product family menu select System x3400 an...

Page 25: ...GB of memory is installed in the server before you run DSA from a bootable CD v Maximum 128 GB 48 GB using unbuffered DIMMs UDIMMs 128 GB using registered DIMMs RDIMMs v Type Registered or unbuffered...

Page 26: ...B ports standard v2 0 supporting v1 1 Four on rear of server Two on front of server v One internal USB tape connector v One Broadcom dual port 10 100 1000 Ethernet controller with Wake on LAN support...

Page 27: ...ound pressure levels in a given location might exceed the average stated values because of room reflections and other nearby noise sources The declared sound power levels indicate an upper limit below...

Page 28: ...rd disk drive activity LED some models On some server models each hot swap drive has a hard disk drive activity LED When this green LED is flashing it indicates that the drive is in use When the drive...

Page 29: ...h the AC and DC power LEDs are lit DC power LED This green LED provides status information about the power supply During typical operation both the AC and DC power LEDs are lit Power error Fault LED W...

Page 30: ...s LED is lit it indicates that there is activity between the server and the network Ethernet link status LED This LED is on the Ethernet connector When this LED is lit it indicates that there is an ac...

Page 31: ...econd power supply is providing power to the server Off On Off Faulty power supply Replace the power supply Off On On Faulty power supply Replace the power supply On Off Off Power supply not fully sea...

Page 32: ...AC power source and the power supply has detected an internal problem Off On Off Faulty power supply Off On On Faulty power supply On Off Off Power supply not fully seated faulty system board or fault...

Page 33: ...section show the LEDs connectors and jumpers on the internal boards The illustrations might differ slightly from your hardware System board internal connectors The following illustration shows the int...

Page 34: ...that is available on the PCI Express extender card if equipped The following illustration shows two additional PCI X expansion slots that are available on the PCI X extender card if equipped 16 IBM S...

Page 35: ...2 and 3 TPM physical presence is not asserted default Note The physical presence requires manual setting on the server to change the TPM configuration The TPM is enabled and physical presence is not a...

Page 36: ...he server then disconnect all power cords and external cables Review the information in Safety on page vii Installation guidelines on page 149 and Handling static sensitive devices on page 151 18 IBM...

Page 37: ...ard is equipped with a PCI extender card that provides either one or two additional expansion slots The following illustration shows the LEDs on the PCI Express extender card if equipped The following...

Page 38: ...system board Video port Serial port NMI button USB ports Ethernet System management Hard disk drive backplane connectors The following illustrations show the connectors on the 2 5 inch and 3 5 inch h...

Page 39: ...Figure 1 Connectors on the 3 5 inch hard disk drive backplane Figure 2 Connectors on the 2 5 inch hard disk drive backplane Chapter 2 Introduction 21...

Page 40: ...22 IBM System x3400 M3 Types 7378 and 7379 Problem Determination and Service Guide...

Page 41: ...codes The diagnostic programs are the primary method of testing the major components of the server See Diagnostic programs messages and error codes on page 97 for more information Event logs Error co...

Page 42: ...ride or remove it You must replace the system board Viewing event logs without restarting the server If the server is not hung methods are available for you to view one or more event logs without havi...

Page 43: ...le describes the methods that you can use to view the event logs depending on the condition of the server The first two conditions generally do not require that you restart the server Table 6 Methods...

Page 44: ...ervice technician only that step must be performed only by a trained service technician Error code Description Action 0010002 Microprocessor not supported 1 Reseat the following components one at a ti...

Page 45: ...microprocessor 2 3 Replace the following components one at a time in the order shown restarting the server each time a Trained service technician only Microprocessor b Trained service technician only...

Page 46: ...the server to the power source and restart the server 3 If the problem remains replace the failing DIMM see Removing a memory module on page 230 and Installing a memory module on page 231 4 Trained se...

Page 47: ...a microprocessor and heat sink on page 284 and Installing a microprocessor and heat sink on page 286 5 Trained service technician only Replace the system board see Removing the system board on page 2...

Page 48: ...d DIMM 4 Trained service technician only If the problem occurs on the same DIMM connector check the DIMM connector If the connector contains any foreign material or is damaged replace the system board...

Page 49: ...a memory module on page 230 and Installing a memory module on page 231 5 Trained service technician only If the problem occurs on the same DIMM connector check the DIMM connector If the connector con...

Page 50: ...cted DIMM failure events see Event logs on page 23 00580A6 Spare Memory Channel Activated Information only Memory online spare channel has been activated to back up a failed DIMM Check the event log f...

Page 51: ...apters from the extender card 5 Replace the following components one at a time in the order shown restarting the server each time a Extender card b Trained service technician only System board 2018002...

Page 52: ...y server firmware settings 2 Turn off the server and remove it from the power source 3 Reconnect the server to the power source and then turn on the server 305000A RTC date time is incorrect 1 Adjust...

Page 53: ...configuration error 1 Remove any recent configuration changes that you made in the Setup utility 2 Run the Setup utility select Load Default Settings and save the settings 3808000 IMM communication f...

Page 54: ...e system board 3818004 Core Root of Trust Measurement CRTM system error 1 Run the Setup utility select Load Default Settings and save the settings 2 Trained service technician only Replace the system...

Page 55: ...erformed only by a trained service technician Message Severity Description Action Numeric sensor Ambient Temp going high upper critical has asserted Error An upper critical sensor going high has asser...

Page 56: ...e levels or coordinated code updates If the device is part of a cluster solution verify that the latest level of code is supported for the cluster solution before you update the code 2 Run the DSA pro...

Page 57: ...code updates If the device is part of a cluster solution verify that the latest level of code is supported for the cluster solution before you update the code 2 Make sure that the installed microproce...

Page 58: ...of code is supported for the cluster solution before you update the code 2 Make sure that the installed microprocessors are compatible with each other see Installing a microprocessor and heat sink on...

Page 59: ...ice technician only Replace microprocessor n n microprocessor number Sensor CPU nOverTemp has transitioned to critical from a non recoverable state n microprocessor number Error A sensor has changed t...

Page 60: ...imeout has occurred on system 1 1 CIM_ComputerSystem ElementName Error A bus timeout has occurred 1 Remove the adapter from the PCI slot that is indicated by a lit LED 2 Replace the extender card 3 Re...

Page 61: ...nt Some cluster solutions require specific code levels or coordinated code updates If the device is part of a cluster solution verify that the latest level of code is supported for the cluster solutio...

Page 62: ...rdinated code updates If the device is part of a cluster solution verify that the latest level of code is supported for the cluster solution before you update the code 5 Make sure that the two micropr...

Page 63: ...ed code updates If the device is part of a cluster solution verify that the latest level of code is supported for the cluster solution before you update the code 5 Trained service technician only Repl...

Page 64: ...emove the PCI adapter and microprocessor 1 Reinstall the microprocessor in socket 1 and restart the server 3 Restart the server 4 Reinstall each device one at a time starting the server each time to i...

Page 65: ...device 5 Replace the failing device 6 Trained service technician only Replace the system board Sensor Pwr Rail D Fault has transitioned to non recoverable Error A sensor has changed to Nonrecoverable...

Page 66: ...om a less severe state 1 Make sure that there are no obstructions such as bundled cables to the airflow from the power supply fan 2 Replace power supply n n power supply number Sensor PSn 12V OV Fault...

Page 67: ...k drive The Drive n Status has been removed from unit Drive 0 Status n hard disk drive number Error A drive has been removed Reseat hard disk drive n n hard disk drive number The Drive n Status has be...

Page 68: ...IBM support website for an applicable retain tip or firmware update that applies to this memory error 2 Manually re enable all affected DIMMs if the server firmware version is older than UEFI v1 10 If...

Page 69: ...has occurred 5 Trained service technician only If the problem occurs on the same DIMM connector check the DIMM connector If the connector contains any foreign material or is damaged replace the syste...

Page 70: ...error still occurs on the same DIMM replace the affected DIMM 4 Trained service technician only If the problem occurs on the same DIMM connector check the DIMM connector If the connector contains any...

Page 71: ...M disabled for All DIMMs on Memory Subsystem All DIMMs Info DIMM disabled 1 Make sure the DIMM is installed correctly see Installing a memory module on page 231 2 If the DIMM was disabled because of a...

Page 72: ...ck the IBM support website for an applicable retain tip or firmware update that applies to this memory error 2 Manually re enable all affected DIMMs if the server firmware version is older than UEFI v...

Page 73: ...e error has occurred 5 Trained service technician only If the problem occurs on the same DIMM connector check the DIMM connector If the connector contains any foreign material or is damaged replace th...

Page 74: ...error still occurs on the same DIMM replace the affected DIMM 4 Trained service technician only If the problem occurs on the same DIMM connector check the DIMM connector If the connector contains any...

Page 75: ...led for One of the DIMMs on Memory Subsystem One of the DIMMs Info DIMM disabled 1 Make sure the DIMM is installed correctly see Installing a memory module on page 231 2 If the DIMM was disabled becau...

Page 76: ...t website for an applicable retain tip or firmware update that applies to this memory error 2 Manually re enable all affected DIMMs if the server firmware version is older than UEFI v1 10 If the serve...

Page 77: ...MM connector If the connector contains any foreign material or is damaged replace the system board see Removing the system board on page 296 and Installing the system board on page 298 6 Trained servi...

Page 78: ...eck the IBM support website for an applicable retain tip or firmware update that applies to this memory error 2 Manually re enable all affected DIMMs if the server firmware version is older than UEFI...

Page 79: ...le error has occurred 5 Trained service technician only If the problem occurs on the same DIMM connector check the DIMM connector If the connector contains any foreign material or is damaged replace t...

Page 80: ...ror still occurs on the same DIMM replace the affected DIMM 4 Trained service technician only If the problem occurs on the same DIMM connector check the DIMM connector If the connector contains any fo...

Page 81: ...mory uncorrectable error or memory logging limit reached follow the suggested actions for that error event and restart the server 3 Check the IBM support website for an applicable retain tip or firmwa...

Page 82: ...els or coordinated code updates If the device is part of a cluster solution verify that the latest level of code is supported for the cluster solution before you update the code 4 Remove the adapter f...

Page 83: ...coordinated code updates If the device is part of a cluster solution verify that the latest level of code is supported for the cluster solution before you update the code 4 Remove both adapters 5 Rep...

Page 84: ...the system board Redundancy Bckup Mem Status has been reduced Error Redundancy has been lost and is insufficient to continue operation 1 Check the system event log for DIMM failure events uncorrectabl...

Page 85: ...g No action information only Ethernet Duplex setting modified from 1 to 2 by user 3 1 CIM_EthernetPort NetworkAddresses 2 CIM_EthernetPort NetworkAddresses 3 user ID Info A user has modified the Ether...

Page 86: ...user ID 2 ValueMap CIM_ProtocolEndpoint ProtocolIFType 3 IP address xxx xxx xxx xxx Info A user has successfully logged in to the IMM No action information only Attempting to 1 server 2 by user 3 1 P...

Page 87: ...t login ID and password are being used 2 Have the system administrator reset the login ID or password The Chassis Event Log CEL on system 1 cleared by user 2 1 CIM_ComputerSystem ElementName 2 user ID...

Page 88: ...r has occurred and the screen capture was successful 1 Reconfigure the watchdog timer to a higher value 2 Make sure that the IMM Ethernet over USB interface is enabled 3 Reinstall the RNDIS or cdc_eth...

Page 89: ...e updates If the device is part of a cluster solution verify that the latest level of code is supported for the cluster solution before you update the code IMM reset was caused by restoring default va...

Page 90: ...ull When the log is full older log entries are replaced by newer ones To avoid losing older log entries save the log as a text file and clear the log 1 Platform Watchdog Timer expired for 2 1 OS Watch...

Page 91: ...her the failing server is part of a shared hard disk drive cluster two or more servers sharing external storage devices If it is part of a cluster you can run all diagnostic programs except the ones t...

Page 92: ...operator information panel see Server controls LEDs and connectors on page 9 If it is flashing check the light path diagnostics LEDs see Light path diagnostics on page 90 h Check for the following res...

Page 93: ...7378 and 7379 on page 141 to determine which components are customer replaceable units CRU and which components are field replaceable units FRU v If an action step is preceded by Trained service tech...

Page 94: ...hnician The server is hung while the screen is on Cannot start the Setup utility by pressing F1 1 See Nx boot failure on page 136 for more information 2 See Recovering the server firmware on page 134...

Page 95: ...termine which components are customer replaceable units CRU and which components are field replaceable units FRU v If an action step is preceded by Trained service technician only that step must be pe...

Page 96: ...the order in which they are listed in the Action column until the problem is solved v See Chapter 4 Parts listing System x3400 M3 Types 7378 and 7379 on page 141 to determine which components are cus...

Page 97: ...The mouse or pointing device is compatible with the server See http www ibm com servers eserver serverproven compat us v The mouse or pointing device cable is securely connected to the server v The m...

Page 98: ...k when it detected a problem or a memory bank might have been manually disabled 2 Check the POST error log v If a DIMM was disabled by a systems management interrupt SMI replace the DIMM v If a DIMM w...

Page 99: ...y If the failures continue after all identified pairs are replaced go to step4 3 Return the removed DIMMs one pair at a time to their original connectors restarting the server after each pair until a...

Page 100: ...ch in speed and cache size 3 Trained service technician only Reseat microprocessor 1 4 Trained service technician only If there is no indication of which microprocessor has failed isolate the error by...

Page 101: ...is blank 1 If the server is attached to a KVM switch bypass the KVM switch to eliminate it as a possible cause of the problem connect the monitor cable directly to the correct connector on the rear o...

Page 102: ...images If this happens turn off the monitor Attention Moving a color monitor while it is turned on might cause screen discoloration Move the device and the monitor at least 305 mm 12 in apart and tur...

Page 103: ...installed correctly v You have not loosened any other installed devices or cables v You updated the configuration information in the Setup utility Whenever memory or any other device is changed you mu...

Page 104: ...not indicate a problem v The microprocessors are installed in the correct sequence 3 Reseat the following components a DIMMs b Trained service technician only Power switch connector c Trained service...

Page 105: ...e units CRU and which components are field replaceable units FRU v If an action step is preceded by Trained service technician only that step must be performed only by a trained service technician Sym...

Page 106: ...e The ServeRAID Manager program cannot view all installed drives or the operating system cannot be installed 1 Make sure that the hard disk drive is connected correctly 2 Make sure that the SAS hard d...

Page 107: ...omes with the software for a description of the messages and suggested solutions to the problem 3 Contact the software vendor Universal Serial Bus USB port problems v Follow the suggested actions in t...

Page 108: ...RU and which components are field replaceable units FRU v If an action step is preceded by Trained service technician only that step must be performed only by a trained service technician Lit light pa...

Page 109: ...nits CRU and which components are field replaceable units FRU v If an action step is preceded by Trained service technician only that step must be performed only by a trained service technician Lit li...

Page 110: ...or lit LEDs Certain components inside the server have LEDs that are lit to indicate the location of a problem The following illustration shows the LEDs on the system board 92 IBM System x3400 M3 Types...

Page 111: ...trained service technician Lit light path diagnostics LED with the system error or information LED also lit Description Action DIMM 1 to DIMM 16 error LEDs A DIMM has failed or is incorrectly install...

Page 112: ...ailing microprocessor 4 Replace the following components one at a time in the order shown restarting the server each time a Trained service technician only Failing microprocessor b Trained service tec...

Page 113: ...shing within 30 seconds of when the server is connected to power complete the following steps 1 Trained service technician only Use the IMM recovery switch to recover the firmware see Table 5 on page...

Page 114: ...esent Off Off On No AC power to the server or a problem with the AC power source and the power supply had detected an internal problem 1 Replace the power supply 2 Make sure that the power cord is con...

Page 115: ...ment again 5 Type gui to display the graphical user interface or select cmd to display the DSA interactive menu 6 Follow the instructions on the screen to select the diagnostic test to run If the diag...

Page 116: ...name for the saved log file Notes 1 To create and use a diskette you must add an optional external diskette drive to the server 2 To save the test log to a diskette you must use a diskette that you ha...

Page 117: ...est level of DSA code go to http www ibm com support docview wss uid psg1SERV DSA 3 Run the test again 4 Make sure that the system firmware is at the latest level The installed firmware level is shown...

Page 118: ...o to http www ibm com support docview wss uid psg1SERV DSA 3 Run the test again 4 Make sure that the system firmware is at the latest level The installed firmware level is shown in the DSA log in the...

Page 119: ...again 8 Replace the following components one at a time in the order shown and run this test again to determine whether the problem has been solved a Trained service technician only Microprocessor boar...

Page 120: ...l is shown in the DSA log in the Firmware VPD section for this component For more information see Updating the firmware on page 302 6 Run the test again 7 If the failure remains go to the IBM Web site...

Page 121: ...are level is shown in the DSA log in the Firmware VPD section for this component For more information see Updating the firmware on page 302 6 Run the test again 7 If the failure remains go to the IBM...

Page 122: ...l is shown in the DSA log in the Firmware VPD section for this component For more information see Updating the firmware on page 302 6 Run the test again 7 If the failure remains go to the IBM Web site...

Page 123: ...The installed firmware level is shown in the DSA log in the Firmware VPD section for this component For more information see Updating the firmware on page 302 6 Run the test again 7 If the failure rem...

Page 124: ...DSA log in the Firmware VPD section for this component For more information see Updating the firmware on page 302 6 Run the test again 7 If the failure remains go to the IBM Web site for more troubles...

Page 125: ...re level is shown in the DSA log in the Firmware VPD section for this component For more information see Updating the firmware on page 302 6 Run the test again 7 If the failure remains go to the IBM W...

Page 126: ...shown in the DSA log in the Firmware VPD section for this component For more information see Updating the firmware on page 302 6 Run the test again 7 If the failure remains go to the IBM Web site for...

Page 127: ...The installed firmware level is shown in the DSA log in the Firmware VPD section for this component For more information see Updating the firmware on page 302 6 Run the test again 7 If the failure re...

Page 128: ...Firmware VPD section for this component For more information see Updating the firmware on page 302 6 Run the test again 7 If the failure remains go to the IBM Web site for more troubleshooting informa...

Page 129: ...DSA log in the Firmware VPD section for this component For more information see Updating the firmware on page 302 6 Run the test again 7 If the failure remains go to the IBM Web site for more troubles...

Page 130: ...g in the Firmware VPD section for this component For more information see Updating the firmware on page 302 6 Run the test again 7 If the failure remains go to the IBM Web site for more troubleshootin...

Page 131: ...ponent For more information see Updating the firmware on page 302 6 Run the test again 7 If the failure remains go to the IBM Web site for more troubleshooting information at http www ibm com systems...

Page 132: ...Run the test again 4 Make sure that the DSA code is at the latest level For the latest level of DSA code go to http www ibm com support docview wss uid psg1SERV DSA 5 Make sure that the IMM firmware i...

Page 133: ...DSA code go to http www ibm com support docview wss uid psg1SERV DSA 5 Make sure that the IMM firmware is at the latest level The installed firmware level is shown in the DSA log in the Firmware VPD s...

Page 134: ...e system to the power source and turn on the system 3 Run the test again 4 Make sure that the DSA code is at the latest level For the latest level of DSA code go to http www ibm com support docview ws...

Page 135: ...he system to the power source and turn on the system 3 Run the test again 4 Make sure that the DSA code is at the latest level For the latest level of DSA code go to http www ibm com support docview w...

Page 136: ...led firmware level is shown in the DSA log in the Firmware VPD section for this component For more information see Updating the firmware on page 302 6 Run the test again 7 Turn off the system and disc...

Page 137: ...rmation at http www ibm com systems support supportsite wss docdisplay brandind 5000008 lndocid SERV CALL 201 803 xxx Memory Memory Test Aborted Test aborted could not enable the processor cache 1 Tur...

Page 138: ...lay brandind 5000008 lndocid SERV CALL 201 806 xxx Memory Memory Test Aborted Test aborted the memory controller fast scrub operation was not completed 1 Turn off and restart the system 2 Run the test...

Page 139: ...ng fast scrub 1 Turn off and restart the system 2 Run the test again 3 Make sure that the DSA code is at the latest level For the latest level of DSA code go to http www ibm com support docview wss ui...

Page 140: ...tion see Updating the firmware on page 302 6 Run the test again 7 Replace the failing DIMMs 8 Re enable all memory in the Setup utility see Using the Setup utility on page 303 9 Run the test again 10...

Page 141: ...utility on page 303 2 Make sure that the DSA code is at the latest level For the latest level of DSA code go to http www ibm com support docview wss uid psg1SERV DSA 3 Run the test again 4 Run the sta...

Page 142: ...t the latest level For the latest level of DSA code go to http www ibm com support docview wss uid psg1SERV DSA 2 Run the test again 3 Check the drive cabling at both ends for loose or broken connecti...

Page 143: ...n connections or damage to the cable Replace the cable if it is damaged 6 Run the test again 7 Make sure that the DSA code is at the latest level For the latest level of DSA code go to http www ibm co...

Page 144: ...dditional troubleshooting information go to http www ibm com support docview wss uid psg1MIGR 41559 6 Run the test again 7 Replace the CD DVD drive 8 If the failure remains go to the IBM Web site for...

Page 145: ...ibm com support docview wss uid psg1SERV DSA 6 Run the test again 7 For additional troubleshooting information go to http www ibm com support docview wss uid psg1MIGR 41559 8 Run the test again 9 Repl...

Page 146: ...st Failed An error was found in the tape alert log page 1 Clean the tape drive using the appropriate cleaning media and install new media 2 Run the test again 3 Clear the error log 4 Run the test agai...

Page 147: ...r tape drives and libraries can be found at http www ibm com systems support 6 Run the test again 7 If the failure remains go to the IBM Web site for more troubleshooting information at http www ibm c...

Page 148: ...e found at http www ibm com systems support 3 Run the test again 4 If the system has stopped responding turn off and restart the system 5 Make sure that the firmware is at the latest level Software fo...

Page 149: ...1 xxx Broadcom Ethernet Device Test MII Registers Failed 1 Make sure that the component firmware is at the latest level The installed firmware level is shown in the DSA log in the Firmware VPD section...

Page 150: ...e adapter Check the PCI Information and Network Settings information in the DSA log to determine the physical location of the failing component 5 If the failure remains go to the IBM Web site for more...

Page 151: ...ical Layer Failed 1 Check the Ethernet cable for damage and make sure that the cable type and connection are correct 2 Make sure that the component firmware is at the latest level The installed firmwa...

Page 152: ...from what is described in this document 1 Go to http www ibm com systems support 2 Under Product support click System x 3 Under Popular links click Software and device drivers 4 Click System x3400 M3...

Page 153: ...type filename s where filename is the name of the executable file that you downloaded with the firmware update package Monitor the firmware update until completion 14 Turn off the server and disconne...

Page 154: ...primary bank Out of band method See the IMM documentation Automated boot recovery ABR While the server is starting if the integrated management module detects problems with the server firmware in the...

Page 155: ...one at a time until the problem is isolated Solving Ethernet controller problems The method that you use to test the Ethernet controller depends on which operating system you are using See the operati...

Page 156: ...assword switch 2 SW4 to override the power on password and clear the CMOS memory see Internal LEDs connectors and jumpers on page 15 Check the LEDs on all the power supplies see Power supply LEDs on p...

Page 157: ...ure occur on a single server or on multiple servers Is the failure repeatable Has this configuration ever worked What changes if any were made before the configuration failed Is this the original repo...

Page 158: ...140 IBM System x3400 M3 Types 7378 and 7379 Problem Determination and Service Guide...

Page 159: ...142 For an updated parts listing on the Web complete the following steps Note Changes are made periodically to the IBM Web site The actual procedure might vary slightly from what is described in this...

Page 160: ...etting service and assistance see the Warranty Information document Table 9 Parts listing Type 7378 7379 Index Description CRU part number Tier 1 CRU part number Tier 2 FRU part number 1 Power supply...

Page 161: ...essor Intel Xeon E5620 4 core 2 40 GHz 12 MB 1066 MHz 80 W 49Y7053 20 Microprocessor Intel Xeon L5640 6 core 2 26 GHz 12 MB 1333 MHz 60 W 49Y7054 20 Microprocessor Intel Xeon L5630 4 core 2 13 GHz 12...

Page 162: ...e swap 49Y4514 Cable operator information panel 41Y9082 Cable backplane configuration 2 5 inch HDD 69Y1331 Cable backplane configuration 3 5 inch HDD 46D1401 Cable Backplane Power 2 5 inch HDD 69Y1326...

Page 163: ...tore Table 10 Consumable parts Type 7378 7379 Index Description Part number ServeRAID battery 43W4342 To order a consumable part complete the following steps 1 Go to http www ibm com 2 From the Produc...

Page 164: ...mey Djibouti Egypt Equatorial Guinea Eritrea Estonia Ethiopia Finland France French Guyana French Polynesia Germany Greece Guadeloupe Guinea Guinea Bissau Hungary Iceland Indonesia Iran Kazakhstan Kyr...

Page 165: ...ted States of America Venezuela 39M5512 110 120 V Antigua and Barbuda Aruba Bahamas Barbados Belize Bermuda Bolivia Caicos Islands Canada Cayman Islands Colombia Costa Rica Cuba Dominican Republic Ecu...

Page 166: ...148 IBM System x3400 M3 Types 7378 and 7379 Problem Determination and Service Guide...

Page 167: ...page vii and the guidelines in Handling static sensitive devices on page 151 This information will help you work safely v Observe good housekeeping in the area where you are working Place removed cov...

Page 168: ...turn on the server Operating the server for extended periods of time more than 30 minutes with the server cover removed might damage server components v You have followed the cabling instructions tha...

Page 169: ...age touch it to an unpainted metal part on the outside of the server for at least 2 seconds This drains static electricity from the package and from your body v Remove the device from its package and...

Page 170: ...eft side of the bezel away from the server 5 From inside of the top section of the bezel door slide the blue tab up to unlock the bezel media door then grasp the depressed area on the media door and p...

Page 171: ...6 When the media door is unlocked the icon on the side of the bezel will be in the unlocked position Media door icon Chapter 5 Removing and replacing server components 153...

Page 172: ...access to the air baffle microprocessors and DIMMs To open the power supply cage complete the following steps 1 Read the safety information that begins on page vii and Handling static sensitive device...

Page 173: ...pply cage handle to unlock the cage then rotate the cage out until it stops The tab on the rear power supply latch bracket clicks into place when the cage is completely out of the way 6 Let the power...

Page 174: ...bracket Power supply support bracket Power supply release tab 2 Rotate the power supply cage into the server chassis The locating tabs on the power supply cage must fit over the corresponding tabs on...

Page 175: ...D adapter has a battery on it and you need to replace it complete the following steps 1 Read the safety information that begins on page vii and Handling static sensitive devices on page 151 2 Turn off...

Page 176: ...the RAID adapter battery in the server complete the following steps 1 Read the safety information that begins on page vii and Handling static sensitive devices on page 151 2 Turn off the server and a...

Page 177: ...the ServeRAID adapter on the system board see Installing an adapter on page 215 9 Install and lock the left side cover see Installing the left side cover on page 181 10 Reconnect the external cables a...

Page 178: ...the server to fall over 5 Unlock and remove the left side cover see Removing the left side cover on page 181 6 Remove the battery a Use one finger to tilt the battery horizontally out of its socket p...

Page 179: ...7 Dispose of the battery as required by local ordinances or regulations see the Environmental Notices and User Guide for more information Chapter 5 Removing and replacing server components 161...

Page 180: ...ies call 1 800 426 7378 within the United States and 1 800 465 7999 or 1 800 465 6666 within Canada Outside the U S and Canada call your IBM marketing representative or authorized reseller v After you...

Page 181: ...battery in a vertical orientation so that the smaller side is facing the socket b Tilt the battery and slide the battery into its socket then press the battery toward the socket until it clicks into p...

Page 182: ...tached If you replace any drives remember which cable is attached to which drive v When you route a cable make sure that it does not block the airflow to the rear of the drives or over the microproces...

Page 183: ...nal power converter cable when you install an RDX internal USB tape drive in the server This cable comes with the server in the plastic bag with the drive rails Connects to tape drive Connects to opti...

Page 184: ...Power converter cable Optical power cable SATA connector Tape drive 166 IBM System x3400 M3 Types 7378 and 7379 Problem Determination and Service Guide...

Page 185: ...ect the cable by using excessive force Failing to remove the cable properly may damage the connectors on the system board Any damage to the connectors may require replacing the system board The follow...

Page 186: ...raSlim DVD drive to the system board Operator information panel cable connection The following illustration shows the internal cable routing and connectors from the operator information panel to the s...

Page 187: ...Chapter 5 Removing and replacing server components 169...

Page 188: ...drives 1 The following illustrations show the connectors on the 2 5 inch and 3 5 inch hard disk drive backplanes Figure 3 Connectors on the 3 5 inch hard disk drive backplane Figure 4 Connectors on th...

Page 189: ...next in sequence to a ServeRAID adapter with battery backup module for example if a ServeRAID adapter with battery backup module is installed in slot 2 do not install any card in slot 3 Figure 5 Cabl...

Page 190: ...e to reconfigure your disk arrays after you install drives See the ServeRAID adapter documentation for additional information about RAID operation and complete instructions for using the ServeRAID ada...

Page 191: ...5 inch hot swap hard disk drives v The following illustration shows the internal power cable routing v The following illustration shows the internal configuration cable routing v The following illustr...

Page 192: ...174 IBM System x3400 M3 Types 7378 and 7379 Problem Determination and Service Guide...

Page 193: ...lustration shows the internal power cable routing v The following illustration shows the internal configuration cable routing v The following illustration shows the internal signal cable routing for i...

Page 194: ...176 IBM System x3400 M3 Types 7378 and 7379 Problem Determination and Service Guide...

Page 195: ...lustration shows the internal power cable routing v The following illustration shows the internal configuration cable routing v The following illustration shows the internal signal cable routing for i...

Page 196: ...178 IBM System x3400 M3 Types 7378 and 7379 Problem Determination and Service Guide...

Page 197: ...2 5 inch hot swap hard disk drives v The following illustration shows the internal power cable routing v The following illustration shows the internal configuration cable routing Chapter 5 Removing an...

Page 198: ...nternal signal cable routing for installing a ServeRAID adapter and a ServeRAID expansion adapter Note SAS expander card does not support 3 GB RAID adapters 180 IBM System x3400 M3 Types 7378 and 7379...

Page 199: ...non hot swap component turn off the server and all peripheral devices and disconnect the power cords and all external cables 3 Unlock the left side cover using the key that comes with the server 4 Pul...

Page 200: ...ide cover on the bottom ledge of the server 2 Rotate the top edge of the cover toward the server and press inward on the cover until it clicks into place 3 Lock the cover using the key that comes with...

Page 201: ...peration using a ServeRAID adapter you might have to reconfigure your disk arrays after you install drives See the ServeRAID adapter documentation for additional information about RAID operation and c...

Page 202: ...n the 3 5 inch hot swap SAS or hot swap SATA hard disk drive server models Figure 8 server with sixteen 2 5 inch hard disk drives Figure 9 server with four 3 5 inch hard disk drives 184 IBM System x34...

Page 203: ...ves You can install removable media drives only in bays 1 2 and 3 on models with four 3 5 inch eight or sixteen 2 5 inch hard disk drives v To install a 3 5 in drive in a 5 25 in bay you must use a 5...

Page 204: ...sult in the loss of data To avoid this potential problem always use an electrostatic discharge wrist strap or other grounding system when you work inside the server with the power on 2 Unlock the left...

Page 205: ...en pull the drive out of the drive bay 5 If you are instructed to return the hot swap hard disk drive follow all packaging instructions and use any packaging materials for shipping that are supplied t...

Page 206: ...proper cooling do not install any card in the slot next in sequence to a ServeRAID adapter with battery backup module for example if a ServeRAID adapter with battery backup module is installed in slot...

Page 207: ...ap bay 5 Rotate the drive handle down until the drive is seated in the hot swap bay and the release latch clicks into place Notes a After you install the hard disk drive check the disk drive status LE...

Page 208: ...dling static sensitive devices on page 151 2 Unlock the left side cover Note You must unlock the left side cover to open or remove the bezel When you lock the left side cover it locks both the cover a...

Page 209: ...structed to return the 3 5 inch hot swap hard disk drive follow all packaging instructions and use any packaging materials for shipping that are supplied to you Chapter 5 Removing and replacing server...

Page 210: ...rive from the package and place it on a static protective surface 3 Make sure that the drive tray handle is in the open position 4 Align the drive assembly with the guide rails in the bay then careful...

Page 211: ...fter you install hard disk drives See the RAID documentation on the IBM Web site at http www ibm com systems support for information about RAID adapters 7 Close the bezel 8 Lock the left side cover Ch...

Page 212: ...n page vii and Handling static sensitive devices on page 151 2 Turn off the server and all attached devices then disconnect all power cords and external cables 3 Unlock the left side cover Note You mu...

Page 213: ...n pull the drive assembly out of the bay and set it aside 7 If you are instructed to return the simple swap hard disk drive follow all packaging instructions and use any packaging materials for shippi...

Page 214: ...kage and place it on a static protective surface 2 Align the drive assembly with the guide rails in the bay 3 Pull the loops of the drive assembly toward each other then carefully slide the drive asse...

Page 215: ...ding system when you work inside the server with the power on 2 Unlock and remove the left side cover see Removing the left side cover on page 181 Attention To ensure proper system cooling do not leav...

Page 216: ...problem always use an electrostatic discharge wrist strap or other grounding system when you work inside the server with the power on 2 Touch the static protective package that contains the hot swap...

Page 217: ...evices and disconnect the power cords and all external cables c Unlock and remove the left side cover see Removing the left side cover on page 181 d Open the bezel by pressing the button on the left e...

Page 218: ...following steps a Read the safety information that begins on page vii and Handling static sensitive devices on page 151 b Turn off the server and peripheral devices and disconnect the power cords and...

Page 219: ...way up until the retainer latch locks the cage in place on the chassis f Remove the air baffle see Removing the air baffle on page 212 g Remove the fan cage assembly see Removing the fan cage assembly...

Page 220: ...lide the drive retention clip from the side of the drive Save the clip to use when you install the replacement drive or replace the UltraSlim DVD drive filler m If you are instructed to return the Ult...

Page 221: ...h as CD ROMs DVD drives fiber optic devices or transmitters are installed note the following v Do not remove the covers Removing the covers of the laser product could result in exposure to hazardous l...

Page 222: ...ternal cables e Unlock and remove the left side cover see Removing the left side cover on page 181 f Remove the fan cage assembly see Removing the fan cage assembly on page 243 g Open the bezel by pre...

Page 223: ...to set jumpers or switches if there are any Note You might find it easier to install the new drive from the front and then attach the cables j Align the rails on the DVD drive with the guides in the d...

Page 224: ...ps v Locate the documentation that comes with the drive and follow those instructions in addition to the instructions in this chapter v Make sure that you have all the cables and other equipment that...

Page 225: ...ectly with optical instruments and avoid direct exposure to the beam Class 1 Laser Product Laser Klasse 1 Laser Klass 1 Luokan 1 Laserlaite Appareil A Laser de Classe 1 b Touch the static protective p...

Page 226: ...y cage assembly all the way up until the retainer latch locks the cage in place on the chassis h Remove the air baffle see Removing the air baffle on page 212 i Remove the fan cage assembly see Removi...

Page 227: ...VD drive through the slim slot on top of the 3 5 inch hard disk drive cage l Connect the power and signal cables to the UltraSlim DVD drive See Internal cable routing and connectors on page 164 for mo...

Page 228: ...ning of the server along the lower edge of the opening Note Pull the power and signal cables of the UltraSlim DVD drive into the upper opening of the server first Make sure the cables are not stuck wh...

Page 229: ...the power supply cage assembly into the chassis u Close the bezel v Install and lock the left side cover see Installing the left side cover on page 181 w Reconnect the external cables and power cords...

Page 230: ...e left side cover on page 181 5 Remove the power supply or power supplies from the power supply cage see Removing a hot swap power supply on page 273 6 Rotate the power supply cage to its open positio...

Page 231: ...into place 3 Rotate the rear hinged part of the air baffle down to the system board Note Make sure that the power supply cage cables are not caught under the air baffle 4 Return the power supply cage...

Page 232: ...rver to fall over 4 Unlock and remove the left side cover see Removing the left side cover on page 181 5 Rotate the adapter retention brackets to the open position 6 Disconnect the cables from the ada...

Page 233: ...ss x16 slot with x8 links PCI Express 1 0a compliant Slots 3 and 4 are PCI Express x8 slots with x4 links PCI Express 1 0a compliant Slot 5 is a PCI Express x8 slot with x8 links PCI Express 1 0a comp...

Page 234: ...ling instructions and information about jumper or switch settings It might be easier for you to route cables before you install the adapter 2 Touch the static protective package that contains the adap...

Page 235: ...k the left side cover see Installing the left side cover on page 181 11 Reconnect the external cables and power cords then turn on the attached devices and turn on the server Note If the server is con...

Page 236: ...ters and place the adapters on a static protective surface see Removing an adapter on page 214 Note You might find it helpful to note where each adapter is installed before you remove the adapters 5 R...

Page 237: ...the chassis then insert the top hinge point into the matching hole 2 Install the adapters see Installing an adapter on page 215 3 Close the rear adapter retention bracket 4 Install and lock the left s...

Page 238: ...wing steps 1 Read the safety information that begins on page vii and Handling static sensitive devices on page 151 2 Turn off the server and peripheral devices and disconnect the power cords and all e...

Page 239: ...able from the system board see System board internal connectors on page 15 10 Locate the operator information panel assembly release latch just above the DVD drive 11 Push up on the release latch whil...

Page 240: ...the system board see System board internal connectors on page 15 and Internal cable routing and connectors on page 164 5 Install the fan cage assembly see Installing the fan cage assembly on page 244...

Page 241: ...e left side cover see Removing the left side cover on page 181 5 Remove the hot swap power supply or power supplies from the power supply cage see Removing a hot swap power supply on page 273 6 Rotate...

Page 242: ...he VRM straight down into the connector by applying pressure on both ends of the VRM simultaneously The retaining clips snap into the locked position when the VRM is seated in the connector 5 Install...

Page 243: ...flat and facing up Note Be careful and do not drop the server 5 Rotate the adapter retention brackets to the open position 6 Remove any adapters that prevent you from accessing the virtual media key c...

Page 244: ...nline memory modules DIMMs that your server supports and other information that you must consider when you install DIMMs Attention Do not mix UDIMMs and RDIMMs in the same server v The server supports...

Page 245: ...er and the configured PCI devices Note If you install a ServeRAID M1015 SAS SATA adapter make sure at least 2 GB of memory is installed in the server before you run DSA from a bootable CD Independent...

Page 246: ...v The maximum amount of available memory is reduced to half of the amount of installed memory when memory mirroring is enabled For example if you install 64 GB of memory only 32 GB of addressable mem...

Page 247: ...or First pair of DIMMs 1 3 6 Second pair of DIMMs 1 2 5 Third pair of DIMMs 1 1 4 Fourth pair of DIMMs 2 14 11 Fifth pair of DIMMs 2 13 10 Sixth pair of DIMMs 2 12 9 Note DIMM connectors 7 8 15 and 16...

Page 248: ...2 DIMM slots 1 4 9 and 12 are not used in memory sparing mode Removing a memory module Retaining clip DIMM To remove a dual inline memory module DIMM complete the following steps 1 Read the safety in...

Page 249: ...erials for shipping that are supplied to you Installing a memory module To install a memory module complete the following steps 1 Locate the DIMM connectors on the system board see System board intern...

Page 250: ...d lock the left side cover see Installing the left side cover on page 181 11 Reconnect the external cables and power cords then turn on the attached devices and turn on the server In two DIMM per chan...

Page 251: ...data bus 10600 10 66 GBps PC3 1333 SDRAMs 8 byte primary data bus 12800 12 80 GBps PC3 1600 SDRAMs 8 byte primary data bus m is the DIMM type E Unbuffered DIMM UDIMM with ECC x72 bit module data bus R...

Page 252: ...Number of DIMMs DIMM type DIMM size Total memory 12 Single rank UDIMMs 2 GB 24 GB 12 Dual rank UDIMMs 4 GB 48 GB 16 Single rank RDIMMs 2 GB 32 GB 16 Dual rank RDIMMs 2 GB 32 GB 16 Dual rank RDIMMs 4 G...

Page 253: ...ward the system board 5 Grasp the flash device and pull to remove it from the connector 6 Return the retention latch to the locked position by pulling it away from the system board 7 If you are instru...

Page 254: ...latch to the locked position by pulling it away from the system board 7 Reconnect the power cord and any cables that you removed 8 Install the cover see Installing the left side cover on page 181 9 T...

Page 255: ...5 Grasp the upgrade key and lift to remove it from connector on the ServeRAID adapter 6 Close the rear adapter retention bracket Chapter 5 Removing and replacing server components 237...

Page 256: ...dvanced feature key To install an optional ServeRAID adapter advanced feature key complete the following steps 1 Read the safety information that begins on page vii and Installation guidelines on page...

Page 257: ...bezel complete the following steps 1 Read the safety information that begins on page vii and Handling static sensitive devices on page 151 2 Unlock the left side cover Note You must unlock the left s...

Page 258: ...bly toward each other and pull the hinge assemblies out of the chassis Note You might need a flat blade screwdriver to pry the hinge assemblies out of the chassis 240 IBM System x3400 M3 Types 7378 an...

Page 259: ...alarmed because this is how the bezel was designed The bezel is designed with breakaway hinges so that you can easily reattach it to the chassis 5 If you are instructed to return the bezel follow all...

Page 260: ...place 3 If you removed the bezel by detaching the sliding hinge mount from the hinge assembly using the breakaway method as the bezel was designed for complete the following steps to reattach the bez...

Page 261: ...4 Close the bezel 5 Lock the left side cover Removing the fan cage assembly To remove the fan cage assembly complete the following steps 1 Read the safety information that begins on page vii and Hand...

Page 262: ...he server The fan cage will lift up slightly when the release latches are fully open 10 Grasp the fan cage assembly and lift it out of the server 11 If you are instructed to return the fan cage assemb...

Page 263: ...le on page 213 5 Return the power supply cage to its closed position see Closing the power supply cage on page 156 6 Install the hot swap power supply or power supplies see Installing a hot swap power...

Page 264: ...151 2 Turn off the server and peripheral devices and disconnect the power cords and all external cables 3 Unlock and remove the left side cover see Removing the left side cover on page 181 4 Open the...

Page 265: ...the server 7 Note the location of the blue rails on the tape drive then remove the blue rails and save them for future use 8 Gently pull the tape drive out of the server 9 If you are instructed to re...

Page 266: ...ce 5 Connect one of the connectors on the optical drive power cable to the tape drive If however you are installing an RDX internal USB tape drive you will need to install the SATA to traditional powe...

Page 267: ...ugh the plastic slots on the bottom of the chassis underneath the fan cage assembly For more information see Internal cable routing and connectors 7 Close the bezel 8 Install and lock the left side co...

Page 268: ...affle on page 212 9 Remove the fan cage assembly see Removing the fan cage assembly on page 243 10 Disconnect the light path diagnostics cable from the system board see System board internal connector...

Page 269: ...SB cable away from the mounting bracket 16 If you are instructed to return the USB cable and light path diagnostics assembly follow all packaging instructions and use any packaging materials for shipp...

Page 270: ...the opening in the front of the server 4 Position the bottom of the USB cable and light path diagnostics assembly mounting bracket into the opening and rotate the top of the bracket toward the server...

Page 271: ...12 Reconnect the external cables and power cords then turn on the attached devices and turn on the server Chapter 5 Removing and replacing server components 253...

Page 272: ...ower supply or power supplies from the power supply cage see Removing a hot swap power supply on page 273 7 Rotate the power supply cage to its open position see Opening the power supply cage on page...

Page 273: ...on page 254 to remove the remaining backplane 13 If you are instructed to return the 2 5 inch hard disk drive backplane follow all packaging instructions and use any packaging materials for shipping...

Page 274: ...age 164 4 If you are replacing another 2 5 inch hard disk drive backplane repeat steps 1 through 3 to install the additional backplane 5 Install the hot swap hard disk drives see Installing a 2 5 inch...

Page 275: ...side cover on page 181 4 Open the bezel 5 Remove the fan cage assembly see Removing the fan cage assembly on page 243 6 Remove the hot swap hard disk drives that are installed in the hard disk drive c...

Page 276: ...lane 12 Lift up on the spring release latch on the drive cage and rotate the backplane away from the drive cage until the backplane tab disengages from the drive cage 13 If you are instructed to retur...

Page 277: ...nfiguration and signal cables to the 3 5 inch hard disk drive backplane For more information see Internal cable routing and connectors 4 Install the hot swap hard disk drives that were removed from th...

Page 278: ...alling the left side cover on page 181 10 Lock the left side cover 11 Reconnect the external cables and power cords then turn on the attached devices and turn on the server 260 IBM System x3400 M3 Typ...

Page 279: ...the fan cage assembly see Removing the fan cage assembly on page 243 6 Remove the simple swap hard disk drives that are installed in the hard disk drive cage see Removing a simple swap hard disk drive...

Page 280: ...drive backplane 12 Lift the latch and rotate the simple swap backplate away from the drive cage as shown in the illustration 13 Remove the simple swap backplate and set it aside 14 If you are instruct...

Page 281: ...ration and signal cables to the 3 5 inch hard disk drive backplate For more information see Internal cable routing and connectors 4 Install the simple swap hard disk drives that were removed from the...

Page 282: ...alling the left side cover on page 181 10 Lock the left side cover 11 Reconnect the external cables and power cords then turn on the attached devices and turn on the server 264 IBM System x3400 M3 Typ...

Page 283: ...ly cage see Removing a hot swap power supply on page 273 6 Rotate the power supply cage to its open position see Opening the power supply cage on page 154 7 Remove the air baffle see Removing the air...

Page 284: ...isk drive backplane on page 254 14 If you are instructed to return the 2 5 inch disk drive cage follow all packaging instructions and use any packaging materials for shipping that are supplied to you...

Page 285: ...el 6 Carefully turn the server on its side so that it is lying flat with the cover facing up Attention Do not allow the server to fall over 7 Connect the power and signal cables from the system board...

Page 286: ...the cover facing up Attention Do not allow the server to fall over 4 Unlock and remove the left side cover see Removing the left side cover on page 181 5 Remove the power supply or power supplies from...

Page 287: ...e screws for future use 14 Pull the drive cage out of the front of server 15 Remove the UltraSlim DVD drive if installed 16 Remove the backplane from the 3 5 inch disk drive cage see Removing the 3 5...

Page 288: ...ive in to the slim slot on top of the upper 3 5 inch disk drive cage follow steps from 2 on page 206 to 2o on page 210 6 Install the 3 5 inch disk drive backplane in the back of the drive cage see Ins...

Page 289: ...e 3 5 inch disk drive backplane and UltraSlim DVD drive see Hard disk drive backplane connectors on page 20 and Internal cable routing and connectors on page 164 14 Install the fan cage assembly see I...

Page 290: ...urface to ease removal 2 Press in on the clips that hold the feet in place then pry the feet away from the server In some cases you might need a screwdriver to press in on the clips Feet 3 Reinstall t...

Page 291: ...server you must turn off the server before removing the power supply To remove a hot swap power supply complete the following steps 1 Read the safety information that begins on page vii and Handling s...

Page 292: ...following precautions Statement 8 CAUTION Never remove the cover on a power supply or any part that has the following label attached Hazardous voltage current and energy levels are present inside any...

Page 293: ...e Note If only one hot swap power supply is installed in the server a power supply filler must be installed in the empty power bay 5 Connect one end of the power cord for the new power supply into the...

Page 294: ...om the power supply cage see Removing a hot swap power supply on page 273 4 Carefully turn the server on its side so that it is lying flat with the cover facing up Attention Do not allow the server to...

Page 295: ...ect the power supply cage cables from the system board 10 Return the power supply cage to its closed position see Closing the power supply cage on page 156 11 Remove the three screws on the rear of th...

Page 296: ...then remove the power supply cage from the package 2 Position the hinge so that the power supply cage would be in the open position if it were installed in the server 3 Move the hinge inside the serve...

Page 297: ...he cables to the system board see System board internal connectors on page 15 b Place the power cable shield over the power cables and align the locating tabs on the cable shield with the correspondin...

Page 298: ...7 Return the power supply cage to its closed position see Closing the power supply cage on page 156 8 Install the power supplies see Installing a hot swap power supply on page 274 9 Install and lock t...

Page 299: ...it is lying flat with the cover facing up Attention Do not allow the server to fall over 4 Unlock and remove the left side cover see Removing the left side cover on page 181 5 Remove any adapters that...

Page 300: ...extender card out of the system board connector 9 If you are instructed to return the extender card follow all packaging instructions and use any packaging materials for shipping that are supplied to...

Page 301: ...ard into the connector 3 Install the two screws that secure the extender card to the system board tray 4 Install the system board in the server see Installing the system board on page 298 5 Install an...

Page 302: ...ply cage to its open position see Opening the power supply cage on page 154 7 Remove the air baffle see Removing the air baffle on page 212 8 Remove the microprocessor heat sink a Lift the heat sink r...

Page 303: ...r socket 2 a Open the retaining clips on each end of the VRM connector b Pull the VRM out of the connector 11 If you are instructed to return the microprocessor follow all packaging instructions and u...

Page 304: ...4 Click System x3400 M3 to display the matrix of downloadable files for the server v Optional Obtain an SMP capable operating system For a list of supported operating systems and optional devices see...

Page 305: ...the microprocessor bracket frame and remove the microprocessor filler if one is installed Attention a Do not touch the microprocessor contacts handle the microprocessor by the edges only Contaminants...

Page 306: ...et The microprocessor has two notches that are keyed to two tabs on the sides of the socket A triangle shaped indicator on one corner of the microprocessor points to a 45 degree angle on one corner of...

Page 307: ...er from the bottom of the heat sink if one is installed c Position the heat sink above the microprocessor with the thermal grease side down Attention The heat sink is keyed to the retention module Mak...

Page 308: ...ctor Firmly press the VRM straight down into the connector by applying pressure on both ends of the VRM simultaneously The retaining clips snap into the locked position when the VRM is seated in the c...

Page 309: ...emoved 4 Use a clean area of the cleaning pad to wipe the thermal grease from the microprocessor then dispose of the cleaning pad after all of the thermal grease is removed Microprocessor 0 02 mL of t...

Page 310: ...ply or power supplies from the power supply cage see Removing a hot swap power supply on page 273 6 Rotate the power supply cage to its open position see Opening the power supply cage on page 154 7 Re...

Page 311: ...n page 286 Attention Make sure that you install each heat sink with its paired microprocessor 4 Install the air baffle see Installing the air baffle on page 213 5 Return the power supply cage to its c...

Page 312: ...rom the power supply cage see Removing a hot swap power supply on page 273 6 Rotate the power supply cage to its open position see Opening the power supply cage on page 154 7 Remove the air baffle see...

Page 313: ...and heat sink see Installing a microprocessor and heat sink on page 286 Attention Make sure that you install each heat sink with its paired microprocessor 4 Install the air baffle see Installing the...

Page 314: ...y on page 273 6 Rotate the power supply cage to its open position see Opening the power supply cage on page 154 7 Remove the air baffle see Removing the air baffle on page 212 8 Remove the fan cage as...

Page 315: ...r to disengage the tabs from the chassis then grasp the handles and carefully lift the system board out of the server Attention When you lift the system board out of the server being careful neither t...

Page 316: ...rear of the chassis to secure the system board 4 Install any of the following components that you removed from the system board v Microprocessors and heat sinks see Installing a microprocessor and hea...

Page 317: ...osed position see Closing the power supply cage on page 156 9 Install the power supplies see Installing a hot swap power supply on page 274 10 Install and lock the left side cover see Installing the l...

Page 318: ...300 IBM System x3400 M3 Types 7378 and 7379 Problem Determination and Service Guide...

Page 319: ...rmation about using the IMM see Using the integrated management module on page 311 v VMware ESXi embedded hypervisor The VMware ESXi embedded hypervisor is available on the server models that come wit...

Page 320: ...o modify UEFI settings from the command line without the need to restart the server to access the Setup utility For more information about using this program see IBM Advanced Settings Utility on page...

Page 321: ...Resolve configuration conflicts Starting the Setup utility To start the Setup utility complete the following steps 1 Turn on the server Note Approximately 20 seconds after the server is connected to A...

Page 322: ...rated Ethernet controllers the SAS SATA adapter SATA optical drive channels and PCI slots If you disable a device it cannot be configured and the operating system will not be able to detect it this is...

Page 323: ...starts from the first boot record that it finds This choice is on the full Setup utility menu only v Boot Manager Select this choice to view add or change the device boot priority boot from a file se...

Page 324: ...t you have made in the settings and restore the previous settings v Load Default Settings Select this choice to cancel the changes that you have made in the settings and restore the factory settings v...

Page 325: ...there is no way to change override or remove it You must replace the system board v Change the position of the power on password switch enable switch 2 of the system board switch block SW6 to bypass t...

Page 326: ...irmware becomes damaged use this backup copy To force the server to start from the backup copy turn off the server then place the UEFI boot recovery jumper JP6 in the backup position pins 2 and 3 Use...

Page 327: ...m the CD v Detects installed optional hardware devices and provides updated device drivers for most adapters and devices v Provides diskette free installation for supported Windows operating systems v...

Page 328: ...system partition options that are based on your operating system selection and the installed hard disk drives 4 The ServerGuide program prompts you to insert your operating system CD and restart the s...

Page 329: ...SNMP e mail v Auto Boot Failure Recovery v A virtual media key which enables remote presence support remote video remote keyboard mouse and remote storage v Automatic Server Restart ASR when POST is...

Page 330: ...perform other management functions Any standard Telnet client application can access the SOL connection Using the embedded hypervisor The VMware ESXi embedded hypervisor is available on server models...

Page 331: ...ssage from the Web interface when you attempt to start the remote presence feature indicating that the hardware key is required to use the remote presence feature The virtual media key has an LED When...

Page 332: ...ons complete the following steps 1 Open a Web browser on a computer that connects to the server and in the address or URL field type the IP address or host name of the IMM to which you want to connect...

Page 333: ...umpers or configure the controllers However you must install a device driver to enable the operating system to address the controllers To find updated information about configuring the controllers com...

Page 334: ...previously stored on the secondary drive of the mirrored pair v If you install a different type of RAID adapter see the documentation that comes with the adapter for information about viewing and cha...

Page 335: ...or Minus key to select Yes select or No deselect to select or deselect a drive from a RAID disk 5 Continue to select drives using the Spacebar or Minus key until you have selected all the drives for y...

Page 336: ...k for updates The available updates are displayed in a table 4 Select the updates that you want to install and click Install to start the installation wizard If your management server is not connected...

Page 337: ...ad the ASU version for your operating system 2 ASU sets the UUID in the Integrated Management Module IMM Select one of the following methods to access the Integrated Management Module IMM to set the U...

Page 338: ...ine KCS access unauthenticated and user restricted You do not need to specify a value for access_method when you use this access method Example asu set SYSTEM_PROD_DATA SysInfoUUID uuid_value The KCS...

Page 339: ...e click IBM System x and BladeCenter Tools Center then click Tool reference for the available tools 5 Restart the server Updating the DMI SMBIOS data The Desktop Management Interface DMI must be updat...

Page 340: ...g commands to set the DMI asu set SYSTEM_PROD_DATA SysInfoProdName m t_model access_method asu set SYSTEM_PROD_DATA SysInfoSerialNum s n access_method asu set SYSTEM_PROD_DATA SysEncloseAssetTag asset...

Page 341: ...method requires that the IPMI driver be installed Some operating systems have the IPMI driver installed by default ASU provides the corresponding mapping layer The following commands are examples of...

Page 342: ...odel host imm_ip asu set SYSTEM_PROD_DATA SysInfoSerialNum s n host imm_ip asu set SYSTEM_PROD_DATA SysEncloseAssetTag asset_tag host imm_ip v Bootable media You can also build a bootable media using...

Page 343: ...gnostic tests that you can perform Most systems operating systems and programs come with documentation that contains troubleshooting procedures and explanations of error messages and error codes If yo...

Page 344: ...and Canada call 1 800 IBM SERV 1 800 426 7378 Hardware service and support You can receive hardware service through your IBM reseller or IBM Services To locate a reseller authorized by IBM to provide...

Page 345: ...FOR A PARTICULAR PURPOSE Some states do not allow disclaimer of express or implied warranties in certain transactions therefore this statement may not apply to you This information could include techn...

Page 346: ...e KB stands for 1024 bytes MB stands for 1 048 576 bytes and GB stands for 1 073 741 824 bytes When referring to hard disk drive capacity or communications volume MB stands for 1 000 000 bytes and GB...

Page 347: ...Limits Particulate v The room air must be continuously filtered with 40 atmospheric dust spot efficiency MERV 9 according to ASHRAE Standard 52 21 v Air that enters a data center must be filtered to 9...

Page 348: ...dio communications Operation of this equipment in a residential area is likely to cause harmful interference in which case the user will be required to correct the interference at his own expense Prop...

Page 349: ...kt entspricht den Schutzanforderungen der EU Richtlinie 2004 108 EG zur Angleichung der Rechtsvorschriften ber die elektromagnetische Vertr glichkeit in den EU Mitgliedsstaaten und h lt die Grenzwerte...

Page 350: ...en Germany Telephone 49 7032 15 2937 Email tjahn de ibm com Generelle Informationen Das Ger t erf llt die Schutzanforderungen nach EN 55024 und EN 55022 Klasse A VCCI Class A statement This is a Class...

Page 351: ...Russia Electromagnetic Interference EMI Class A statement People s Republic of China Class A electronic emission statement Taiwan Class A compliance statement Appendix B Notices 333...

Page 352: ...334 IBM System x3400 M3 Types 7378 and 7379 Problem Determination and Service Guide...

Page 353: ...rview 313 boot selection menu program using 308 C cable routing internal 164 cache 7 caution statements 6 checkout procedure 73 74 Class A electronic emission notice 330 closing power supply cage 156...

Page 354: ...ages 98 DVD cable routing 167 drive problems 75 drive installing 203 drive removing 199 error symptoms 75 DVD drive activity LED 10 eject button 10 E eject button DVD 10 electrical input 9 electronic...

Page 355: ...hot swap SAS or SATA removing 190 hardware service and support 326 heat output 9 heat sink retention module installing 293 removing 292 help getting 325 hot swap drives SAS backplane LEDs 10 SAS SATA...

Page 356: ...gs system event message 37 LSI Configuration Utility overview 315 starting 316 M memory 7 installing 226 two DIMM per channel 2DPC 232 234 memory mirroring description 228 DIMM population sequence 229...

Page 357: ...flash device 77 IMM 37 intermittent 78 memory 80 microprocessor 82 monitor 83 mouse 78 optional devices 85 POST 26 power 86 137 serial port 87 ServerGuide 88 software 89 undetermined 138 USB port 89 p...

Page 358: ...alling 263 removing 261 size 8 slots 7 software problems 89 software service and support 326 stabilizing feet turning 272 starting backup server firmware 308 LSI Configuration Utility 316 Setup utilit...

Page 359: ...ure 313 ServerGuide 308 Setup utility 303 the remote presence feature 313 V video connector 11 problems 83 viewing event logs 24 virtual media key installing 226 removing 225 VMware Hypervisor support...

Page 360: ...342 IBM System x3400 M3 Types 7378 and 7379 Problem Determination and Service Guide...

Page 361: ......

Page 362: ...Part Number 00KC028 Printed in USA 1P P N 00KC028...

Reviews: