


Operation and Configuration
Entering the Administration Menu Password
Chapter 3
3-12
Entering the Administration Menu Password
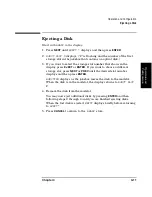
READY
>
ADMIN *
>
PSWD 000 000 000
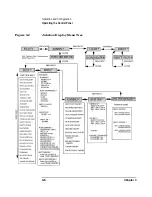
A numeric password is required to access choices in the
ADMIN *
menu
(see Figure 3-2). A three-part password of 000-000-000 was set at the
factory. The customer may have set a new password. Coordinate with the
system administrator, if necessary, to access choices in the
ADMIN *
menu.
The following steps describe how to enter the password. For your
reference, a description of changing the password is in “Changing the
Administration Menu Password” on page 13. Changing the password is
an operation normally used only by the customer.
Start with
READY
in the display
.
1. Press
NEXT
until
ADMIN *
displays.
2. Press
ENTER
.
PSWD 000 000 000
displays and the first set of three
zeros flashes.
NOTE
If the default password,
000 000 000
, is still in effect, accept this
password by pressing
ENTER
three times (once for each set of three
zeros).
TEST *
displays which indicates you are in the menu tree
below
ADMIN *
.
Entering a private password is described in steps 3 to 5 below. You
may have to ask the system administrator enter this password.
3. Press
NEXT
or
PREV
until the first number of the password displays.
Press
ENTER
. The middle set of three zeros flashes.
4. Press
NEXT
or
PREV
until the second number of the password
displays. Press
ENTER
. The third set of three zeros flashes.
5. Press
NEXT
or
PREV
until the third number of the password displays.
Press
ENTER
.
TEST *
displays.
To access menu choices under the
ADMIN *
menu press
NEXT
or
PREV
or
until the desired choice displays, and then press
ENTER
.
Summary of Contents for Surestore 160ex - Optical Jukebox
Page 10: ...TOC x Contents ...
Page 14: ...Tables TOC xiv ...
Page 15: ...Chapter 1 1 1 Product Information 1 Product Information ...
Page 26: ...Product Information Environmental Specifications Chapter 1 1 12 ...
Page 27: ...Chapter 2 2 1 Installation 2 Installation ...
Page 30: ...Installation Identifying Controls and Features Chapter 2 2 4 Figure 2 2 Left Side ...
Page 47: ...Chapter 3 3 1 Operation and Configuration 3 Operation and Configuration ...
Page 75: ...Chapter 4 4 1 Troubleshooting and Diagnostics 4 Troubleshooting and Diagnostics ...
Page 122: ...Troubleshooting and Diagnostics Running an Internal Test Chapter 4 4 48 ...
Page 123: ...Chapter 5 5 1 Removal and Replacement 5 Removal and Replacement ...
Page 129: ...Removal and Replacement Service Access Chapter 5 5 7 Removal and Replacement Front Panel ...
Page 188: ...Removal and Replacement Replaceable Parts Chapter 5 5 66 Figure 5 43 Exploded View 1 of 3 ...
Page 190: ...Removal and Replacement Replaceable Parts Chapter 5 5 68 Figure 5 45 Exploded View 3 of 3 ...
Page 192: ...Removal and Replacement Replaceable Parts Chapter 5 5 70 Figure 5 47 Rope and Pulley System ...
Page 193: ...Chapter 6 6 1 Theory of Operation 6 Theory of Operation ...
Page 218: ...Theory of Operation Optical Drive Mechanism Chapter 6 6 26 ...
Page 219: ...Appendix A A 1 Safety and Regulatory A Safety and Regulatory Information ...


