Configuration and utilities 101
intervention. During this process, the ORCA utility, in most cases, automatically configures the array to a
default setting based on the number of drives connected to the server.
NOTE:
The server may not support all the following examples.
NOTE:
If the boot drive is not empty or has been written to in the past, ORCA does not
automatically configure the array. You must run ORCA to configure the array settings.
Drives installed
Drives used
RAID level
1 1 RAID
0
2 2 RAID
1
3, 4, 5, or 6
3, 4, 5, or 6
RAID 5
More than 6
0
None
To change any ORCA default settings and override the auto-configuration process, press the
F8
key when
prompted.
By default, the auto-configuration process configures the system for the English language. To change any
default settings in the auto-configuration process (such as the settings for language, operating system, and
primary boot controller), execute RBSU by pressing the
F9
key when prompted. After the settings are
selected, exit RBSU and allow the server to reboot automatically.
For more information on RBSU, see the
HP ROM-Based Setup Utility User Guide
on the Documentation CD
or the HP website (
http://www.hp.com/support/smartstart/documentation
).
Boot options
Near the end of the boot process, the boot options screen is displayed. This screen is visible for several
seconds before the system attempts to boot from a supported boot device. During this time, you can do
the following:
•
Access RBSU by pressing the
F9
key.
•
Access the System Maintenance Menu (which enables you to launch ROM-based Diagnostics or
Inspect) by pressing the
F10
key.
•
Force a PXE Network boot by pressing the
F12
key.
Configuring lockstep memory
To configure Lockstep memory:
1.
Install the required DIMMs ("
Installing a DIMM
" on page
49
).
2.
Access RBSU by pressing the
F9
key during power-up when the prompt is displayed.
3.
Select
System Options
.
4.
Select
Advanced Memory Protection
.
5.
Select
Lockstep with Advanced ECC Support
.
6.
Press the
Enter
key.
7.
Press the
Esc
key to exit the current menu, or press the
F10
key to exit RBSU.
Summary of Contents for ProLiant DL370
Page 1: ...HP ProLiant DL ML370 G6 Server User Guide Part Number 513482 001 March 2009 First Edition ...
Page 16: ...Component identification 16 SFF hard drives LFF hard drives ...
Page 29: ...Operations 29 6 Remove the hard drive cage blank ...
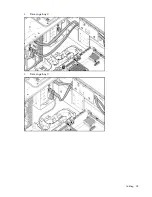
Page 94: ...Cabling 94 Drive cage bay 2 Drive cage bay 3 ...
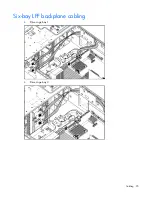
Page 95: ...Cabling 95 Six bay LFF backplane cabling Drive cage bay 1 Drive cage bay 2 ...
Page 97: ...Cabling 97 Battery cabling for BBWC DVD ROM drive cabling ...
Page 98: ...Cabling 98 Slimline optical drive cabling ...
Page 123: ...Troubleshooting 123 ...
Page 146: ...Technical support 146 ...
Page 147: ...Technical support 147 ...

