background image

Buttons

Function

Settings – Opens the 

Route settings

 screen

Simulation - this feature has no navigation function, it merely
provides a quick view of the route. It presents a simulation of
the route showing what you might see later when navigating.

You can choose from two different kinds of simulations:

Fly Over

: The route is simulated with high speed.

Simulate

: The route is simulated with the speed identical

to the speed limit on the streets and roads in the route.

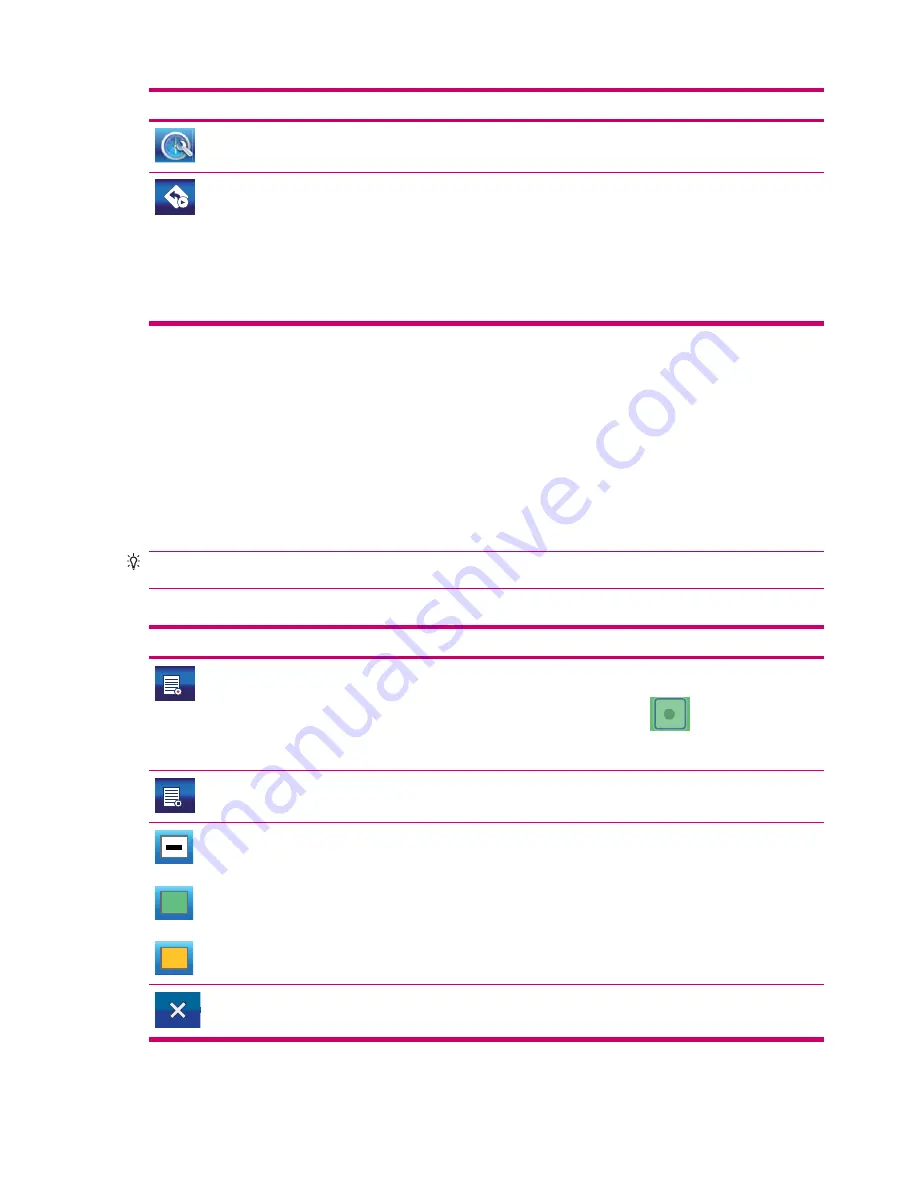
Manage Track Logs

Using the Travel Companion it is also possible to save the track logs of your journeys. This screen lets
you manage all your track logs. When it comes up, it shows a list of all track logs already saved.

The original name of a track log is the date and time when it was recorded. You can change the name
to something more meaningful if you wish.

Each track log has a color, displayed to the left of its name, when the track log is visible on the map. If
the track is not visible, a horizontal line is displayed. Tapping the line of the highlighted track log toggles
between showing and hiding that log. The track log is drawn on the map using the color next to its name.

TIP:

When a track log is being recorded, a new line is displayed in this list with a horizontal line, as

newly recorded track logs are not displayed on the map normally.

On this screen you have the following options:

Button

Function

Initiates track log recording. A new line is displayed in the list,
and GPS position data is saved until you stop the recording or

exit the Travel Companion. A 

 icon is displayed on the

map to let you know that a recording is in progress. Tapping
that icon opens this 

Track Log

 screen.

Stops track log recording.

This icon displays the color of the track log line on the map. A
horizontal line means the track log is not displayed on the map.
Tap this box to toggle between showing and hiding the track
log.

Deletes the track log it is displayed next to.

54

Chapter 13   Route

Summary of Contents for iPAQ 300 Travel Companion

Page 1: ...HP iPAQ Product Guide ...

Page 2: ...right protection and other intellectual property rights owned by or licensed to Tele Atlas The use of this material is subject to the terms of a license agreement You will be held liable for any unauthorized copying or disclosure of this material Data Source 2007 Tele Atlas N V BEV GZ 1368 2003 DAV violation of these copyrights shall cause legal proceedings IGN France This product includes mapping...

Page 3: ...nd replace the battery cover 7 Step 3 Charge the battery 8 Power on Travel Companion 8 Car kit setup 8 6 Warnings and safety information 7 Learn the basics Hardware buttons 12 Power on off 12 Multifunction wheel 12 Zoom in and out 12 Adjust volume and brightness 12 Open the Quick Launch menu 13 Screen buttons 13 Buttons on the top and the bottom of the screen 13 Buttons on the map 16 Selectors 17 ...

Page 4: ...o an address 30 Navigate to a POI 31 Create a route with multiple destinations 31 Create a route with a different start point 32 Save user data 33 10 Reference book Navigation menu Go to 34 Find an address street intersection or city 35 Find in History 36 Find one of the Favorites 36 Find home or work 36 Find a POI 36 Search reference 36 POI groups 37 POI subgroups 37 Select a POI 37 Find co ordin...

Page 5: ...ute 47 Turn preview 47 Cursor the selected map point 47 Track Log recording playback indicator 47 Cursor menu 48 Current street 49 Distance to next turn 49 Next street Next city 49 13 Route Edit Route 50 Route Detail 50 Saved Routes 51 Route Info 51 Route data displayed for destination and Via points 51 Warning icons 53 Other functions 53 Manage Track Logs 54 14 Settings Visual settings 56 3D sett...

Page 6: ...ff 61 Avoidances 61 Unpaved Roads 61 Motorways 61 Ferries 62 Cross border planning 62 U turns 62 Permit needed 62 Toll roads 62 Carpool lanes for the USA map only 62 Keep position on road 62 Regional settings 62 Language 62 Voice 63 Units 63 Time settings 63 Set time format 63 Warnings 63 Warn when speeding 63 Speeding tolerance 63 Alternative speed limit 63 Alternative speeding tolerance 64 Enabl...

Page 7: ... 73 European Union Notice 73 Products with 2 4 GHz Wireless LAN Devices 74 France 74 Italy 74 Battery Warning 74 Battery Recycling 74 Battery Disposal 74 Equipment Warning 75 Acoustics Warning 75 Airline Travel Notice 76 Medical Electronic Equipment 76 Wireless Notices 76 U S Regulatory Wireless Notice 76 Canadian Regulatory Wireless Notice 76 Brazilian Notice 76 Japanese Notice 76 Bluetooth Devic...

Page 8: ...Obtain services for a cracked or damaged screen 78 Protect the Travel Companion screen from cracking or damage 79 viii ...

Page 9: ...nhance your travels Here you can find new Web based trip planning services that allow you to personalize your travel by creating custom itineraries for export to your Travel Companion Visit http www ipaq com to learn about the latest services and content available for the Travel Companion Use this guide to know more about how to Get started with using your Travel Companion Manage your contacts and...

Page 10: ...ices and personalized newsletters After registering the Travel Companion you will receive an e mail message regarding special offers and promotions Visit http www register hp com and follow the on screen instructions to register the Travel Companion or update your mail or e mail address after registration You are required to enter your user ID and registration password to edit your profile online ...

Page 11: ...ntents vary by model Box Contents 1 Travel Companion 2 Stylus 3 1700 mAH li ion removable rechargeable battery 4 Getting Started CD with additional software 5 Travel Companion Documentation 6 AC adapter with interchangeable plug 7 mini USB cable power cable 8 Case 9 Dash mount disk 10 Car kit windshield mounting bracket 11 Car kit holder 12 Car kit Travel power adapter Box contents 3 ...

Page 12: ...tion 1 Power Key and LED Press and hold to turn on the Travel Companion Charge LED Solid Amber Battery charging Solid Green Battery fully charged 2 Bluetooth LED Blue Bluetooth ON 3 Microphone For Bluetooth hands free audio 4 Chapter 4 Components ...

Page 13: ...th 3 5 mm audio headphones 3 Charging Communications Port Use to connect the mini USB cable 4 Reset Use to reset the Travel Companion 5 SD Card Slot Insert a Secure Digital SD storage card with the label side up for data storage Top and bottom components Component Function 1 Microphone For Bluetooth hands free audio Left and right components 5 ...

Page 14: ...1 Stylus Remove and use to select elements on the screen and to enter information 2 Back Speaker Use the speaker to listen to audio 3 Back Cover Slide the cover away from the Travel Companion to remove the battery 6 Chapter 4 Components ...

Page 15: ...he back cover down and away from the Travel Companion Step 2 Install the battery and replace the battery cover 1 Align the battery connectors on the battery with the housing pins in the battery compartment and insert the battery 2 Slide the battery cover until it clicks into place Set up the Travel Companion 7 ...

Page 16: ...y turn it over TIP You can also charge the battery by connecting the Travel Companion to a USB port on your computer using the mini USB cable You can only transfer data when charging through USB NOTE Whenever a replacement battery is inserted into the Travel Companion press the Power key for at least two seconds In case the device does not turn on attach the AC adapter to turn on the Travel Compan...

Page 17: ...he Travel Companion and that the connector is turned the correct way to plug into the unit 3 Install the holder onto the windshield mounting bracket 4 Place the car kit assembly onto the windshield 1 and then press the locking lever 2 to securely mount the assembly into place 5 To install the Travel Companion Car kit setup 9 ...

Page 18: ...Insert the securing clip into the slot on the top of the Travel Companion c Plug the power cable into the Travel Companion 6 Use the knobs to adjust the vertical and horizontal orientation of the Travel Companion 10 Chapter 5 Power on and set up the Travel Companion ...

Page 19: ...ng your journey The driver s attention should always be on the road Plan your route before departure and pull over if you need to change route parameters It is also important that you look at the display only if it is absolutely safe to do so You should always observe traffic signs and road geometry before you obey any instruction from the Travel Companion If you need to deviate from the recommend...

Page 20: ...ion wheel The Multifunction wheel performs multiple functions Zoom in and out When the map is visible on the screen turn the wheel up to zoom in and turn it down to zoom out Adjust volume and brightness To adjust the volume and brightness 1 Press the button swiftly to open the Master volume slider below the speaker icon You may also tap to open the Master volume slider 2 Now turn the wheel up or d...

Page 21: ... you tap the map to place the cursor Buttons on the top and the bottom of the screen The blue bars on the top and the bottom of all screens contain buttons that initiate functions or lead to different parts of the application The symbols on the buttons may provide information on the current state of the Travel Companion The buttons are as follows Button Function Opens Backlight settings and Power ...

Page 22: ...you can edit the item it is displayed next to Opens the GPS Data screen Displays the current GPS reception quality status The more vertical lines the better is the reception A cross means there is no GPS reception Locks the touch screen against accidental tapping The hardware buttons can be operated even if the screen is locked Unlock Reactivates the touch screen Returns to the Main menu screen Op...

Page 23: ...1 52 10 5 14 min 3 16 43 1 31 h Displays the time remaining to reach the final destination or to reach the next Via point Toggles between the values Opens Settings at the page related to the current screen s content Some screen specific buttons Button Function Aa 123 On keyboard screens this icon toggles between the alphabetic and numeric keyboards On keyboard screens this icon inserts a space cha...

Page 24: ... when you tap Add POI in the Cursor menu First select the POI group in which you wish to save the POI and then tap this icon to start entering the details When saving a user POI this icon lets you create a new group for the new POI Tap it and enter the name of the new POI group On the screen of current TMC messages this icon opens the TMC radio settings Buttons on the map When you tap the map you ...

Page 25: ...d re enables Smart Zoom that automatically scales and tilts the map based on the distance of the next route event When GPS position is not available the map jumps to the position of the Cursor This icon is displayed on the screen when a track log is being recorded Tap it to jump to the list of track logs This icon is displayed on the screen during route simulation and track log playback Tap the sc...

Page 26: ...omes effective immediately Switches When a function can only have two values mainly Enabled and Disabled a switch is used The horizontal line contains the name of the function and not the actual status There is a check box on the left to show whether the function is active or not When the check mark is cleared or missing it indicates that the function is not selected When the check mark is selecte...

Page 27: ... keys are as follows Button Function Aa 123 Toggles between the alphabetic and numeric keyboards Inserts a space character in the entered text Clears the last entered character Tap this icon to finish entering characters The numeric keyboard The numeric keyboard only contains numbers on buttons The special keys you find on the other keyboards except Space are available on this keyboard as well The...

Page 28: ...nment Tap to access the following applications Videos Music Games Pictures Videos To play your videos and organize your playlist 1 Tap to access the video function 2 Tap to view and organize your playlist 3 Tap to add videos to the playlist NOTE You will need to add your video files to Media directories to play videos on your Travel Companion For more information see Media directories on page 29 4...

Page 29: ...Artist album Album Genre artist Genre artist album Genre album 3 The files can also be sorted by title track file name and file size 4 Tap the corresponding to select individual songs or tap to select all of them 5 Tap to add them to your playlist NOTE You will need to add your music files to Media directories to play music on your Travel Companion For more information see Media directories on pag...

Page 30: ...tion the music player remembers your playlist until you delete it You can listen to background music whenever you use your Travel Companion Tap Always to enable this feature Tap Ask to enable this feature for some time Tap Never to turn this feature off Games Tap to see the list of games Tap the icon representing the game you wish to launch Games Description 1 Contains four classic games including...

Page 31: ...Media directories on page 29 When you first enter the picture viewer you can see the contents of the Unfiled Pictures album To see another album just tap the button on top of the screen and select the album from the list Tap to configure the picture viewer Slide Show Effect The following slide show transition effects are available for selection Fade Slide Special Effect 1 10 No effect Slide Show I...

Page 32: ...e phone 1 2 fax birthday pager Web other address office location job spouse anniversary children home fax car phone assistant name assistant phone categories radio phone company When you are ready tap which brings you back to the data sheet You can choose another field and follow the same process to fill in the required details To save your changes and return to the contact list tap 24 Chapter 8 D...

Page 33: ...u to navigate to one of your contacts without entering the navigation application and typing the address of the destination The addresses that can be navigated to are indicated by a sign If an address has a sign next to it it means that the application could not find the address on the map Tap the contact you wish to navigate to and tap NOTE If the contact does not have an address an error message...

Page 34: ...ze the alarm To set the length of delay select the required minutes from the list 5 Tap to confirm your selection The following types of alarms are available Once The alarm is not recurrent Regular The alarm is recurrent Here you can choose the days of the week you require an alarm Countdown The alarm alerts after the specified delay Call back A link to the Contact list is displayed at the bottom ...

Page 35: ...atures are also available Tap to display a list of previous calls Each entry contains the phone number and the date and time of the call Tap to add a number on the list to your contacts Tap to delete individual entries Tap to completely clear your call history Calculator Tapping opens the calculator function Tap Mode to switch between the two calculator types basic exponential NOTE The currently u...

Page 36: ...ith instructions is displayed on the screen 2 Tap the stylus on the center of the cross and repeat this each time the cross moves around the screen 3 When the cross disappears tap the screen within 30 seconds to save the new calibration or wait for 30 seconds to retain the original calibration Time To set the time 1 You can set hours and minutes by tapping and 2 Tap 12 24 12 24 to choose between 1...

Page 37: ... a folder and use to remove all directories 2 When you delete a folder the application displays Directory won t be scanned after this Are you sure to confirm whether you really require to remove the selected directory Choose Yes to confirm deletion In this case the particular directory is not removed from your Travel Companion but is removed only from the list of media directories If required you ...

Page 38: ...own or b tap the icon with the name of the settlement and enter the desired city or town 7 With country and city town selected you have two options a tap City Center to navigate to the centre of the city town or b tap Enter Street Name and enter the street you are looking for 8 With country city town and street selected there are three options to finish the address search a tap Street Center to na...

Page 39: ...Is that appear Here a tap ABC to see the POIs in alphabetical order b tap Km Mi to see the POIs ordered by their distance from the reference c and finally tap the desired POI to see its details 7 On the screen that shows the details of the selected POI tap 8 The map is displayed with the selected point in the middle and the Cursor menu shows your options 9 Tap Set as Destination 10 The route is au...

Page 40: ... GPS position 5 If you confirm the new starting point is set and automatic route recalculation is disabled otherwise the Travel Companion would recalculate the route from the current GPS position as soon as a new position data is received 6 The new route has the same destination and Via points as the previous one Alternatively you can also create a route with a different starting point and a new d...

Page 41: ...n menu tap Go to and select a point The map with the Cursor menu is displayed From the Cursor menu tap Save as Favorite if you wish to place this point on the list of your favorite destinations tap Add POI if you wish to save a useful map point with icon telephone number and additional information or tap Add Speedcam to save the point as a location of a road safety camera Save user data 33 ...

Page 42: ...ompanion Opens Navigation Extras the screen for additional navigation features Go to The Go to menu is accessible from the Main menu This screen offers various options for selecting a location When a selected location is found the results are displayed on the map marked with the cursor a red dot with radiating red circles The Cursor menu appears with possible actions There are multiple menu option...

Page 43: ...east a part of the address this is the quickest way to find the location The button names are as follows Button names Function Country Name Tap to select a different country History Tap to select a city town from the list of recently used cities and towns City Name Tap to select a region state in the displayed country City Center Tap this button to navigate to the centre of the selected region sta...

Page 44: ...favorite it appears next to Find home or work The first item in the list of favorite destinations is and the second one is These two points can be accessed directly from the Go to menu Tap any of the two icons and the map with the Cursor menu is displayed with the selected point in the middle Find a POI You can select your destination from the thousands of POIs included with the Travel Companion o...

Page 45: ...her icons lead to a list of POI groups On this screen you can see the first page of the top level POI categories The options are as follows Buttons Functions Km Mi The list of results is ordered by their distance from the reference ABC The list of results is ordered alphabetically Save Save the current search criteria to be accessed later from Quick Search Show the list of all POI items matching t...

Page 46: ...ent formats To easily enter a Latitude Longitude pair 1 The left field contains the latitude 2 Check the first character an N North or S South letter This specifies whether the point is in the Northern or the Southern hemisphere 3 Use N S to change the hemisphere if necessary 4 Use to clear the figures not matching the desired latitude 5 Enter numbers for the latitude Use the decimal point if the ...

Page 47: ...sometimes displayed with their addresses and sometimes with their co ordinates This setting lets you choose whether to display co ordinates in degrees dd dddddd degrees and minutes dd mm mmm or degrees minutes and seconds dd mm ss s Go to 39 ...

Page 48: ...th enabled phone to your Travel Companion You can connect Bluetooth capable mobile phones to your Travel Companion Check the documentation of your phone for compatibility information To connect to a Bluetooth enabled phone 1 Make sure that Bluetooth is enabled on the phone 2 Tap Settings R 3 Tap Explore Bluetooth devices 4 Nearby Bluetooth devices are listed Tap your phone s name when displayed in...

Page 49: ...of previous connect attempts NOTE My Shortcuts menu contains devices you have previously paired with your Travel Companion for easy access Tap to initiate pairing from your mobile phone Tap to initiate a call Tap to end a call Make a call You can make calls using the phone feature contacts or POI Use phone dialer To make calls using the phone dialer 1 Tap Settings R 2 Tap to enter a phone number 3...

Page 50: ...ou can answer or reject calls on your Travel Companion In case of a call Incoming Call is displayed on the screen Tap to answer the call and tap to reject a call Connect to a Bluetooth stereo headphones You can connect a Bluetooth enabled stereo headphone to your Travel Companion To connect to a Bluetooth enabled stereo headphone 1 Make sure that Bluetooth is enabled on the phone 2 Tap Settings R ...

Page 51: ...e If you are navigating some more route data like the next street in your route the distance to travel type of the next route event There are several controls that function in a similar fashion on the two screens They are described in the following sections Button Function Exits navigation and opens the Phone dialer application Opens Route Progress screen Turn preview Opens a large turn preview bo...

Page 52: ...option is displayed only when GPS position is available Re enables Lock to Position and Smart Zoom 2D 3D Toggles between 2D Map and 3D Cockpit screens Selected map point Cursor Rotates map left 3D map only Rotates map right 3D map only 2007 08 04 18 12 04 Date and Time Changes content Date Time or Date Time This option enables you to switch to full screen map mode and back to normal map mode on th...

Page 53: ...n Settings or let the Travel Companion do it automatically for you NOTE The automatic day night mode is based upon the current date and GPS position by which the Travel Companion calculates the exact sunrise and sunset times on the particular day at the particular location Using that information the Travel Companion can automatically switch between the color schemes a few minutes before sunrise wh...

Page 54: ...rsor is displayed on the display with the red dot and the radiating red circles Visible POIs Points of Interest Your Travel Companion comes with thousands of built in POIs and you can create your own POI database as well POIs are represented by icons on the map For a built in POI it is the icon of the subcategory of the actual POI For points you create it is the icon you had chosen when you create...

Page 55: ...you can choose whether to include or avoid some road types in Route settings sometimes they are impossible to avoid near the starting point Via points or the destination If so the Travel Companion displays those segments of the route with an alternate color Turn preview On the Map screens this field shows a graphic illustration of the next maneuver For example when you approach a turn an arrow sho...

Page 56: ... a route is already active Remove Via This button replaces Add Via if the Cursor is at or near to any of the Via points of the route Tap it to remove that particular Via point from the route Continue This button adds a new final destination after the previous destination The new destination replaces the old one which is now demoted to a Via point This is the way to build your multi point route in ...

Page 57: ...ws the distance to go before reaching the next route event turn roundabout exit etc This field is only displayed when navigating a route Next street Next city This field shows the road or street that comes next in the route itinerary If you are not yet in the city or town where this next street is the Travel Companion displays the name of the settlement instead of the name of the road or street A ...

Page 58: ...he list Moves the highlighted route point down in the list Selects a new point to add to the list below the highlighted route point Deletes the highlighted route point Optimizes the route sequence Optimization is for Via points only Your starting point and destination remain in their positions Route Detail This function opens the itinerary route event list of the active route All significant junct...

Page 59: ...unctions on this screen Buttons Function Deletes the route it is displayed next to Deletes all saved routes Route Info The Route Information screen has all the data and some functions that you might need while navigating Without an active route some icons are inactive and route data cannot be displayed Route data displayed for destination and Via points The route data displays information about th...

Page 60: ...f the line remains grey Destination Via point This field shows the exact address or its co ordinates if the address is not available of the final destination If Via points exist tap and tap again any of the fields to see the address or co ordinates of the first second etc Via point Estimated Arrival This field shows the estimated arrival time at the final destination of the route based on informat...

Page 61: ... route This icon shows that you need to pay for the ferry This icon is displayed when the Travel Companion could not plan a route with all your suggested road type preferences Sometimes it is impossible to find a suitable route near the start or the destination This icon warns you that the Travel Companion had to recommend a route that does not match all your preferences given at the Route Paramet...

Page 62: ...ft of its name when the track log is visible on the map If the track is not visible a horizontal line is displayed Tapping the line of the highlighted track log toggles between showing and hiding that log The track log is drawn on the map using the color next to its name TIP When a track log is being recorded a new line is displayed in this list with a horizontal line as newly recorded track logs ...

Page 63: ...th the details of that track log On this screen you have the following options Button Function Changes the color of the track log Opens a new screen where you can change the name of the track log Exports the track log to an inserted SD card in GPX format Route Info 55 ...

Page 64: ... visibility and to better recognize complex junctions with flyovers You can suppress elevation to view a road network that looks like a conventional map Buildings 3D buildings can slow down map visualization and can make the map dense Turn this feature on or off to configure the Travel Companion to display only the closest buildings or buildings far ahead Terrain Terrain can be displayed using ric...

Page 65: ... Lock to Position and have the labels and icons disappear again 2D 3D map view In 2D map view mode the map is displayed in a conventional top down view with a fixed North up orientation You cannot tilt or rotate the map The elevation of the map is displayed with colors and shading similar to a topographic map In 3D map view mode the map shows a perspective view You can change the vertical angle of...

Page 66: ...nd its subgroups If you wish to have uniform visibility for the whole group tap the button again Night mode Using the automatic night mode your Travel Companion switches between the daylight and night color schemes a few minutes before sunrise and a few minutes after sunset based on the time and location information provided by your GPS Set Night mode permanently on or off to display only the dayl...

Page 67: ...ut does not change the zoom level If you turn this feature on the Travel Companion zooms in to the selected point The zoom level in this case depends on the type of object you have searched for For example in the case of a city search the zoom level shows you the whole region state or at least a significant part of it around its centre Selecting a POI a junction or an exact address gives you a clo...

Page 68: ...ght be too loud to clearly understand the voice guidance messages and perceive the key sounds Using Dynamic Volume you can configure your Travel Companion to increase the volume when your speed exceeds a certain minimum and reach its highest volume at the given maximum speed To change dynamic volume 1 Tap Dynamic Volume to turn on the feature 2 Move the slider to set the minimum and maximum speeds...

Page 69: ...stray Off If you stick to the original route and you wish to get back to it on your own you can disable recalculation Guidance stops until you return to the recommended route Avoidances To select the route that fits your needs you can also set which road types are to be considered for or to be excluded from the route if possible On Check items to avoid screen select the road type you require to av...

Page 70: ... box if your vehicle is authorized to enter these roads Toll roads You can select this option to disable Toll roads and configure your Travel Companion to plan the best toll free route you may have to travel more to avoid paying a toll Carpool lanes for the USA map only You can configure your Travel Companion to use carpool lanes when planning routes These lanes are currently available in the USA ...

Page 71: ...s Tap Warnings to enable and fine tune user alerts A new window opens with the options Warn when speeding Maps might contain information about the speed limits of the road segments You can configure your Travel Companion to warn you when you exceed the current limit This information is region specific and might not be available for your region ask your local dealer or might not be fully correct fo...

Page 72: ...rn you when you approach known speed and red light cameras previously uploaded or copied into the device or saved manually in the software This can be done using the Cursor menu On this screen you can enable or disable the visible and audible warning for known cameras WARNING Detecting the location of speed cameras might be prohibited by law in certain countries or regions Be sure to check if it i...

Page 73: ...bout compatible TMC solutions for your area visit http www hp com accessories ipaq If public TMC data is broadcast at your location the Travel Companion automatically takes into account the TMC information received The receiver automatically searches the FM radio stations for TMC data and the decoded information is immediately used in route planning As soon as the Travel Companion receives traffic...

Page 74: ...n shows the selected TMC source and allows you to change the radio settings Selected FM radio station The name and frequency of the selected radio station is displayed The signal strength information is indicated by a bar The radio can be tuned manually with the plus and minus buttons or it can be automatic if auto tuner is selected With auto tuner the radio scans the frequency range tests every r...

Page 75: ... GPS to calculate your current location You can also view the satellite signal strength bars The grey bars are for the yellow satellites and colored bars are for the green satellites The more satellites your GPS tracks the green ones the more accurate your calculated position is The GPS data screen also includes information like current position in latitude longitude format elevation speed date ti...

Page 76: ...creen You can access this screen from the main page by tapping Settings System About The screen provides information on the maps and licenses you have installed on your Travel Companion 68 Chapter 17 About screen ...

Page 77: ...ch version is to be retained or resolve the conflict automatically depending on the configuration The Travel Companion can resolve conflicts automatically or prompts user The tool minimizes on the task bar and detects and synchronizes automatically when a device is connected You can select any of the following options Synchronize automatically When enabled the tool synchronizes with the device imm...

Page 78: ...o Integrated microphone speaker and one 3 5 mm stereo headset jack Battery 1 700 mAh Li ion removable rechargeable battery Bluetooth Bluetooth 2 0 with Enhanced Data Rate typical 10 meter range approximately 33 feet High speed low power short range wireless communication with other Bluetooth devices LED Indicators Charge and Notification LED Solid Amber Battery charging Solid Green Battery fully c...

Page 79: ...ric Temperature Operating 32 to 104 F 0 to 40 C Nonoperating 9 6 to 140 F 20 to 60 C Relative Humidity Operating up to 85 up to 85 Nonoperating up to 85 up to 85 Maximum Altitude Operating 0 to 15 000 ft 0 to 4572 m Nonoperating 0 to 40 000 ft 0 to 12192 m Operating environment 71 ...

Page 80: ...ceiver Connect the equipment to an outlet on a circuit different from that to which the receiver is connected Consult the dealer or an experienced radio or television technician for help Modifications The FCC requires the user to be notified that any changes or modifications made to this device that are not expressly approved by HP may void the user s authority to operate the equipment Cables To m...

Page 81: ... by HP If this product has telecommunications functionality it also complies with the essential requirements of the following EU Directive R TTE Directive 1999 5 EC Compliance with these directives implies conformity to harmonized European standards European Norms that are listed in the EU Declaration of Conformity issued by HP for this product or product family This compliance is indicated by one...

Page 82: ...p www arcep fr Italy E necessaria una concessione ministeriale anche per l uso del prodotto Verifici per favore con il proprio distributore o direttamente presso la Direzione Generale Pianificazione e Gestione Frequenze License required for use Verify with your dealer or directly with the General Direction for Frequency Planning and Management Direzione Generale Pianificazione e Gestione Frequenze...

Page 83: ... the AC adapter and pull out from the electrical outlet Do not use converter kits sold for appliances to power your HP iPAQ Acoustics Warning WARNING Listening to this device at high volume levels and for extended durations may damage one s hearing In order to reduce the risk of damage to hearing one should lower the volume to a safe comfortable level and reduce the amount of time listening at hig...

Page 84: ...radiated output power of this device is below the FCC radio frequency exposure limits Nevertheless the device should be used in such a manner that the potential for human contact during normal operation is minimized To avoid the possibility of exceeding the FCC radio frequency exposure limits human proximity to the antenna should be minimized No metallic body accessories are allowed and 1 5 cm spa...

Page 85: ...Bluetooth Devices Taiwan DGT Notice Korean Notice Taiwan DGT Notice 77 ...

Page 86: ...or the metal surface Do not wipe the Travel Companion with any corrosive liquid or coarse objects This can damage the outer surface of the Travel Companion Carrying or storing the Travel Companion Do not leave the Travel Companion in extremely high or low temperature environments Remove the battery from the Travel Companion if it is not going to be used for a long period of time Store the Travel C...

Page 87: ...it Observe the following practices to protect the screen of the Travel Companion from damage Do not sit on the Travel Companion When transporting the Travel Companion in a purse pocket briefcase etc ensure the device does not get compressed bent dropped or hit When not in use use the protective screen cover if one is available on the Travel Companion and store it in a case Do not place anything on...

Reviews: