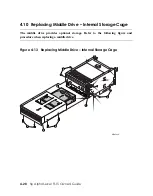
Accessing the Internal Storage Cage
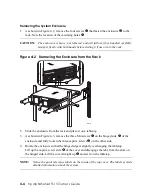
1.
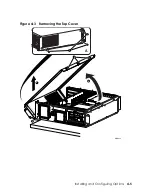
Shut down the system and remove the top cover as explained in Section 4.2.
2.
Pull the two spring loaded insert posts
X
inward so that the posts come out of the
receiving holes
Y
.
3.
Pull the storage cage back, pivot the rear end up, and remove it from the enclosure.
Turn the cage over to access the remaining cables.
4.
Remove the IDE data cable
[
power cable
\
from the DVD/CD-RW drive. All the
cables are routed through the top slot area
^
.
5.
Remove the SCSI cable
p
and power cable
]
.
6.
Reverse the procedure (steps 5 to 2) to install the storage cage.
7.
Since this storage cage does not have a fan, verify that the Feature_4 jumper is installed.
See Section 6.10 for details.
8.
Replace the top cover and reassemble the system enclosure as explained in the end of
Section 4.2.
9.
Turn on system power by pressing the power switch on the operator control panel. Boot
the operating system.
Installing and Configuring Options
4-17


