background image

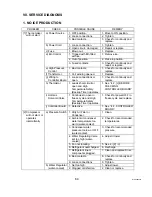
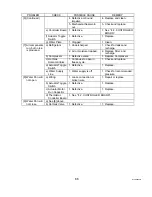
PROBLEM

CHECK

POSSIBLE CAUSE

REMEDY

4. Defective or bound

impeller.

4. Replace and clean.

5. Mechanical Seal worn

out.

5. Check and replace.

e) Controller Board

1. Defective.

1. See “II. 2. CONTROLLER

BOARD”.

f) Actuator Toggle

Switch

1. Defective.

1. Replace.

[6] (Continued)

g) Water Plate

1. Clogged.

1. Clean.

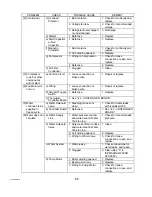
1. Undercharged.

1. Check for leaks and

recharge.

a) Refrigerant

2. Air or moisture trapped.

2. Replace Drier, and

recharge.

b) Compressor

1. Defective valve.

1. Replace Compressor.

c) Hot Gas

Solenoid Valve

1. Continues to open in

freeze cycle.

1. Check and replace.

d) Actuator Toggle

Switch

1. Defective.

1. Replace.

[7] All components

run, but no ice
is produced.

e) Water Supply

Line

1. Water supply is off.

1. Check for recommended

pressure.

a) Wiring

1. Loose connection or

broken wire.

1. Repair or replace.

b) Actuator Toggle

Switch

1. Defective.

1. Replace.

c) Actuator Motor,

Run Capacitor

1. Defective.

1. Replace.

[8] Water Pan will

not open.

d) Thermistor,

Controller Board

1. See “II. 2. CONTROLLER BOARD”.

a) See [8] above.

[9] Water Pan will

not close.

b) Hot Gas Valve

1. Defective.

1. Replace.

66

E1CG4880210

Summary of Contents for IM-240AME

Page 1: ...CT 10 2002 REVISED OCT 10 2002 HOSHIZAKI HOSHIZAKI STACKABLE CUBER STACKABLE CUBER MODEL MODEL IM 240DME IM 240DME IM 240DWME IM 240DWME IM 240DSME IM 240DSME IM 240XME IM 240XME IM 240XWME IM 240XWME IM 240XSME IM 240XSME IM 240AME IM 240AME SERVICE MANUAL SERVICE MANUAL ...

Page 2: ...BOARD 16 16 c SEQUENCE LED INDICATORS ON OFF PATTERN c SEQUENCE LED INDICATORS ON OFF PATTERN 17 17 d FAULT DIAGNOSIS d FAULT DIAGNOSIS 18 18 e CONTROLS AND ADJUSTMENT e CONTROLS AND ADJUSTMENT 20 20 3 FAN MOTOR CONTROL DME XME AME ONLY 3 FAN MOTOR CONTROL DME XME AME ONLY 22 22 III INSTALLATIONINSTRUCTIONS III INSTALLATIONINSTRUCTIONS 23 23 1 UNPACKING 1 UNPACKING 23 23 2 LOCATION 2 LOCATION 25 2...

Page 3: ...IM 240DSME IM 240XSME c IM 240DSME IM 240XSME 59 59 d IM 240AME d IM 240AME 60 60 3 PERFORMANCE DATA 3 PERFORMANCE DATA 61 61 VII SERVICE DIAGNOSIS VII SERVICE DIAGNOSIS 64 64 1 NO ICE PRODUCTION 1 NO ICE PRODUCTION 64 64 2 LOW ICE PRODUCTION 2 LOW ICE PRODUCTION 67 67 3 ABNORMAL ICE 3 ABNORMAL ICE 68 68 4 OTHERS 4 OTHERS 69 69 VIII ADJUSTMENT VIII ADJUSTMENT 70 70 1 EXPANSION VALVE 1 EXPANSION VA...

Page 4: ...AR SIDE b CAM ARM B REAR SIDE 87 87 13 ACTUATOR TOGGLE SWITCH 13 ACTUATOR TOGGLE SWITCH 88 88 14 CONTROLLER BOARD 14 CONTROLLER BOARD 91 91 a MODIFICATION a MODIFICATION 91 91 b REPLACEMENT b REPLACEMENT 91 91 15 THERMISTOR FOR CUBE CONTROL 15 THERMISTOR FOR CUBE CONTROL 93 93 16 SURGE ABSORBER 16 SURGE ABSORBER 94 94 17 FAN MOTOR DME XME ONLY 17 FAN MOTOR DME XME ONLY 95 95 18 FAN MOTOR DSME XSME...

Page 5: ...1 1 E1CG4880210 E1CG4880210 I SPECIFICATIONS I SPECIFICATIONS 1 DIMENSIONS CONNECTIONS 1 DIMENSIONS CONNECTIONS a IM 240DME Air cooled a IM 240DME Air cooled ...

Page 6: ...2 2 E1CG4880210 E1CG4880210 b IM 240DWME Water cooled b IM 240DWME Water cooled ...

Page 7: ...3 3 E1CG4880210 E1CG4880210 c IM 240DSME Remote Air cooled c IM 240DSME Remote Air cooled ...

Page 8: ...4 4 E1CG4880210 E1CG4880210 d IM 240XME Air cooled d IM 240XME Air cooled ...

Page 9: ...5 5 E1CG4880210 E1CG4880210 e IM 240XWME Water cooled e IM 240XWME Water cooled ...

Page 10: ...6 6 E1CG4880210 E1CG4880210 f IM 240XSME Remote Air cooled f IM 240XSME Remote Air cooled ...

Page 11: ...7 7 E1CG4880210 E1CG4880210 g IM 240AME Air cooled g IM 240AME Air cooled ...

Page 12: ...MENSIONS W x D x H DIMENSIONS W x D x H 657 x 399 x 426 mm 657 x 399 x 426 mm REFRIGERANT CHARGE REFRIGERANT CHARGE R404A 1000 g R404A 1000 g WEIGHT WEIGHT Net 20 kg Net 20 kg CONDENSER CONDENSER Air cooled Air cooled HEAD PRESSURE CONTROL HEAD PRESSURE CONTROL Condensing Pressure Regulator Condensing Pressure Regulator AMBIENTCONDITION AMBIENTCONDITION Min 1 Min 1 C to Max 40 C C to Max 40 C Outd...

Page 13: ...er Valve Water Tank Water Tank Pump Motor Pump Motor Drain Pan Drain Pan Actuator Motor Actuator Motor Control Box Control Box Top Panel Top Panel Power Cord Power Cord Condensing Unit Condensing Unit Front Panel Front Panel Storage Bin Optional Storage Bin Optional Bin Door Bin Door Adjustable Legs Adjustable Legs Handle Handle Louver Air Filter Louver Air Filter II GENERAL INFORMATION II GENERAL...

Page 14: ...e Switch Water Valve Water Valve Water Tank Water Tank Pump Motor Pump Motor Drain Pan Drain Pan Actuator Motor Actuator Motor Water Regulating Valve Water Regulating Valve Control Box Control Box Top Panel Top Panel Power Cord Power Cord Condensing Unit Condensing Unit Front Panel Front Panel Storage Bin Optional Storage Bin Optional Bin Door Bin Door Adjustable Legs Adjustable Legs Handle Handle...

Page 15: ...Toggle Switch Water Valve Water Valve Water Tank Water Tank Pump Motor Pump Motor Drain Pan Drain Pan Actuator Motor Actuator Motor Control Box Control Box Top Panel Top Panel Power Cord Power Cord Condensing Unit Condensing Unit Front Panel Front Panel Storage Bin Optional Storage Bin Optional Bin Door Bin Door Adjustable Legs Adjustable Legs Handle Handle Remote Condenser Unit Remote Condenser U...

Page 16: ...lve Hot Gas Valve Actuator Toggle Switch Actuator Toggle Switch Water Valve Water Valve Backside Backside Water Tank Water Tank Pump Motor Pump Motor Drain Pan Drain Pan Actuator Motor Actuator Motor Top Panel Top Panel Power Cord Power Cord Condenser Condenser Front Panel Front Panel Storage Bin Optional Storage Bin Optional Bin Door Bin Door Adjustable Legs Adjustable Legs Handle Handle ...

Page 17: ...ctronic devices and parts on the Controller Board in the field Replace the whole board assembly when it fails field Replace the whole board assembly when it fails 5 To get static free always touch the metal part of the icemaker before servicing 5 To get static free always touch the metal part of the icemaker before servicing Electrostatic Discharge will cause severe damage to the Controller Board ...

Page 18: ...trol VR5 Cube Control VR5 Defrost Control VR2 Defrost Control VR2 Reset Switch Reset Switch Water Supply Time Water Supply Time Setting Jumper Setting Jumper Wires Wires Signal Ground Signal Ground Connector K2 Connector K2 Connector K1 Connector K1 ID Number ID Number Connector K3 Connector K3 a CONTROLLER BOARD LAYOUT a CONTROLLER BOARD LAYOUT ...

Page 19: ...on of the board pushtheResetButtononly board pushtheResetButtononly during the freeze cycle during the freeze cycle Relay Relay X1 Actuator Motor and Pump Motor X1 Actuator Motor and Pump Motor X2 Hot Gas Valve and Fan Motor X2 Hot Gas Valve and Fan Motor X3 Water Valve X3 Water Valve X4 Compressor X4 Compressor Control Control VR2 Defrost Control VR2 Defrost Control VR3 Backup Timer VR3 Backup Ti...

Page 20: ...d Handle with care glass sealed Handle with care Disconnect the Connector K4 on the Disconnect the Connector K4 on the board board Remove the screw and the Thermistor Remove the screw and the Thermistor Holder on the Evaporator Holder on the Evaporator Immerse the Sensor part in a glass Immerse the Sensor part in a glass containing ice and water for 5 minutes containing ice and water for 5 minutes...

Page 21: ...ze cycle X 4 ON X 1 2 OFF X 3 OFF X 4 OFF X 1 2 OFF X 3 OFF X 4 ON X 1 2 OFF X 3 ON X 4 ON X 1 2 ON X 3 OFF Cube Control Thermistor detects defrost cycle finished X 4 ON X 1 2 OFF X 3 ON X 4 ON X 1 2 ON X 3 ON Actuator Toggle Switch moves to DEFROST position Bin Control Switch tripped during defrost cycle X 4 OFF X 1 2 ON X 3 OFF 1 2 4 3 4 Adjustable Relay Legend X1 Actuator Motor and Pump Motor X...

Page 22: ...e See guide below component that could result in an extended freezing time See guide below Lamp ON Water Plate open Lamp ON Water Plate open The Timer has stopped the machine because of an excessive defrost time See the guide The Timer has stopped the machine because of an excessive defrost time See the guide below to check out the probable cause below to check out the probable cause Lamp flashing...

Page 23: ...d Defective Cube Control Defective Cube Control Thermistor Thermistor Clean or replace Clean or replace Replace Replace Replace Replace Replace Replace Check for leak Check for leak Replace Comp Replace Comp Starting Capacitor Starting Capacitor Replace Replace Check for leak Check for leak Replace Comp Replace Comp Starting Capacitor Starting Capacitor Replace Actuator Replace Actuator Toggle Swi...

Page 24: ...at blade screwdriver CAUTION CAUTION When adjusting the Variable Resistor VR5 for smaller dimple cubes it may be When adjusting the Variable Resistor VR5 for smaller dimple cubes it may be necessary to also increase the water supply time to melt away fragments of ice necessary to also increase the water supply time to melt away fragments of ice obstructing the Water Plate which could prevent cubes...

Page 25: ...struction below be necessary to adjust the water supply time setting as well following the instruction below Cut the jumper wire JE marked by arrow by Cut the jumper wire JE marked by arrow by a nipper Water supply time will be 60 sec a nipper Water supply time will be 60 sec when the Water Plate is closed when the Water Plate is closed Normal setting 15 sec with Water Plate closed Normal setting ...

Page 26: ...n the is in turn controlled by the Bimetal Thermostat which is attached to the Control Box When the Relay is energised Thermostat contacts closed the Motor operates at approximately half Relay is energised Thermostat contacts closed the Motor operates at approximately half speed When the Relay is de energised Thermostat contacts open the Motor operates at speed When the Relay is de energised Therm...

Page 27: ...ING WARNING WARNING Children should not be allowed in reach of the packaging elements plastic bags Children should not be allowed in reach of the packaging elements plastic bags and expanded polystyrene as they are potential sources of danger and expanded polystyrene as they are potential sources of danger CAUTION CAUTION Remove shipping carton tape s and packing If packing material is left in the...

Page 28: ...emote Air Cooled Remote Air Cooled 1 1 Outlet Hose Outlet Hose Air Cooled Air Cooled 1 1 Water Cooled Water Cooled 2 2 Remote Air Cooled Remote Air Cooled 1 1 1 2 3 4 Nipple Water Cooled 1 2 3 4 Nipple Water Cooled 2 2 b Scoop Except IM 240X b Scoop Except IM 240X 1 1 c Ice Chute IM 240X IM 240A c Ice Chute IM 240X IM 240A 1 1 d Drain Pipe Collar IM 240X only d Drain Pipe Collar IM 240X only 1 1 e...

Page 29: ...ide a firm and level foundation for the equipment 4 Allow 15 cm clearance at rear sides and top for proper air circulation and 4 Allow 15 cm clearance at rear sides and top for proper air circulation and ease of maintenance and or service should they be required For air cooled ease of maintenance and or service should they be required For air cooled model only allow 30 cm clearance at the right si...

Page 30: ...to right and front to rear directions See Fig 4 3 Remove the icemaker panels The Rear Panel 3 Remove the icemaker panels The Rear Panel is not required to be removed for installation is not required to be removed for installation See 1 UNPACKING See 1 UNPACKING 4 Remove the shipping tape holding the Drain Pan 4 Remove the shipping tape holding the Drain Pan 5 Place the icemaker on the top of the S...

Page 31: ...Control Switch to the Mounting Frame using the two bolts and flat washers Frame using the two bolts and flat washers provided Fix the Bin Control Switch wiring provided Fix the Bin Control Switch wiring with the two nylon ties Place the Ice Chute with the two nylon ties Place the Ice Chute on the Unit Frame and refit the Drain Pan in on the Unit Frame and refit the Drain Pan in its correct positio...

Page 32: ...ed with the X type icemaker Misconnection or no connection may cause supplied with the X type icemaker Misconnection or no connection may cause serious damage to the icemaker units resulting in failure serious damage to the icemaker units resulting in failure 1 Prepare and position the Storage Bin as detailed in 1 and 2 in 3 INSTALLATION 1 Prepare and position the Storage Bin as detailed in 1 and ...

Page 33: ...r removal See Fig 12 Keep it after removal See Fig 12 11 Attach the upper or middle unit on the lower 11 Attach the upper or middle unit on the lower unit See Fig 13 unit See Fig 13 12 Secure the two units with the two bolts and the 12 Secure the two units with the two bolts and the two nuts provided See Fig 13 two nuts provided See Fig 13 13 Align the lower unit drain hole and the upper 13 Align ...

Page 34: ... cord and the plug should need to be replaced it should only be done by a If the supply cord and the plug should need to be replaced it should only be done by a qualified service engineer qualified service engineer For the U K and the Republic of Ireland only For the U K and the Republic of Ireland only The wires in the mains lead are coloured in accordance with the following code The wires in the...

Page 35: ...packing packing 2 Remove the Top Panel 2 Remove the Top Panel 3 Checkthattherefrigerantlinesdonotrubortouch 3 Checkthattherefrigerantlinesdonotrubortouch lines or other surfaces and that the fan blade lines or other surfaces and that the fan blade turnsfreely turnsfreely 4 Recommended parts and materials listed below 4 Recommended parts and materials listed below will be required will be required ...

Page 36: ...on and to avoid the possibility of the unit standing in water prevent heat reflection and to avoid the possibility of the unit standing in water The maximum line length is 10 m For information on longer line installations call Hoshizaki The maximum line length is 10 m For information on longer line installations call Hoshizaki Care 44 0 1223242254 Care 44 0 1223242254 The Condenser should not be i...

Page 37: ...lines through the Gauge Ports for 20 minutes at max 0 1 torr Charge both lines with the lines through the Gauge Ports for 20 minutes at max 0 1 torr Charge both lines with vapour refrigerant R404A to a pressure of 1 bar Add nitrogen to raise the pressure to 15 vapour refrigerant R404A to a pressure of 1 bar Add nitrogen to raise the pressure to 15 bar Thoroughly leak test the joints with a leak de...

Page 38: ...uts from the Access Valves on both the Condenser and the icemaker on both the Condenser and the icemaker Open the liquid and gas line valves by turning Open the liquid and gas line valves by turning the Spindle with a hexagon wrench until fully the Spindle with a hexagon wrench until fully open open 7 Refit the Cap Nuts to a torque of 25 3 Nm 7 Refit the Cap Nuts to a torque of 25 3 Nm 8 Check the...

Page 39: ... Unit must be connected to the This Condenser Unit must be connected to the Fan Motor Junction Box on the icemaker Fan Motor Junction Box on the icemaker Usually an electrical permit and services of a Usually an electrical permit and services of a licensed electrician are required licensed electrician are required 1 Remove the two screws and the Junction Box 1 Remove the two screws and the Junctio...

Page 40: ... refrigerant lines and make electrical connections for each Fan Motor as instructed under connections for each Fan Motor as instructed under c and d c and d 7 WATER SUPPLY AND DRAIN CONNECTIONS 7 WATER SUPPLY AND DRAIN CONNECTIONS For the U K only the connections must be in For the U K only the connections must be in accordance with current requirements of the accordance with current requirements ...

Page 41: ...ig 28 2 Attach the other end of inlet hose to the water tap Fig 29 noting washer is correctly 2 Attach the other end of inlet hose to the water tap Fig 29 noting washer is correctly positioned before hand tightening as above It is a wise precaution to have a stop valve positioned before hand tightening as above It is a wise precaution to have a stop valve within easy reach within easy reach 3 Hand...

Page 42: ...etween the Cooling Tower and the icemaker should be at least 20 mm DIA to reduce Pipes between the Cooling Tower and the icemaker should be at least 20 mm DIA to reduce pressure loss even though the icemaker fittings are 13 mm DIA pressure loss even though the icemaker fittings are 13 mm DIA Pressure loss in the water circuit inside the unit will be 5 to 6 m when the cooling water flows Pressure l...

Page 43: ...ubber washer before finally hand tightening the joint This pipe can be cut to length as necessary to suit position of main drain the joint This pipe can be cut to length as necessary to suit position of main drain 4 By means of a suitable spanner or wrench tighten the 1 2 3 4 nipples accessory into the 4 By means of a suitable spanner or wrench tighten the 1 2 3 4 nipples accessory into the Rc1 2 ...

Page 44: ...nections according to regulations other than WRC by utilising accessory b Connections according to regulations other than WRC by utilising accessory hoses Fig 32 hoses Fig 32 1 Follow the instructions from 1 to 4 in a above 1 Follow the instructions from 1 to 4 in a above 2 For Condenser connections use supplied accessory hoses and make the same 2 For Condenser connections use supplied accessory h...

Page 45: ... tested or checked against the nameplate rating 6 Has the power supply voltage been tested or checked against the nameplate rating Has a proper earth been installed to the icemaker Has a proper earth been installed to the icemaker 7 Has the water supply pressure been checked to ensure a minimum of 0 5 bar and maximum 7 Has the water supply pressure been checked to ensure a minimum of 0 5 bar and m...

Page 46: ... disconnect the icemaker circuits and potential electrical shocks If in doubt disconnect the icemaker Do not pull the power cord in order to disconnect the icemaker from the Do not pull the power cord in order to disconnect the icemaker from the feed network feed network This appliance is not suitable for unsupervised use by young children or This appliance is not suitable for unsupervised use by ...

Page 47: ...x it there with tapes 3 Connect the power supply 3 Connect the power supply 4 After 10 seconds in the defrost cycle the unit stops Leave the unit 4 After 10 seconds in the defrost cycle the unit stops Leave the unit for 12 hours Oil Heater energised for 12 hours Oil Heater energised 5 Move the Washing Switch to the ICE position and release the Bin Control Switch into the 5 Move the Washing Switch ...

Page 48: ...r source and reconnect after 3 minutes after 3 minutes 6 The Water Pan will open and then the 6 The Water Pan will open and then the Actuator Toggle Switch will turn to the Actuator Toggle Switch will turn to the DEFROST position in 40 seconds Click DEFROST position in 40 seconds Click sound will be heard sound will be heard 7 Blow out the water supply line immediately 7 Blow out the water supply ...

Page 49: ...age Bin This switch will turn side of the Storage Bin This switch will turn offtheunitautomaticallywhentheStorageBin offtheunitautomaticallywhentheStorageBin is full of ice is full of ice Handle the Bin Control Switch carefully Handle the Bin Control Switch carefully because the switch assembly is fragile because the switch assembly is fragile Especially on removing ice do not touch or Especially ...

Page 50: ...o prevent damage to the cam surface with care to prevent damage to the cam surface of the Actuator of the Actuator DETECTOR DETECTOR Push out the Detector holding the Switch Push out the Detector holding the Switch Actuator Actuator c REASSEMBLING c REASSEMBLING SWITCH ACTUATOR SWITCH ACTUATOR Insert the lower Shaft and push it along the U Insert the lower Shaft and push it along the U Notch Check...

Page 51: ...aning Sanitisation Daily 2 Scoop and Storage Bin Handle Cleaning Sanitisation Daily 1 Either mix 3 litres of water with 11 ml of 5 25 sodium hypochlorite solution in a suitable 1 Either mix 3 litres of water with 11 ml of 5 25 sodium hypochlorite solution in a suitable container or the recommended Hoshizaki sanitiser as directed container or the recommended Hoshizaki sanitiser as directed 2 Soak t...

Page 52: ...Air Filter Air Cooled Model Only 4 Air Filter Air Cooled Model Only Plastic mesh Air Filters are fitted to remove dirt or dust from the air preventing the Condenser Plastic mesh Air Filters are fitted to remove dirt or dust from the air preventing the Condenser from getting clogged As the Filters become dirty air circulation through the Condenser will from getting clogged As the Filters become dir...

Page 53: ...rom the Water Valve 4 Disconnect the Inlet Hose from the Water Valve 5 Remove the Mesh Filter from the Water Valve 5 Remove the Mesh Filter from the Water Valve 6 Clean the Mesh using a brush 6 Clean the Mesh using a brush 7 Replace the Mesh and Inlet Hose in their correct positions 7 Replace the Mesh and Inlet Hose in their correct positions 8 Open the Shut off Valve 8 Open the Shut off Valve 9 P...

Page 54: ... the panels and check for leaks from the water line 3 Unplug the icemaker or disconnect the power source and close the water supply tap 3 Unplug the icemaker or disconnect the power source and close the water supply tap 4 Disconnect the cooling water inlet and outlet pipings and attach fittings to connect hoses 4 Disconnect the cooling water inlet and outlet pipings and attach fittings to connect ...

Page 55: ...se any ammonia type cleaners on any part of the icemaker 6 Do not use any ammonia type cleaners on any part of the icemaker 7 When the ambient and water temperatures are 10 C or below the Water Pan 7 When the ambient and water temperatures are 10 C or below the Water Pan may remain open Warm the icemaking compartment up to 20 C around the may remain open Warm the icemaking compartment up to 20 C a...

Page 56: ...Circulate the cleaning solution for 30 minutes Open the water supply tap and repeat the above steps 6 and 7 above steps 6 and 7 12 When the Water Pan closes again pour clean water into the Water Pan until it floods from 12 When the Water Pan closes again pour clean water into the Water Pan until it floods from the Overflow Pipe and circulate the water for 5 minutes the Overflow Pipe and circulate ...

Page 57: ...ith the screw See Fig 20 Move the Tank Drain Pipe to the normal position and secure it with the screw See Fig 36 36 21 Repeat the above steps 6 and 7 again When the 21 Repeat the above steps 6 and 7 again When the icemaker stops move the Washing Switch to the ICE icemaker stops move the Washing Switch to the ICE position See Fig 46 The icemaker will resume position See Fig 46 The icemaker will res...

Page 58: ...denser Expansion Expansion Valve Bulb Valve Bulb Strainer Strainer Hot Gas Hot Gas Valve Valve Compressor Compressor Water Circuit Water Circuit Refrigerant Circuit Refrigerant Circuit Evaporator Evaporator Fan Motor Fan Motor VI TECHNICAL INFORMATION VI TECHNICAL INFORMATION 1 WATER CIRCUIT AND REFRIGERANT CIRCUIT 1 WATER CIRCUIT AND REFRIGERANT CIRCUIT a IM 240DME IM 240XME IM 240AME Air cooled ...

Page 59: ... Expansion Expansion Valve Valve Drier Drier Condenser Condenser Expansion Expansion Valve Bulb Valve Bulb Strainer Strainer Hot Gas Hot Gas Valve Valve Compressor Compressor Water Circuit Water Circuit Refrigerant Circuit Refrigerant Circuit Evaporator Evaporator Water Regulating Valve Water Regulating Valve b IM 240DWME IM 240XWME Water cooled b IM 240DWME IM 240XWME Water cooled ...

Page 60: ...Con Con denser denser Bulb Bulb Strainer Strainer Hot Gas Hot Gas Valve Valve Compressor Compressor Water Circuit Water Circuit Refrigerant Circuit Refrigerant Circuit CPR CPR Fan Fan Condenser Unit Condenser Unit Access Access Valve Valve Connecting Connecting Pipe Pipe Insulation Insulation Insulation Insulation Connecting Connecting Pipe Pipe Access Access Valve Valve c IM 240DSME IM 240XSME Re...

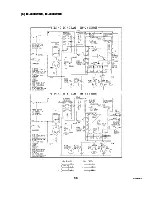
Page 61: ...57 57 E1CG4880210 E1CG4880210 2 WIRING DIAGRAM 2 WIRING DIAGRAM a IM 240DME IM 240XME a IM 240DME IM 240XME ...

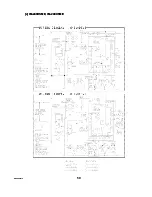
Page 62: ...58 58 E1CG4880210 E1CG4880210 b IM 240DWME IM 240XWME b IM 240DWME IM 240XWME ...

Page 63: ...59 59 E1CG4880210 E1CG4880210 c IM 240DSME IM 240XSME c IM 240DSME IM 240XSME ...

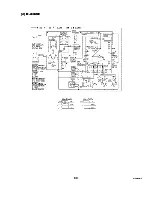
Page 64: ...60 60 E1CG4880210 E1CG4880210 d IM 240AME d IM 240AME ...

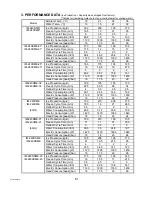
Page 65: ... 34 Defrost Cycle Time min 4 3 5 2 5 2 5 Water Consumption lit h 29 7 24 8 14 5 12 2 Electric Consumption W 1120 1200 1330 1450 IM 240DME 32 IM 240XME 32 Head Pressure peak bar 16 17 5 23 26 Ice Production kg d 190 210 200 175 Freeze Cycle Time min 18 5 19 21 24 5 Defrost Cycle Time min 5 5 3 2 2 Water Consumption lit h 48 5 31 2 20 9 13 9 Electric Consumption W 1420 1470 1600 1640 IM 240DME IM 24...

Page 66: ... IM 240XWME 23 Head Pressure peak bar 19 2 19 2 19 2 19 6 Ice Production kg d 180 170 160 152 Freeze Cycle Time min 23 5 25 27 7 29 3 Defrost Cycle Time min 3 3 2 2 Water Consumption lit h 21 1 20 11 2 10 6 Electric Consumption W 1250 1260 1300 1330 IM 240DWME 32 IM 240XWME 32 Head Pressure peak bar 19 2 19 2 19 2 19 6 Ice Production kg d 210 205 200 180 Freeze Cycle Time min 18 5 19 5 20 5 23 Def...

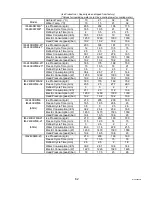
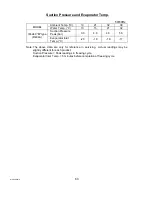
Page 67: ...k bar 3 0 4 0 4 5 5 5 IM 240 M type R404A Evaporator Inlet Temp C 20 19 18 17 Note The above data are only for reference in servicing Actual readings may be slightly different for each product Suction Pressure Peak readings in freezing cycle Evaporator Inlet Temp 5 minutes before completion of freezing cycle E1CG4880210 63 ...

Page 68: ...ee II 2 c BEFORE CHECKING CONTROLLER BOARD i Hot Gas Solenoid Valve 1 Continues to open in freeze cycle and High Temperature Safety Backup Timer operates 1 Check for power OFF in freeze cycle and replace 1 The icemaker will not start j Controller Board 1 Defective 1 See II 2 CONTROLLER BOARD 1 Dirty Air Filter or Condenser 1 Clean 2 Ambient or condenser water temperature too warm water cooled 2 Ch...

Page 69: ...ator Toggle Switch 1 Defective 1 Replace 4 Fan Motor will not run c Thermistor Controller Board 1 See II 2 CONTROLLER BOARD a Water Solenoid Valve 1 Diaphragm does not close 1 Check for water leaks with icemaker OFF 5 Water continues to be supplied in freeze cycle b Controller Board 1 Defective 1 See II 2 CONTROLLER BOARD a Water Supply Line 1 Water pressure too low and water level in Water Tank t...

Page 70: ...tive valve 1 Replace Compressor c Hot Gas Solenoid Valve 1 Continues to open in freeze cycle 1 Check and replace d Actuator Toggle Switch 1 Defective 1 Replace 7 All components run but no ice is produced e Water Supply Line 1 Water supply is off 1 Check for recommended pressure a Wiring 1 Loose connection or broken wire 1 Repair or replace b Actuator Toggle Switch 1 Defective 1 Replace c Actuator ...

Page 71: ...istor Controller Board 1 See II 2 CONTROLLER BOARD g Air Filter Condenser 1 Clogged 1 Clean 1 Freeze cycle time is too long h Fan Motor 1 Running at half speed continuously DME XME only 1 Check Bimetal Thermostat for closed contacts or Relay X6 for welded contacts 1 Scaled up 1 Clean or remove scale Install a water filter or scale treatment a Evaporator 2 Defective 2 Replace b Refrigerant Charge 1...

Page 72: ...ommended pressure a Water Supply Line 2 Clogged 2 Check Strainer and clean 1 High hardness or contains impurities 1 Install a water filter or scale treatment b Water Quality 2 Lime is deposited inside Cooling Water Tubing 2 Clean c Water Valve 1 Clogged 1 Clean d Water System 1 Scaled up 1 Clean or remove scale e Water Plate 1 Jet hole clogged 1 Clean 1 Leaks 1 Replace 2 Bearings worn out 2 Replac...

Page 73: ... out 1 Replace 1 Bearings worn out 1 Replace 2 Fan Blade deformed 2 Replace Fan Blade c Fan Motor 3 Fan Blade does not move freely 3 Replace d Compressor 1 Mounting pad out of position 1 Reinstall 2 Abnormal noise e Refrigerant Lines 1 Rubbing or touching on other surfaces 1 Secure or reset pipes 3 Ice in Storage Bin often melts a Bin Drain 1 Plugged 1 Clean a Bimetal Thermostat 1 Defective 1 Repl...

Page 74: ...otate the Adjust Screw 3 Watch holes of ice cubes produced Standard setting is that Evaporator inlet side and 3 Watch holes of ice cubes produced Standard setting is that Evaporator inlet side and outlet side cubes have almost the same diameters To make the inlet side larger rotate outlet side cubes have almost the same diameters To make the inlet side larger rotate 90 180 clockwise Smaller counte...

Page 75: ...h a pressure gauge to high side line or prepare a thermometer to check Condenser 1 Attach a pressure gauge to high side line or prepare a thermometer to check Condenser drain temperature drain temperature 2 Rotate the Adjust Screw using a flat blade screwdriver so that the pressure gauge shows 2 Rotate the Adjust Screw using a flat blade screwdriver so that the pressure gauge shows 19 bar or the t...

Page 76: ...problem to use the same handy flux Repair of the refrigerant circuit needs brazing It is no problem to use the same handy flux that has been used for the current refrigerants However its entrance into the refrigerant that has been used for the current refrigerants However its entrance into the refrigerant circuit should be avoided as much as possible circuit should be avoided as much as possible 4...

Page 77: ...ced with a proper Access Valve see Fig 45 when recovery is Process Tube to be replaced with a proper Access Valve see Fig 45 when recovery is completed completed The DSME XSME high side can be accessed using the Gauge Port on the Upper Condenser The DSME XSME high side can be accessed using the Gauge Port on the Upper Condenser Line Access Valve liquid return attached to the right side of the icem...

Page 78: ... the low side Note Note Always charge in the liquid stage as many refrigerants are blends and vapour Always charge in the liquid stage as many refrigerants are blends and vapour charging will affect the blend consistency eg R404A charging will affect the blend consistency eg R404A 7 Turn on the icemaker Release the High side 7 Turn on the icemaker Release the High side Access Connector and allow p...

Page 79: ...in position and secure it using the Bolts and Washers 10 Place the Compressor in position and secure it using the Bolts and Washers 11 Remove Plugs from the Compressor Suction and Discharge Pipes 11 Remove Plugs from the Compressor Suction and Discharge Pipes 12 Braze or solder the Access Suction and Discharge lines Do not change this order with 12 Braze or solder the Access Suction and Discharge ...

Page 80: ... the new Drier with the arrow on the Drier in the direction of the refrigerant 6 Braze or solder the new Drier with the arrow on the Drier in the direction of the refrigerant flow Use nitrogen gas at the pressure of 0 2 0 3 bar when brazing tubings flow Use nitrogen gas at the pressure of 0 2 0 3 bar when brazing tubings 7 Check for leaks using nitrogen gas 10 bar and soap bubbles 7 Check for leak...

Page 81: ...rom excessive heat with damp cloths or similar from excessive heat with damp cloths or similar 5 Remove the Expansion Valve Sensor Bulb 5 Remove the Expansion Valve Sensor Bulb 6 Remove the Drier using brazing equipment 6 Remove the Drier using brazing equipment 7 Braze in the new Expansion Valve Protect the body of the valve from excessive heat and 7 Braze in the new Expansion Valve Protect the b...

Page 82: ...der connections on the Evaporator using brazing equipment Protect 5 Disconnect the solder connections on the Evaporator using brazing equipment Protect the Expansion Valve from excessive heat the Expansion Valve from excessive heat 6 Remove four nuts holding the Evaporator 6 Remove four nuts holding the Evaporator 7 Install the new Evaporator and secure it with the Bolts Collars Spacer and Nuts 7 ...

Page 83: ...he valve and Drier using brazing equipment 7 Braze the new Hot Gas Valve with nitrogen gas flowing at the pressure of 0 2 0 3 bar 7 Braze the new Hot Gas Valve with nitrogen gas flowing at the pressure of 0 2 0 3 bar WARNING WARNING Always protect the valve body by using a damp cloth to prevent the valve from Always protect the valve body by using a damp cloth to prevent the valve from overheating...

Page 84: ...s 11 Plug in the icemaker or connect the power source 11 Plug in the icemaker or connect the power source b WHOLE VALVE b WHOLE VALVE IMPORTANT IMPORTANT Always install a new Drier every time the sealed refrigeration system is opened Always install a new Drier every time the sealed refrigeration system is opened Do not replace the Drier until after all other repair or replacement has been Do not r...

Page 85: ...the Capillary Tubes into the Copper Tube 10 Web the Copper Tube end and braze or solder the Copper Tube and Capillary Tubes 10 Web the Copper Tube end and braze or solder the Copper Tube and Capillary Tubes together together 11 Install the new Drier See 3 DRIER 11 Install the new Drier See 3 DRIER 12 Check for leaks using nitrogen gas 10 bar and soap bubbles 12 Check for leaks using nitrogen gas 1...

Page 86: ... Assembly 6 Remove the Water Plate Bracket and the Water Pan Assembly 7 Remove the two Spring Hook Screws from the Water Tank 7 Remove the two Spring Hook Screws from the Water Tank 8 Remove the screws and the Water Plate Bracket 8 Remove the screws and the Water Plate Bracket 9 Remove the Pump Suction and Discharge Tubings 9 Remove the Pump Suction and Discharge Tubings 10 Remove the Pump Motor B...

Page 87: ... 5 Pump Tubing Suction Pump Tubing Suction 6 6 Pump Tubing Discharge Pump Tubing Discharge 7 7 Pump Motor Bracket Pump Motor Bracket 8 8 Water Plate Water Plate 9 9 Overflow Pipe Overflow Pipe 10 10 Thumbscrew for Overflow Pipe Thumbscrew for Overflow Pipe 11 11 Nylon Tie Nylon Tie 12 12 O ring O ring J J Pump Motor Assembly Pump Motor Assembly S1 4 S1 4 Tapping Screw Tapping Screw S5 S5 Machine S...

Page 88: ... Disassemble the Pump Motor and check the Motor or parts 6 Disassemble the Pump Motor and check the Motor or parts 7 Install the new motor or parts in the reverse order of the removal procedure 7 Install the new motor or parts in the reverse order of the removal procedure 8 Plug in the icemaker or connect the power source and check for leaks 8 Plug in the icemaker or connect the power source and c...

Page 89: ...he Clamp 6 Remove the Inlet Hose and Water Valve 6 Remove the Inlet Hose and Water Valve 7 Install the new valve in the reverse order of the removal procedure 7 Install the new valve in the reverse order of the removal procedure 8 Open the water supply tap 8 Open the water supply tap 9 Plug in the icemaker or connect the power source 9 Plug in the icemaker or connect the power source 10 Check for ...

Page 90: ...he Actuator Motor Bracket 7 Remove the Spring Pin securing the Shaft to the Cam Arm 7 Remove the Spring Pin securing the Shaft to the Cam Arm 8 Remove the Actuator Motor 8 Remove the Actuator Motor 9 Install the new Actuator Motor in the reverse order of the removal procedure 9 Install the new Actuator Motor in the reverse order of the removal procedure 10 Check and adjust so that the Cam Arm norm...

Page 91: ...or disconnect the power source 3 Unplug the icemaker or disconnect the power source 4 Remove the Extension Spring from the Cam Arm B 4 Remove the Extension Spring from the Cam Arm B 5 Remove the Split Pin from the Cam Shaft 5 Remove the Split Pin from the Cam Shaft 6 Remove the Cam Arm B 6 Remove the Cam Arm B 7 Install the new Cam in the reverse order of the removal procedure 7 Install the new Ca...

Page 92: ...the Vinyl Cover Bag 4 Cut off the Nylon Tie holding the Vinyl Cover Bag 5 Disconnect the Receptacle of the leads 5 Disconnect the Receptacle of the leads 6 Install the new Actuator Toggle Switch in the reverse order of the removal procedure 6 Install the new Actuator Toggle Switch in the reverse order of the removal procedure Note Be sure to secure the Vinyl Cover Bag Note Be sure to secure the Vi...

Page 93: ...89 89 E1CG4880210 E1CG4880210 Fig 54 Fig 54 ...

Page 94: ...r Bracket 10 10 Cam Shaft Bearing Cam Shaft Bearing 11 11 Spring Pin Spring Pin 13 13 Cam Arm B Cam Arm B 14 14 Cam Shaft Cam Shaft 15 15 Snap Pin Snap Pin 16 16 Split Pin Split Pin 17 17 Spring Spring 18 18 Washer A Washer A 19 19 Washer B Washer B 20 20 Washer C Washer C 21 21 Thermistor Holder Thermistor Holder 22 22 Label for Overflow Pipe Label for Overflow Pipe 23 23 Thermistor Cube Control ...

Page 95: ...on Sheet attached b REPLACEMENT b REPLACEMENT 1 Unplug the icemaker or disconnect the power source 1 Unplug the icemaker or disconnect the power source 2 Remove the Front Panel 2 Remove the Front Panel 3 Remove screws and the Control Box Cover 3 Remove screws and the Control Box Cover 4 Pull the Shield Plate slightly toward you and disconnect the Signal Ground wire 4 Pull the Shield Plate slightly...

Page 96: ...ig 55 Fig 55 Control Box Cover Control Box Cover Pawl Pawl Nylon Tie Nylon Tie Do not cut off Do not cut off Bushing Bushing Base Base Signal Ground Wire Signal Ground Wire Shield Plate Shield Plate Controller Board Controller Board ...

Page 97: ...e the Connector K4 on the Controller Board referring to 14 b REPLACEMENT 4 Unscrew and remove the Thermistor Holder and Thermistor located on the Evaporator 4 Unscrew and remove the Thermistor Holder and Thermistor located on the Evaporator Front Side Front Side 5 Install the new thermistor in the reverse order of the removal procedure by using a sealant 5 Install the new thermistor in the reverse...

Page 98: ...uick Disconnect Terminal from the Surge Absorber 4 Remove the Quick Disconnect Terminal from the Surge Absorber 5 Remove the screw securing the Surge Absorber 5 Remove the screw securing the Surge Absorber 6 Remove the Surge Absorber 6 Remove the Surge Absorber 7 Install the new Surge Absorber in the reverse order of the removal procedure 7 Install the new Surge Absorber in the reverse order of th...

Page 99: ...or connect the power source 18 FAN MOTOR DSME XSME ONLY 18 FAN MOTOR DSME XSME ONLY 1 Unplug the icemaker or disconnect the power source 1 Unplug the icemaker or disconnect the power source 2 Remove the Condenser Cover and Junction Box Cover 2 Remove the Condenser Cover and Junction Box Cover 3 Cut the Fan Motor Leads at the connectors in the Junction Box 3 Cut the Fan Motor Leads at the connector...

Page 100: ...HOSHIZAKI EUROPE LTD HOSHIZAKI EUROPE LTD UNIT A STAFFORD PARK 18 TELFORD UNIT A STAFFORD PARK 18 TELFORD SHROPSHIRE TF3 3DJ ENGLAND SHROPSHIRE TF3 3DJ ENGLAND PHONE 01952 291777 PHONE 01952 291777 ...

Reviews: