


For this section you will need:
Note: The following steps show the assembly of the wing
using one aileron servo. For a 2-servo installation, please
refer to the section “After You Master the NexSTAR in its
Original Form” on page 27.
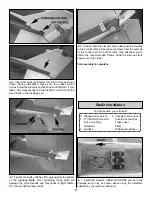
❏
1. Mark a line on the bottom of the wings 1/4" [6mm] from
the end of the tips.
❏
2. Install the Airfoil Extensions on both wings as shown
using 3/4" to 1" [19 to 25mm] heavy duty clear plastic tape.
❏
3. Locate the Spin-Control Airfoil Extension decals on the
decal sheet and apply them to both wings following the
scheme on the top of both wings. Also apply the NexSTAR
decal on the top of the left or right wing.
❏
4. Install the CenterCore wing rib on the right wing using
two #4 x 3/4" [19mm] screws.
❏
5. Install the aileron servo as shown using the hardware
supplied by the manufacturer.
1 Left wing
1 Right wing
2 Airfoil extensions
2 SpeedBrakes training
flaps
1 CenterCore wing rib
1 Steel wing rod
1 Anti-Rotation steel pin
2 Nylon clevises
2 Nylon faslinks
2 Silicone retainers
2 2-56 X 6" [150mm]
pushrods
2 Nylon horns
4 #4 x 3/4" [19mm]
Wood screws
6 #4 x 5/16" [8mm]
Wood screws
1 Standard servo
1 Phillips screwdriver
3/4" to 1" [19 to
25mm] Heavy duty
clear plastic tape
Assemble the Wing
ASSEMBLY
9
Summary of Contents for NexStar ARF
Page 31: ...31 Correct Angle Rods Fin...
Page 32: ...32...


