


❏
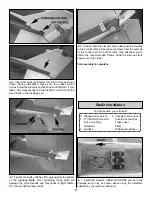
8. Slide one of the main landing gear legs into the landing
gear slot as shown above. Push it in until you hear a “click”
or until it does not slide in any more. Note: The two landing
gear legs are identical, so it does not matter which one you
install on the left side or right side of the airplane.
❏
9. Install the other landing gear leg on the other side of
the fuselage the same way. Once they are both installed,
apply a light force to pull them out. You should not be able
to pull them out. If they do pull out, then push them back in
again until they are secured properly. Note: The legs may fit
a little loose inside the pocket. This is normal as long as you
are not able to pull the landing gear legs out.
Landing gear installation is complete.
Note: Should you ever need to remove the landing gear
from the fuselage, insert a screwdriver into the hole under
the fuselage farther from the leg you want to remove. Apply
light pressure to the tab inside the hole and pull the landing
gear leg out. Once the tab is moved, the screwdriver must
be removed to allow the leg to come all the way out. Do the
same with the other landing gear leg.
Note: If your landing gear does not insert easily in the
fuselage or it does not lock in, clean up any glue or paint
blobs that may be on the gear or in the mounting
mechanism. Insert the gear again and make sure it does
lock in.
Note: If your landing gear legs spread after a hard landing,
remove the legs from the airplane and bend them back to
the correct position with a vise. Do not try to straighten the
legs while installed in the airplane as that may damage the
Snap Gear Landing Gear mechanism.
15
Summary of Contents for NexStar ARF
Page 31: ...31 Correct Angle Rods Fin...
Page 32: ...32...


