


❏
11. Install the nylon horns on the aileron torque rods.
Thread them in until the bottom of the horn is about 1/2"
[12mm] from the wing surface. Connect the clevises to the
horns. Slip the clevis retainers over the clevises.
❏
12. Locate one of the SpeedBrakes Training flaps. There
are three small holes drilled into the trailing edge of the wing
near the center. Install the flap to the wing using three #4 x
1/4" [6mm] screws. The inner end of the flap should align
with the end of the aileron.
❏
13. Install the other flap onto the other wing using three
more #4 x 1/4" [6mm] screws. The wing is now complete.
Note: Install the leading edge extensions and the flaps
for your initial flights. The airplane has been designed
around them and it performs better as a trainer with them
installed. Never attempt to fly the airplane for the first time
without them or with just one of the devices as the model will
be difficult to trim. Do not let anyone’s opinion get in the way.
Install both these devices for your initial flights. If after
a few flights you decide to remove the extensions or flaps,
then read the section “After You Master the NexSTAR in its
Original Form” on page 27.
For this section you will need:
❏
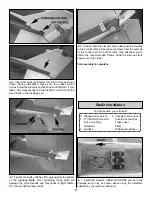
1. Slide the fuel tank into the fuel tank compartment.
Make sure the fuel tubing comes out through the hole in the
firewall. Slide the fuel tank in until the neck of the fuel tank
comes out the firewall as shown above. Use a Phillips
screwdriver to tighten the fuel tank screw and secure the
tank in place.
❏
2. Use four 4mm x 20mm machine screws and four 4mm
washers to install the engine mount as shown above. Use
Great Planes Thread Locking Compound on the machine
screws before you tighten them.
Engine
Fuel tank
Metal engine mount
4 4mm x 20mm Engine
mount machine
screws
IsoSmooth complete
engine mount
4 4mm x 30mm
IsoSmooth engine
mount screws
4 4mm Nuts
8 4mm Washers
4 4mm Lock washers
2-56 x 17-1/2"
[445mm] pushrod.
Phillips screwdriver
Install the Engine
11
Summary of Contents for NexStar ARF
Page 31: ...31 Correct Angle Rods Fin...
Page 32: ...32...


