


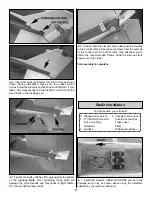


For this section you will need:
❏
1. File two flat spots on the nose gear wire as shown above.
❏
2. Install the nylon nose gear bracket to the firewall using
two 4 x 20mm machine screws and two 4mm flat washers.
Use Great Planes Thread Locking Compound on the
machine screws before tightening them.
❏
3. Place a wheel collar in the nylon steering arm as
shown. Use the 4 x 6mm [1/4"] machine screw on the wheel
collar. Slide the steering pushrod’s “Z” bend through the
hole in the steering arm.
❏
4. Slide the steering arm’s pushrod into its guide tube.
Install the nose landing gear leg through the nylon bracket,
the steering arm and then the engine mount. Tighten the
screw on the steering arm.
❏
5. Install the nose wheel on the nose gear wire. Use two
wheel collars, one on each side of the wheel, to align it and
secure it in place. Apply some Great Planes Thread Locking
Compound to the screws.
❏
6. Install a wheel axle on each aluminum landing gear
leg. File a flat spot near the end of the axle.
❏
7. Install a wheel on each of the axles and then secure
them with a wheel collar. Use some Great Planes Thread
Locking Compound on the screws.
Nose gear wire
Aluminum main gear
(2 parts)
3 Wheels
2 Landing gear axles
1 Nylon nose gear
bracket
2 4mm x 19mm
Machine screws
2 4mm Washers
1 Steering arm
5 4mm Wheel collars
1 Steering pushrod
Phillips screwdriver
Metal file
Landing Gear Installation
14
Summary of Contents for NexStar ARF
Page 31: ...31 Correct Angle Rods Fin...
Page 32: ...32...


