


❏
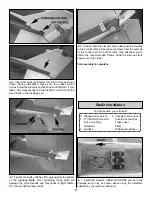
4. Move the throttle stick on the transmitter all the way up.
The carburetor should be fully open.
❏
5. If you are not able to achieve these settings, more or
less movement may be required from the throttle pushrod.
The same as the control surface throws, this is done by
relocating the clevis on the carburetor arm to the other hole,
or by relocating the pushrod connector on the servo arm to
another hole.
DO NOT DISREGARD THIS STEP!
This important step is also referred to as “checking the
C.G.” (center of gravity). Simply stated, the center of gravity
is the point at which the model balances when lifted under
the wing. If the C.G. is too far forward, the model will be
“nose-heavy” and could be difficult to takeoff and land and
lose some of its self-correcting tendencies. If the C.G. is too
far aft, the model will be “tail-heavy” and the controls may be
too sensitive, making the model too difficult to control—
especially for an inexperienced pilot! Follow the instructions
to balance the model correctly, thus giving you the greatest
chances for success!
❏
1. There is a decal with two black lines on the underside
of the wing. Those mark the forward and aft CG limit for the
NexSTAR ARF. The forward CG limit is 3-3/16" [81mm]. The
aft CG limit is 3-9/16" [90mm] from the LE.
❏
2. Make certain the model is in “ready-to-fly” condition
with all components mounted and installed (propeller,
spinner, landing gear, etc.). The fuel tank must be empty.
❏
3. Mount the wing to the fuselage with the nylon wing
bolt. Lift the model on both sides of the fuselage with your
fingertips between the two lines on the bottom of the wing.
❏
4. If the fuselage is level when lifting the model with your
fingers anywhere between the lines, the C.G. is correct.
Proceed to the checklist in the following section. If you cannot
find a spot between the two lines where the airplane balances,
then either one of the following will happen: If the tail drops
when lifting the model, the plane is tail heavy and will require
nose weight to balance. If the nose drops, the plane is nose
heavy and will require tail weight. Do not be concerned if your
model requires a few ounces of nose or tail weight. Almost all
models require additional weight to balance and fly correctly!
If additional weight is required to balance the plane, purchase Great
Planes
®
Self Adhesive Lead Weights (GPMQ4485). The weight is
segmented in 1/4 oz. increments and is easy to work with. If adding
weight to the tail, attach it to the left side of the fuselage (opposite
the muffler) under the stab. If adding weight to the nose, attach it to
the inside of the fuselage side next to the engine.
❏
5. If you found it necessary to add weight, recheck the
C.G. after doing so.
Whether you fly at an R/C club or somewhere on your own, you
should have your name, telephone number, address and AMA
number on or in your model so it can be identified and returned
in case it lands somewhere away from the flying site. Fill out the
I.D. tag found in the back of the manual and use spray adhesive
or tape to stick it in the model.
Identify your Model
Balance the Model
22
Summary of Contents for NexStar ARF
Page 31: ...31 Correct Angle Rods Fin...
Page 32: ...32...


