


❏
3. Install the IsoSmooth rubber boots on the engine
mounting lugs. The IsoSmooth rubber boots have been
designed to fit most .46 size engines. If the boots do not fit
your engine, then you will have to use an alternate method
to install your engine (see below).
❏
4. Use four 4mm x 30mm machine screws, four 4mm
washers, four 4mm lock washers and four 4mm nuts to secure
the engine with the IsoSmooth nylon bracket on the engine
mount. Use Great Planes Thread Locking Compound on the
screws to prevent them from coming loose with vibration.
❏
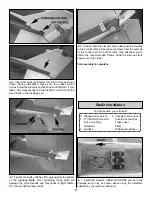
5. Install a clevis and a clevis retainer on the threaded
end of the 17-1/2" [445mm] pushrod. Bend the pushrod
slightly as shown above to clear the engine mounting bolts.
❏
6. Slide the pushrod into the guide tube and then connect
the clevis to the carburetor arm as shown above. Slip the
clevis retainer onto the clevis.
❏
7. Mount the muffler on the engine following your engine
manufacturer’s recommendations. Also, install the glow plug
and connect the fuel lines to the engine. The red line goes
to the pressure tap on the muffler, the green line goes to the
needle valve, and the blue line is the fill line. Cap the fill line
with the aluminum plug supplied.
12
Summary of Contents for NexStar ARF
Page 31: ...31 Correct Angle Rods Fin...
Page 32: ...32...


