


For this section you will need:
Note: It is recommended that you apply the fuselage, stab
and fin decals at this point. It is easier to do when the parts
are all apart.
❏
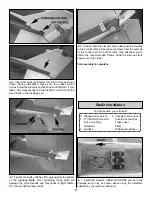
1. Install a nylon clevis and a clevis retainer on the two
steel pushrods. Slide both pushrods into their guide tubes in
the tail of the airplane.
❏
2. Position a nylon control horn on the bottom of the right
elevator all the way against its inner edge. Mark the location
of the control horn mounting holes. Drill through the marks
with a 1/16" [1.6mm] drill bit. Secure the control horn to the
elevator using two #2 x 1/2" [12mm] screws.
❏
3. Position a nylon control horn on the rudder as shown
about 1/8" [3mm] from the bottom edge. Note that one of the
edges of the control horn is aligned with the hinge line of the
rudder. Mark the location of the control horn mounting
holes. Drill through the marks with a 1/16" [1.6mm] drill bit.
Secure the control horn to the rudder using two #2 x 1/2"
[12mm] screws.
❏
4. Insert the horizontal stabilizer into the stab slot as
shown above. Insert the two nylon fin tail bolts half-way into
the bottom fuselage and into the stab to hold it in place.
❏
5. Place the fin over the sketch found on the last page of
the manual and make sure the fin rods are bent at the same
angle as the ones shown on the sketch. This step is critical
to make the fin installation easier.
Stabilizer
Fin
2 Control
horns
4 #2 x 1/2 [12mm]
Screws
2 Nylon tail bolts
2 Nylon
clevises
2 Silicone
clevis
retainers
2 2mm Steel pushrods
Phillips screwdriver
Install the Tail Surfaces
16
Summary of Contents for NexStar ARF
Page 31: ...31 Correct Angle Rods Fin...
Page 32: ...32...


