


Now the plane is assembled, but there are a few things that
must be done before it will be ready to fly. You must carefully
perform all of the following Setup procedures. If possible,
have your flight instructor assist you.
If you have not yet charged the batteries, you may still
proceed. However, as the batteries have not yet been fully
charged, they may not provide enough power to make it all
the way through the setup procedures. If the batteries quit
working, set your tools aside and charge the batteries as
described in the instruction manual for the radio control
system that you are using.
Follow the battery charging instructions that came with your
radio control system to charge the batteries. You should
always charge your transmitter and receiver batteries the
night before you go flying, and at other times as
recommended by the radio manufacturer.
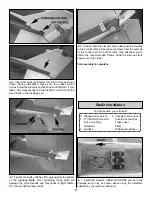
❏
1. Move the right control stick on the transmitter to the
right as shown in the photo. Observe the direction the
ailerons move.
The right aileron should move up and the left aileron should
move down. Moving the control stick to the left should make
the ailerons move the opposite way. If the ailerons do not
respond as described, reverse the direction using the
reversing switch for the aileron on the face of the
transmitter. If necessary, refer to the instructions in your
radio instruction manual to identify and operate the
reversing switch.
❏
2. Move the right stick down and observe the direction the
elevator moves.
Moving the right stick down should make the elevator move
up. Note that moving the elevator stick down moves the
elevator up (which, in flight, pushes the tail down, thus
increasing the angle of the wing and making the model
climb). The best way to keep this in mind is to think in terms
of a pilot in an airplane. He pulls the control stick back to
“pull up” the nose of the plane.
Check Control Direction
CAUTION: Unless the instructions that came with your
radio system state differently, the initial charge on new
transmitter and receiver batteries should be done for 15
hours using the slow-charger that came with the radio
system. This will “condition” the batteries so that the next
charge may be done using the fast-charger of your choice.
If the initial charge is done with a fast-charger, the
batteries may not reach their full capacity and you may be
flying with batteries that are only partially charged.
Charge the Batteries
GET THE MODEL READY TO FLY
20
Summary of Contents for NexStar ARF
Page 31: ...31 Correct Angle Rods Fin...
Page 32: ...32...


