


❏
1. Fuel proof all areas exposed to fuel or exhaust
residue such as the wing saddle area, etc.
❏
2. Check the C.G. according to the measurements
provided in the manual.
❏
3. Be certain the battery and receiver are securely
mounted in the fuse. Simply stuffing them into place
with foam rubber is not sufficient.
❏
4. Extend your receiver antenna and make sure it has
a strain relief inside the fuselage to keep tension off
the solder joint inside the receiver.
❏
5. Use threadlocking compound to secure critical
fasteners such as the set screws that hold the wheel
axles to the struts, screws that hold the carburetor arm
(if applicable), screw-lock pushrod connectors, etc.
❏
6. Add a drop of oil to the axles so the wheels will
turn freely.
❏
7. Make sure all hinges are securely glued in place.
❏
8. Reinforce holes for wood screws with thin CA
where appropriate (servo mounting screws, cowl
mounting screws, etc.).
❏
9. Confirm that all controls operate in the correct direction
and the throws are set up according to the manual.
❏
10. Make sure there are silicone retainers on all the
clevises and that all servo arms are secured to the
servos with the screws included with your radio.
❏
11. Secure connections between servo wires and
Y-connectors or servo extensions, and the
connection between your battery pack and the
on/off switch with vinyl tape, heat shrink tubing or
special clips suitable for that purpose.
❏
12. Make sure any servo extension cords you may
have used do not interfere with other systems
(servo arms, pushrods, etc.).
❏
13. Make sure the fuel lines are connected and are
not kinked.
❏
14. Balance your propeller (and spare propellers).
❏
15. Tighten the propeller nut and spinner.
❏
16. Place your name, address, AMA number and
telephone number on or inside your model.
❏
17. Cycle your receiver battery pack (if necessary) and
make sure it is fully charged.
❏
18. If you wish to photograph your model, do so before
your first flight.
❏
19. Range check your radio when you get to the
flying field.
If you haven't already done so, refer to the Futaba
instruction manual for the radio control system and charge
the batteries in the plane and in the transmitter overnight
the night before you go flying.
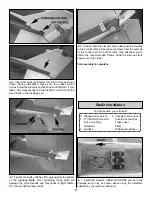
In addition to the equipment required to fuel and start the
engine mentioned near the beginning of the manual, you
should start a collection of tools that may be required for
adjustments and maintenance at the flying field. The
following is a list of the most important items.
Now it's time to do a final check before taking the model to
the field. These checks are best done in the peace and
comfort of your own shop, so take the time now to make
certain your model is ready.
❏
1. Check to see that the screws on the wheel collars that
hold on the wheels are fully tightened.
❏
2. Be certain the silicone retainers on all the nylon
clevises are in position.
❏
3. Make certain the elevator, rudder and ailerons
respond in the correct directions.
❏
4. Make certain the wing is securely joined.
❏
5. Check to see that the fin bolts that hold the fin and
stab in position are present and secure. These may
become slightly loose after the first 10-15 flights.
❏
6. Make certain the propeller and spinner are secure.
❏
7. Make certain you have balanced the model according
to the instructions.
❏
8. Check to see that the screws that hold the servo arms
to the servos are present and secure.
❏
9. Make certain you have filled out the I.D. card and
placed it inside the model.
At-the-Shop Checklist
1 Medium (#1) Phillips
screwdriver
1 Medium (#1) flat
screwdriver
1 5/16" (or 8mm) Socket
wrench (for glow plug)
1 7/16" (or 11mm) Wrench
or crescent wrench (for
propeller nut)
Gather your Tools
FINAL PREPARATIONS
Check List
24
Summary of Contents for NexStar ARF
Page 31: ...31 Correct Angle Rods Fin...
Page 32: ...32...


