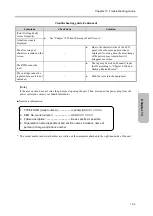
Chapter 13. Troubleshooting Guide
13-2
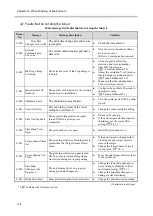
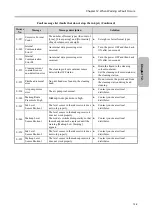
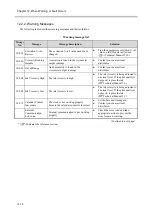
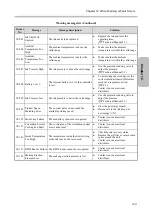
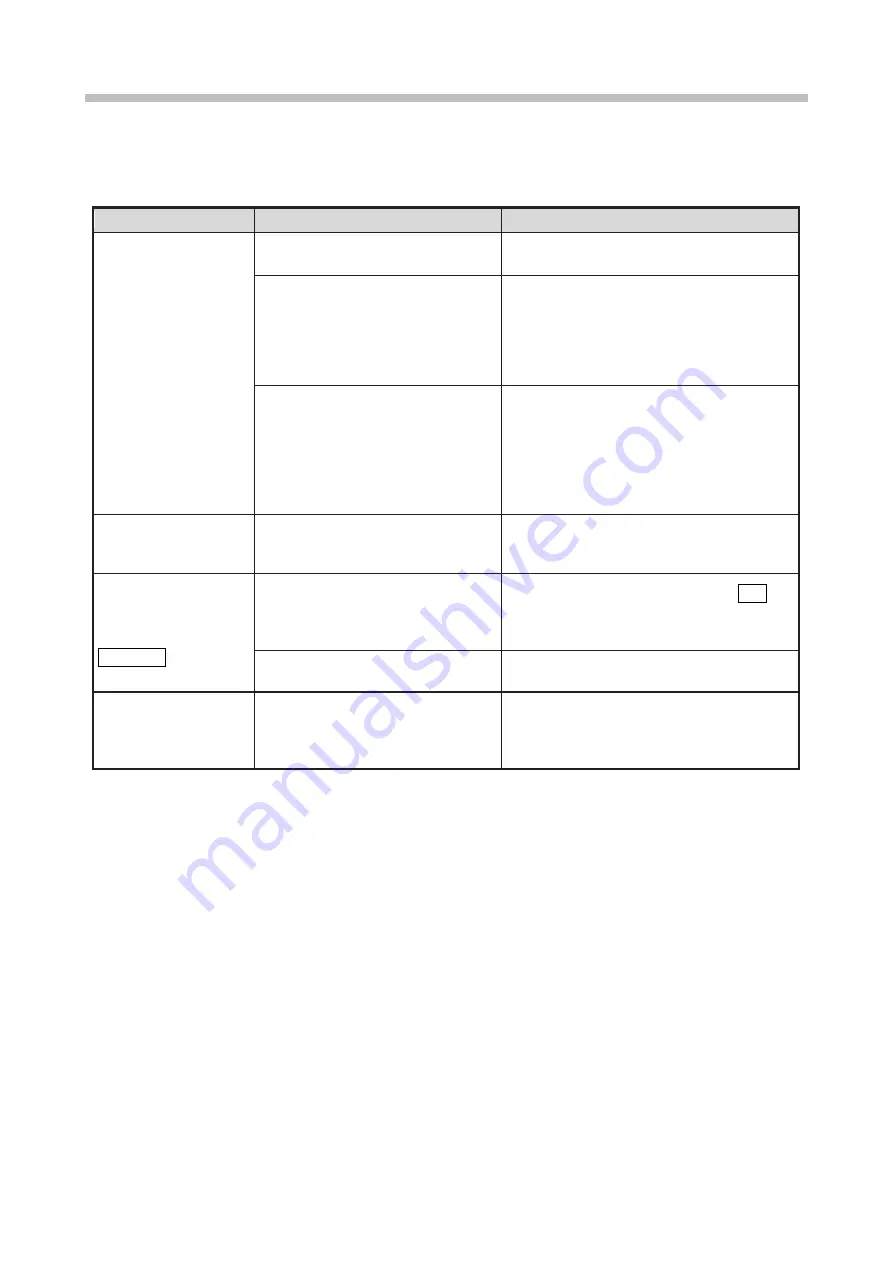
If the unit does not start up normally, check the following before concluding that it is malfunctioning.
Troubleshooting Guide
Symptom
Check item
Solution
The power does not turn
ON by pressing the ON
switch.
●
Check if the main power switch is
ON.
●
Turn ON the main power switch.
●
Check if the power plug is
properly connected to a power
outlet.
●
Check if electrical power is
supplied to the employed power
outlet.
●
Turn OFF the main power switch. Make
sure that power is supplied to the power
outlet, and then connect the power plug to
the power outlet.
●
Check if the status indicator lamp
was not ON when the ON switch
was pressed.
●
Check if the ON switch was
pressed for about two seconds.
●
Make sure that the status indicator lamp is
OFF before pressing the ON switch.
●
Turn OFF the main power switch and ON
it back ON after ten seconds. Then, press
the ON switch.
●
Press the ON switch for about two
seconds.
The printed calendar
time is incorrect.
●
Check if [clock stop] is selected
in [Date/time setup]. (See "9.2.
Setting Date and Time".)
●
Set the current date and time as the
calendar time.
(See "9.2. Setting Date and Time".)
The unit does not
become ready for
printing even when
STARTUP is pressed.
●
Check if there is ink stream
ejection from the nozzle.
●
Check if the ejected ink stream
enters the gutter hole.
●
Stop the ink ejection by pressing Stop.
●
See the Technical Manual "5.5. Stream
alignment" and correct the problem.
●
Check if the print head is dirty.
●
See "1.2.3. Print Head Cleaning" and
clean the print head.
The remote operation
does not work even
when the signal is input.
●
Check if the confirmation window
is displayed.
●
Check if any other screen than
[HOME] is displayed.
●
Close the window and display the
[HOME] screen. Then, input the signal
again.
(Continue to next page)
Summary of Contents for UX2 Series
Page 6: ......
Page 14: ......
Page 17: ...iii ...
Page 24: ......
Page 37: ...2 1 Chapter 2 2 Specifications Chapter 1 Chapter 2 Chapter 3 Chapter 4 Chapter 5 ...
Page 41: ......
Page 42: ...This page is blank ...
Page 53: ......
Page 54: ...This page is blank ...
Page 82: ......
Page 118: ......
Page 156: ...This page is blank ...
Page 205: ...Chapter 7 Auxiliary Functions 7 49 Chapter 7 HOME screen after editing widget ...
Page 206: ...This page is blank ...
Page 228: ...This page is blank ...
Page 247: ......
Page 248: ...This page is blank ...
Page 258: ...This page is blank ...
Page 276: ...This page is blank ...
Page 292: ......
Page 293: ...13 1 Chapter 13 13 Troubleshooting Guide Chapter 13 Chapter 11 Chapter 12 Chapter 14 Appendix ...
Page 296: ...This page is blank ...
Page 297: ...14 1 Chapter 14 14 Emergency Procedures Chapter 14 Chapter 11 Chapter 13 Chapter 12 Appendix ...
Page 299: ......
Page 300: ......

