background image

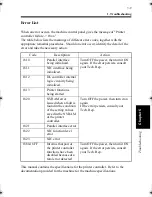
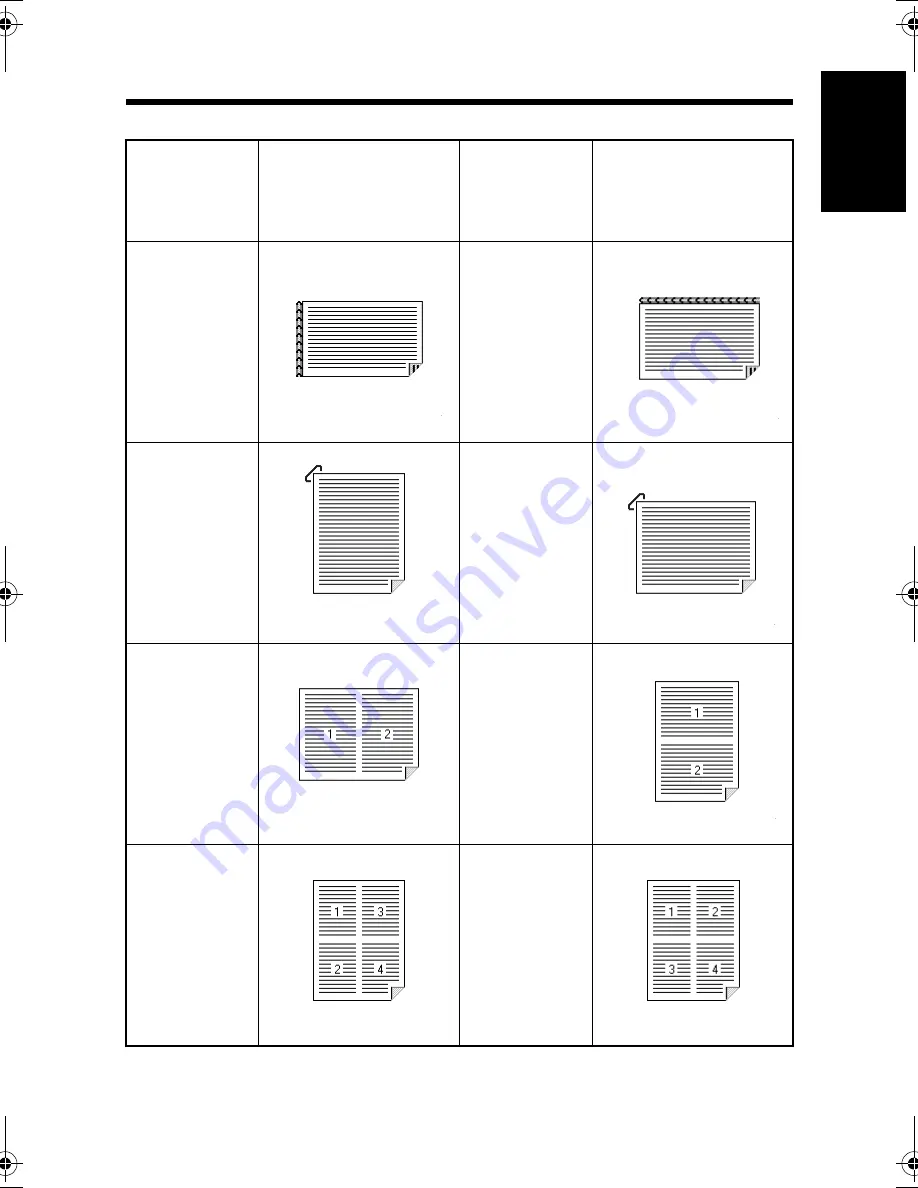
2. Preview Listing

A-5

A

p

pe

nd

ix

 A

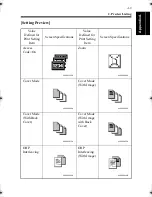
Value 

Defined for 

Print Setting 

Item

Screen Specifications

Value 

Defined for 

Print Setting 

Item

Screen Specifications

DuplexPrint=
Bind Short 
Edge 
Landscape

DuplexPrint=
Bind Long 
Edge 
Landscape

Staple=
Corner 
Portrait

Staple=
Corner 
Landscape

2in1
Portrait

2in1 
Landscape

4in1(Vert)
Portrait

4in1(Horiz)
Portrait

4608P148CA

4608P149CA

4608P071CA

4608P150CA

4608P072CA

4608P183CA

4608P142CA

4608P141CA

win.book  Page 5  Wednesday, January 26, 2000  11:31 AM

Summary of Contents for Hi-35pc

Page 1: ...Printer Driver for Controller User s Manual 1999 Hitachi Koki Imaging Solutions Inc 1757 Tapo Canyon Road Simi Valley CA 93063 December 1999 336872 001 Revision A for Windows ...

Page 2: ...ent Copier DDC DDC 35n and their associated logo marks are trademarks of Hitachi Koki Imaging Solutions Inc Hitachi and the Hitachi logo are trademarks of Hitachi Ltd All rights reserved All other terms and product names may be trademarks or registered trademarks of their respective owners and are hereby acknowledged NOTICE TO USER In an effort to meet the demands of a rapidly changing technology ...

Page 3: ...es necessary When operating the printer controller and machine follow the instructions given in this manual and in the one for the machine Do not attempt to touch any part that is not covered in these manuals Never attempt to disassemble or remodel any pieces of equipment either to prevent possible hazardous conditions Some of the screens shown in this manual may look different from what you will ...

Page 4: ...chnology equipment ITE EN61000 3 2 1995 Electromagnetic compatibility EMC Part 3 Limits Section 2 Limits for harmonic current emissions equipment input current 16A per phase EN 50 082 1 1992 Electromagnetic compatibility Generic immunity standard Part1 Residential commercial and light industry IEC 801 2 1991 Electrostatic discharge requirement IEC 801 3 1984 Radiated electromagnetic field requirem...

Page 5: ...3 Test Print p 2 9 Making General Settings Before Using the Printer p 2 10 Displaying a Property Sheet p 2 11 Displaying a Property Sheet from the Printer Folder p 2 11 Displaying a Property Sheet from an Application Menu p 2 11 General Property Sheet p 2 13 Details Property Sheet p 2 14 Sharing Property Sheet p 2 15 2 Windows NT4 0 Operating Environment p 2 16 Installation p 2 17 Test Print p 2 2...

Page 6: ...perty Sheet 1 Property Sheets Property Sheets p 3 2 2 Device Option Property Sheet Functions of the Device Option Property Sheet p 3 3 3 Paper Property Sheet Functions of the Paper Property Sheet p 3 5 Security Dialog Box p 3 13 4 Advanced Property Sheet Functions of the Advanced Property Sheet p 3 14 Watermark Dialog Box p 3 19 5 Graphics Property Sheet Functions of the Graphics Property Sheet p ...

Page 7: ...sing the Copy Track Function Overview p 4 18 Procedure p 4 18 9 Printing Pages with a Distribution Number Overview p 4 24 Procedure p 4 24 10 Printing Pages with Watermarks Overview p 4 26 Procedure p 4 26 11 Printing on OHP Transparencies Overview p 4 29 Procedure p 4 29 12 Adding a Cover to Each Copy Set Overview p 4 31 Procedure p 4 31 13 Using the Lock Job Function Overview p 4 33 Procedure on...

Page 8: ...t Quality p 5 8 Error List p 5 9 Appendix A 1 Function Combination Matrix Function Combination Matrix p A 2 2 Preview Listing Paper Preview p A 4 Machine Preview p A 7 Setting Preview p A 9 3 Specifications Specifications p A 11 Font p A 13 Symbol Sets p A 15 Selectable Paper Sizes p A 16 Appendix B 1 Glossary Glossary p B 2 Appendix C 1 INDEX INDEX p C 2 ...

Page 9: ...Before Using the Printer Controller Chapter 1 1 1 Chapter 1 Before Using the Printer Controller ...

Page 10: ...mputer screen NOTE When using the printer controller be sure to set the machine in the On Line state Some functions offered by the machine cannot be combined such as Staple and Hole Punch and others may not be used because of a paper size involved The functions that cannot be selected either appear dimmed or appended with a before the menu option Further if functions that are incompatible with eac...

Page 11: ...ides of a single sheet of paper Enlarges or reduces the image on the original Prints two pages or four pages of originals on a single sheet of paper Prints four pages of originals to both front and back sides of a single sheet of paper 4608O008AA 4608O009AA Bind Long Edge Bind Short Edge 1149O004AA 1155O007AA 4608O010AA 2in1 4in1 4608O011AB ...

Page 12: ...inals stapled together or punched for filing By combining Sort or Group with other finishing capabilities you can make complete sets of documents for immediate delivery without having to do any further processing Adds a reference number Distribution Number to each document set during printing 4608O001AA 4608O012AB 4608O026DA 4608O014AC 4608O027DA 1166O114AA ...

Page 13: ... same contents as those on the OHP transparencies Administrative Functions Different accounts can be managed for printing records just as when using the machine as a copier The setting of 100 accounts or 1000 accounts depends on the setting made on the machine Printing of confidential documents may be withheld until a legitimate password is entered on the machine About PCL5e and PCL6 In PCL6 graph...

Page 14: ...acintosh 4608D018AA 4608O017AA 4608O019AA 4608O018AA Printer Controller Allows you to use the machine as a printer controlled by your personal computer Memory 32MB 64MB Option Expands the memory capacity of Hi 35pc Hard Disk Drive Option For downloading PS fonts for the exclusive use in Macintosh NIC Board Option Allows you to use the machine as a printer in a network environment 10 100BaseT 10Bas...

Page 15: ...ller is connected to the machine with the engine interface cable and to the computer with a printer cable or network cable Power to the printer controller is supplied from the machine NOTE Do not connect any peripheral devices to the engine interface cable that is used to connect the printer controller to the machine TIP If you cannot print from your computer check that the engine interface cable ...

Page 16: ... a printer The machine starts the print cycle before it completes receiving the entire data of a particular print job On receiving the data for one page the machine starts printing accepting no other job for copying This means that less time is available to you for copying but you do not have to wait long before a particular print job is done On Line This function is the same as that available in ...

Page 17: ...4 Settings Made on the Machine 1 9 Before Using the Printer Controller Chapter 1 Refer to the Test Print Outputs 4608O028CA ...

Page 18: ...ows NT 4 0 printer drivers Digital Copier 35cpm PCL5e PCL6 PostScript Windows 3 1 printer drivers Digital Copier 35cpm PCL5e PCL6 PostScript Windows NT 3 51 printer drivers Digital Copier 35cpm PCL5e PostScript Macintosh printer drivers Install the printer driver suitable for the operating system that runs on your computer For the installation procedures see the relevant page as detailed below Ins...

Page 19: ...Installing the Printer Driver Chapter 2 2 1 Chapter 2 Installing the Printer Driver ...

Page 20: ...ws NT 4 0 printer driver see p 2 16 Windows 3 1 For the operating environment and installation procedure for the Windows 3 1 printer driver see p 2 32 Windows NT 3 51 For the operating environment and installation procedure for the Windows NT 3 51 printer driver see p 2 39 Personal computer IBM PC or a compatible with an i486DX or higher CPU Operating system Windows 95 English Memory 8MB or more I...

Page 21: ...starting to install the printer driver be sure first to quit all applications TIP The following procedure assumes that the machine is a Digital Copier 35cpm and the printer driver is PCL5e 1 Click the Start button From the menu that appears select Settings then click Printers 2 The Printers window will appear Double click the Add Printer icon 4608P001CD 4608P002CB ...

Page 22: ...r 2 3 The Add Printer Wizard will appear Click the Next button 4 A window will appear asking how the printer is to be connected If your computer is directly connected to the machine select Local printer and then click the Next button 4608P003CB 4608P004CB ...

Page 23: ...ected to a network select Network printer and click the Next button Then a window will appear prompting you to enter the network path so enter the path 5 A window will appear prompting you to select the manufacturer and model of your printer Click the Have Disk button on the lower right part of the screen 6 The Install From Disk dialog box will appear Install the printer controller driver CD ROM t...

Page 24: ...Copy manufacturer s file from box As an example the CD ROM drive is drive I Click the OK button To install PCL5e I Win95 PCL5e To install PCL6 I Win95 PCL6 To install PS I Win95 PS 8 A Printers list appears Select the driver to be installed and click the Next button 4608P190CA 4608P194CA ...

Page 25: ... printer cable has been connected then click the Next button 10 A window that asks you to confirm the printer name will appear Check the printer name If you want to change the printer name to one that is easy to remember change it in this step If you want to designate this printer as the default printer select Yes Click the Next button 4608P008CB 4608P195CA ...

Page 26: ...ect No It is recommended that a test page be printed to ensure that the printer driver has been installed properly Now click the Finish button 12 Installation will start When all the files have been copied from the floppy disk the corresponding icon will be added to the Printers window This completes the installation 4608P010CB 4608P196CA ...

Page 27: ...ng the Printer Driver Chapter 2 Test Print If Yes recommended has been selected in step 11 to specify printing of a test page test printing starts Check that the printer name is correct Refer to the Test Print Output 4608O029CA ...

Page 28: ...ng that you do not usually bother to change them Some items must however be changed in the following cases For the details of Device Option see Chapter 3 Cases where changes are necessary Applicable property sheets Ref page You want to add a comment to distinguish the printer from others General p 2 13 The computer s connecting port has been changed You want to change the conditions for the displa...

Page 29: ...od is mainly used when there will be no big changes in the settings once made such as Device Option It allows you to set the environment in which you will use the printer The settings made through this method are valid in all applications Displaying a Property Sheet from an Application Menu 1 Select Print from the File menu of the application 2 Check that the Name of the Printer is Digital Copier ...

Page 30: ...he Printer Driver Chapter 2 NOTES The steps to display a property sheet may be different depending on the application Follow the correct procedure according to the application The procedure above is based on the application WordPad ...

Page 31: ... sheet is commonly available to the Windows 95 based printer drivers There is no need of making changes in settings for ordinary operating environments See Windows 95 Help for more details NOTE If Separator page is specified a separator page can be inserted between multiple print jobs 4608P197CA ...

Page 32: ...r Chapter 2 Details Property Sheet This property sheet is commonly available to the Windows 95 based printer drivers There is no need of making changes in settings for ordinary operating environments See Windows 95 Help for more details 4608P198CA ...

Page 33: ...ty sheet is commonly available to the Windows 95 based printer drivers It allows you to make settings for sharing a printer among different users It is displayed only when a Windows 95 based printer is being used over the network For more details see Windows 95 Help for more details 4608P199CA ...

Page 34: ...ows 95 printer driver see p 2 2 Windows 3 1 For the operating environment and installation procedure for the Windows 3 1 printer driver see p 2 32 Windows NT 3 51 For the operating environment and installation procedure for the Windows NT 3 51 printer driver see p 2 39 Personal computer IBM PC or a compatible with an i486DX or higher CPU Operating system Windows NT 4 0 English Memory 8MB or more I...

Page 35: ...ore starting to install the printer driver be sure first to quit all applications TIP The following procedure assumes that the machine is a Digital Copier 35cpm and the printer driver is PCL5e 1 Click the Start button From the menu that appears select Settings then click Printers 2 The Printers window will appear Double click the Add Printer icon 4608P038CC 4608P002CB ...

Page 36: ...If the printer is connected via a network printer server select Network printer server NOTE When installing the printer driver in a computer connected to the machine via a network be sure to consult the network administrator 4 Click the Next button 5 Select the name of the port to be used and click the Next button 4608P039CA 4608P040CA ...

Page 37: ...ct the manufacturer and model of your printer Click the Have Disk button on the lower right part of the screen 7 The Install From Disk dialog box will appear Install the printer controller driver CD ROM that is included with the printer controller in the CD ROM drive of your computer 4608P041CA 4608P006CA ...

Page 38: ...he Copy manufacturer s file from box As an example the CD ROM drive is drive I Click the OK button To install PCL5e I NT40 PCL5e To install PCL6 I NT40 PCL6 To install PS I NT40 PS 9 A Printers list appears Select the driver to be installed and click the Next button 4608P191CB 4608P200CA ...

Page 39: ...r name that is displayed change the Printer name on this screen If not leave it as is Click the Next button 11 If you share the printer with other users select Shared and type the share name in the box to the right of Share Name If not select Not shared Click the Next button 4608P201CA 4608P043CA ...

Page 40: ...No It is recommended that a test page be printed to ensure that the printer driver has been installed properly As the last step click the Finish button 13 Installation will start When all the files have been copied from the floppy disk the corresponding icon will be added to the Printers window This completes the installation 4608P044CA 4608P196CA ...

Page 41: ...ing the Printer Driver Chapter 2 Test Print If Yes recommended has been selected in the step to specify printing of a test page test printing starts Check that the printer name is correct Refer to the Test Print Output 4608O030CA ...

Page 42: ...following cases For the details of Device Option see Chapter 3 Cases where changes are necessary Applicable property sheet Ref page You want to add a comment to distinguish the printer from others General p 2 27 The computer s connecting port has been changed You want to change the conditions for the display of a timeout error You want to designate a port to which the machine is connected via a ne...

Page 43: ...ice Option 3 Click Document Defaults from the menu that will then appear This opens the Digital Copier 35cpm PCL5e Default This method is mainly used when there will be no big changes in the settings once made such as Device Option It allows you to set the environment in which you will use the printer The settings made through this method are valid in all applications Displaying a Property Sheet f...

Page 44: ...of the screen NOTES The steps to display a property sheet may be different depending on the application Follow the correct procedure according to the application The procedure above is based on the application WordPad With PostScript the contents are different between when the property sheet is accessed from Print Manager and when accessed from an application ...

Page 45: ...eet is commonly available to the Windows NT 4 0 based printer drivers There is no need of making changes in settings for ordinary operating environments See Windows NT 4 0 Help for more details NOTE If Separator page is specified a separator page can be inserted between multiple print jobs 4608P202CA ...

Page 46: ... Chapter 2 Ports Property Sheet This property sheet is commonly available to the Windows NT 4 0 based printer drivers There is no need of making changes in settings for ordinary operating environments See Windows NT 4 0 Help for more details 4608P203CA ...

Page 47: ...apter 2 Scheduling Property Sheet This property sheet is commonly available to the Windows NT 4 0 based printer drivers There is no need of making changes in settings for ordinary operating environments See Windows NT 4 0 Help for more details 4608P204CA ...

Page 48: ...Chapter 2 Sharing Property Sheet This property sheet is commonly available to the Windows NT 4 0 based printer drivers There is no need of making changes in settings for ordinary operating environments See Windows NT 4 0 Help for more details 4608P205CA ...

Page 49: ...hapter 2 Security Property Sheet This property sheet is commonly available to the Windows NT 4 0 based printer drivers There is no need of making changes in settings for ordinary operating environments See Windows NT 4 0 Help for more details 4608P206CA ...

Page 50: ...inter driver see p 2 2 Windows NT 4 0 For the operating environment and installation procedure for the Windows NT 4 0 printer driver see p 2 16 Windows NT 3 51 For the operating environment and installation procedure for the Windows NT 3 51 printer driver see p 2 39 Personal computer IBM PC or compatible with an i486DX or higher CPU Operating system Windows 3 1 English Memory 8MB or more I O inter...

Page 51: ...E Before starting to install the printer driver be sure first to quit all applications TIP The following procedure assumes that the machine is a Digital Copier 35cpm and the printer driver is PCL5e 1 Double click the Print Manager icon in the Main group 2 The Print Manager dialog box will appear Select Printer Setup from the Options menu 4608P127CA 4608P128CB ...

Page 52: ...rs dialog box will appear Select Install Unlisted or Updated Printer and click the Install button 4 The Install Driver dialog box will appear Install the printer controller driver CD ROM that is included with the printer controller in the CD ROM drive of your computer 4608P129CA 4608P119CA ...

Page 53: ...Driver dialog box As an example the CD ROM drive is drive I Click the OK button To install PCL5e I Win31 PCL5e To install PCL6 I Win31 PCL6 To install PS I Win31 PS 6 The List of Printers appears Select the driver to be installed and click the OK button 7 Installation will start 4608P192CB 4608P207CA ...

Page 54: ... Installing the Printer Driver Chapter 2 When installation is completed the corresponding icon will be added to the Installed Printers list of the Printers dialog box This completes the installation procedure 4608P208CA ...

Page 55: ... Setup button to show the property sheet This method is mainly used when there will be no big changes in the settings once made such as Device Option It allows you to set the environment in which you will use the printer The settings made by showing the property sheet from the control panel are valid in all applications Displaying a Property Sheet from an Application Menu 1 Select Print Setup from...

Page 56: ...ES The steps to display a property sheet may be different depending on the application Follow the correct procedure according to the application The settings made on the property sheet accessed through the application are valid only for that particular application ...

Page 57: ...dows 95 printer driver see p 2 2 Windows NT 4 0 For the operating environment and installation procedure for the Windows NT 4 0 printer driver see p 2 16 Windows 3 1 For the operating environment and installation procedure for the Windows 3 1 printer driver see p 2 32 Personal computer IBM PC or a compatible with an i486DX or higher CPU Operating system Windows NT 3 51 English Memory 8MB or more I...

Page 58: ...ore starting to install the printer driver be sure first to quit all applications TIP The following procedure assumes that the machine is a Digital Copier 35cpm and the printer driver is PCL5e 1 Double click the Print Manager icon which is located in the Main group within the Windows NT 3 51 Program Manager 2 The Print Manager dialog box will appear 4608P099CA 4608P100CA ...

Page 59: ...t Create Printer from the Printer menu If the printer is connected via a network printer server select Connect to Printer NOTE When installing the printer driver in a computer connected to the machine via a network be sure to consult the network administrator 4 The Create Printer dialog box will appear 4608P101CA 4608P102CA ...

Page 60: ...stall the printer controller driver CD ROM that is included with the printer controller in the CD ROM drive of your computer and change the drive name to the CD ROM drive 7 Type the driver on the Install Driver dialog box As an example the CD ROM drive is drive I Click the OK button To install PCL5e I NT351 PCL5e To install PS I NT351 PS 4608P103CA 4608P104CA 4608P193CB ...

Page 61: ...e Printer Driver Chapter 2 8 A Printer Driver list appears Select the driver to be installed and click the OK button 9 The printer driver name selected is displayed in the Driver box on the Create Printer dialog box 4608P209CA 4608P210CA ...

Page 62: ...the Printer Driver Chapter 2 10 Type any desired printer name in the Printer Name edit box and click the OK button 11 The Device Option property sheet will appear Make the necessary settings and click the OK button 4608P211CA 4608P225CA ...

Page 63: ...4 Windows NT 3 51 2 45 Installing the Printer Driver Chapter 2 12 The installed printer driver window will be added to Print Manager This completes the installation 4608P212CA ...

Page 64: ... be opened from it The most common settings have already been made when the printer driver is installed meaning that you do not usually bother to change them Some items must however be changed in the following cases For the details of Device Option see Chapter 3 Cases where changes are necessary Applicable property sheet Ref page The name of the printer to be used is not Digital Copier 35cpm PCL5e...

Page 65: ...utton To display a screen other than Device Option 5 Click the Details button 6 Click the Job Defaults button This method is mainly used when there will be no big changes in the settings once made such as Device Option It allows you to set the environment in which you will use the printer The settings made by showing the property sheet from Print Manager are valid in all applications Displaying a ...

Page 66: ...cedure according to the application The PostScript property sheet of the PostScript driver may be accessed by either one of the following three ways 1 click the Print Manager icon then choose Properties and then Setup 2 clock the Print Manger icon then choose Properties Details and then Job Default or 3 through the application Note that the contents of the screen accessed through approaches 2 and ...

Page 67: ...apter 2 Printer Properties Dialog Box This dialog box is commonly available to the Windows NT 3 51 based printer drivers There is no need of making changes in settings for ordinary operating environments See Windows NT 3 51 Help for more details 4608P213CA ...

Page 68: ...Chapter 2 Printer Details Dialog Box This dialog box is commonly available to the Windows NT 3 51 based printer drivers There is no need of making changes in settings for ordinary operating environments See Windows NT 3 51 Help for more details 4608P144CA ...

Page 69: ...3 1 Property Sheet Chapter 3 Chapter 3 Property Sheet ...

Page 70: ...o make basic printer settings such as the number of copies paper size print orientation and the paper source loaded with the paper for printing It allows you to set enhanced printer functions such as duplex printing N in 1 printing print zoom ratio and booklet creation It further allows you to set finishing capabilities including sort staple and hole punch when you need to make multiple complete s...

Page 71: ...function properly or printing cannot be performed correctly The settings should match the machine configuration 1 Installed Drawer Set the drawer installed in the machine If the bottommost Drawer is the LCC select LCC instead of Drawer 3 or Drawer 4 Setting values Drawer 1 2 Drawer 1 2 3 Drawer 1 2 3 4 Drawer 1 2 3 4 5 Drawer 1 2 LCC Drawer 1 2 3 LCC 2 Duplex Unit Set whether the Duplex Unit is in...

Page 72: ...figured with the system 5 Mail Bin Name If the machine is equipped with a Mailbin Finisher you can name each bin Setting values 1 to 8 characters 6 Displays the machine preview that represents the configuration of the machine and options For preview listing see p A 7 7 User Name The user name up to eight characters set in the printer driver is displayed as the job user name on the machine s Touch ...

Page 73: ...unction the Copy Track function must be enabled in the machine When the Copy Track function is enabled in the machine printing may not be effected unless the correct access number authorized by the machine is entered in Access Number of Security For more details see p 3 13 2 Paper preview Displays the text as it will appear when printed on a sheet of paper It helps you visualize how N in 1 duplex ...

Page 74: ...to be used by the machine Available options are limited depending on the type of paper source mounted in the machine Auto Automatically selects the paper source in which paper of the size specified by Paper Size is loaded Drawer 1 to Drawer 5 LCC Prints on paper loaded in the specified paper source Drawer Bypass Prints on paper loaded in the Multi Bypass Tray NOTES It is possible that an option ca...

Page 75: ...he finishing option type is set with Device Option The machine preview shows the exit tray to be used 6 Collate Select whether printed pages are to be sorted into copy sets when printing more than one copy of the same document Collated Sorts pages into copy sets For instance when printing 5 sets of a document consisting of 10 pages printed pages are sorted by copy i e 5 sets of a 10 page document ...

Page 76: ...r source and exit tray For a listing of machine preview formats see p A 7 8 Hole Punch when Finisher or Mailbin Finisher is mounted Select whether to punch holes in the printed pages None Does not punch holes Short Edge Punches holes along the short edge of the document Long Edge Punches holes along the long edge of the document NOTES It is possible that no holes are made depending on the paper si...

Page 77: ...n is determined according to the direction of the first page It is possible that an option cannot be selected depending on the paper size For details see the Operator s Manual of the machine TIP The print preview allows you to check for the stapling position 10 Setting preview Displays the icons corresponding to the settings made for the printer driver It allows you to identify which functions are...

Page 78: ...wed on the paper preview None Does not perform duplex printing Bind Short Edge Prints on both sides of each page so that the printed pages can be bound along the short edge Bind Long Edge Prints on both sides of each page so that the printed pages can be bound along the long edge TIPS The paper sizes that permit Duplex Print are Ledger 11 x14 Legal Letter Executive A3 A4 A5 B4 B5 FLS1 FLS2 FLS3 an...

Page 79: ...er Zoom Prints at an enlargement or reduction Booklet Prints four pages to both sides of a single sheet of paper so that the output page can be folded at the center to form a booklet NOTES When a document that contains pages of different size and orientation from the rest is printed by Booklet void or overlapped image could result TIP The paper preview displays the printout layout 15 Paper Specify...

Page 80: ... Shift Tray Job Tray 1st 2nd Tray Finisher Top Offset Tray Mailbin Finisher Top Offset Tray Finishing Collate Collated Hole Punch None Staple None Copies 1 Orientation Portrait Duplex Print None Layout Form 1in1 Paper A4 TIPS For the defaults in the Advanced Graphics and PostScript property sheets see Restore Defaults of the corresponding property sheet For the defaults of the PostScript property ...

Page 81: ...ransmission When Access Code is used printing may not be effected unless the access number has been correctly set It is possible by using the utility that comes with the NIC Board option to check on the personal computer screen to see whether the job has been canceled or not Displaying the Security Dialog Box Windows 95 The dialog box appears when the OK key is clicked on the Printer dialog box if...

Page 82: ...r each set of prints Print page designation Select whether the distribution number is to be printed on the first page only or every page Setting values 1st Page Only All Pages Image Density Set the image density of the distribution numbers Setting values Normal Darker Lighter Starting Number Specify the starting distribution number Setting range 001 to 999 NOTE When this function is used in combin...

Page 83: ...PY DRAFT FILE COPY FINAL PROOF TOP SECRET WaterMark1 WaterMark5 Edit button Displays the Watermark dialog box that allows you to set the style or position of the watermark For more details see p 3 19 NOTE When this function is used in combination with Cover Mode and if With Image is not selected under Cover Mode and 1st Paper Only is selected under this function the watermark is printed on the sec...

Page 84: ...rleaving Paper Source Select the paper source from which to feed interleaves Setting values Drawer 1 to Drawer 5 LCC with Image Select this box if you want the OHP data printed on the interleaves NOTES Set 1 in Copies when using OHP Interleaving The same paper source cannot be selected for OHP Paper Source and Interleaving Paper Source Applicable paper sizes are A4 B5 TIPS The machine preview show...

Page 85: ...CC with Image Select this box if you want data printed on the front cover with Back Cover Select this box if you want a back cover NOTE If thick paper or other special paper is selected the machine may not feed prints out into the selected exit tray TIPS No data will be printed on the back cover if selected even when you select to print data on the front cover The machine preview shows the paper s...

Page 86: ...Only Text CONFIDENTIAL OHP Interleaving Off OHP Paper Source Drawer1 Interleaving Paper Source Drawer2 with Image Off Cover Mode Off Paper Source Drawer1 Front Cover Paper Source Drawer1 with Image Off with Back Cover Off TIPS For the defaults in the Paper Graphics and PostScript property sheets see Restore Defaults of the corresponding property sheet For the defaults of the PostScript property sh...

Page 87: ...able 5 Watermark1 to Watermark5 No of characters Within 63 TIP Only the text for Watermark1 to Watermark5 can be edited The set phrases of CONFIDENTIAL COPY DRAFT FILE COPY FINAL PROOF and TOP SECRET cannot be edited 2 Fonts Specify the font of the text to be printed as the watermark When PCL5e is being used with Windows 95 3 1 or NT 4 0 select one from among those installed in the OS PC fonts Whe...

Page 88: ...s the watermark The specified angle can be viewed in the print preview on the right Setting value 90 to 90 clockwise 0 horizontal counterclockwise 7 Position Specify the position of the text to be printed as the watermark Automatically Center Watermark Prints the watermark at the center of the page Position Relative to Center Prints the watermark at a position defined by the numerical values enter...

Page 89: ...cs Property Sheet Property Sheet for PCL5e 1 Graphics Mode Select the graphic image type either vector or raster Use Vector Graphics Transmits the data as vector graphics Use Raster Graphics Expands vector graphics data to transmit bit mapped graphics data NOTE Use Raster Graphics cannot be used in 2in1 4in1 Zoom and Booklet 2 Resolution Select the desired print resolution Setting value 600 dpi 46...

Page 90: ...nsmits the data in the outline format if the corresponding font is not available Download as Bitmap Transmits the data in bit map format if the corresponding font is not available NOTE This setting is valid if Print as Graphics image is OFF 5 Print text as graphics image Transmits all data in the bit map format 6 Restore Defaults Resets all settings on the Paper Advanced and Graphics property shee...

Page 91: ...he description for the PCL5e version 7 Halftone Allows you to select the desired gray scale dithering method Normal Does not perform dithering Print results will have no gray gradation Line Art Performs dithering using lines Select this option if the document contains clear borders between white black and gray shadings like line drawings 4608P218CA 2 7 4 8 ...

Page 92: ...he defaults Graphics property sheet Resolution 600 dpi Halftone Normal TrueType Fonts Download as Outline TIP For the defaults in the Paper Advanced and PostScript property sheets see Restore Defaults of the corresponding property sheet Property Sheet for Windows 95 3 1 PS 2 Resolution See the description for the PCL5e version 4608P219CB 2 9 10 12 11 ...

Page 93: ...Usually use the default values 10 TrueType fonts Send TrueType fonts to printer according to the font Transmits TrueType fonts according to table correspondence Edit the table Only when opened from the control panel Displays a screen on which the system fonts Device fonts are assigned to the PC fonts TrueType fonts Always use built in printer fonts instead of TrueType fonts Uses the printer fonts ...

Page 94: ...Resolution 600 dpi Halftone Use Printer s settings Screen frequency 60 Screen Angle 45 TrueType Fonts Send True Type fonts to printer according to the font Special Negative Image Off Mirror Image Off TIP For the defaults in the Paper Advanced and PostScript property sheets see Restore Defaults of the corresponding property sheet Property Sheet for Windows NT 4 0 NT 3 51 PS 4608P220CA 2 13 14 15 11...

Page 95: ...ansmits TrueType fonts according to table correspondence Always use TrueType fonts Transmits the TrueType fonts at all times 15 Restore Defaults Resets all settings on the Paper Advanced Graphics and PostScript property sheets to the defaults Graphics property sheet Resolution 600 dpi TrueType Fonts Send True Type font to printer according to the font Special Negative Image Off Mirror Image Off TI...

Page 96: ...s for faster printing process Encapsulated PostScript EPS Describes an image or page contained within a file and places the file within another application for printing 2 PostScript header Set the method of transmitting the header Download header with each print job Transmits header information for each print job It is recommended when sharing a network printer Assume header is downloaded and reta...

Page 97: ...sion Specify whether to perform bitmap compression or not Compress bitmap image Transmits graphics data after compressing it No bitmap compression Transmits graphics data without compressing it 7 Restore Defaults Resets all settings made on the Paper Advanced Graphics and PostScript property sheets to the defaults PostScript property sheet PostScript output format PostScript PostScript header Down...

Page 98: ...ed from a Windows NT 4 0 NT 3 51 PS application 1 PostScript Output Format See the Windows 95 3 1 PS version 2 PostScript Header See the Windows 95 3 1 PS version 3 Ctrl D See the Windows 95 3 1 PS version 6 Bitmap Compression See the Windows 95 3 1 PS version 4608P222CA 1 2 8 6 3 ...

Page 99: ...stScript Output Format PostScript PostScript Header Download header with each print job Ctrl D Send CTRL D before job Off Send CTRL D after job Off Bitmap Compression Compress bitmap images TIP For the defaults in the Paper Advanced and Graphics property sheets see Restore Defaults of the corresponding property sheet Property sheet accessed from a Windows NT 4 0 NT 3 51 PS control panel 4608P223CA...

Page 100: ... fonts A shorter printing time results since the TrueType fonts are not downloaded at printing There may however be some discrepancies in fonts between what you see on the screen and what you get on printout Slowly Downloads TrueType fonts at printing So there is an accurate font correspondence between what you see on the screen and what you get on printout A longer printing time could result Edit...

Page 101: ...lected in Title in a tree form 2 Title Displays the title given to the settings programmed in the printer driver 3 Restore button Click this button to change the current printer driver settings to those selected in Title NOTE The Device Option values of those options marked with f in Title are different from what are stored and they cannot be restored 4 Delete button Click this button to delete th...

Page 102: ...ettings Property Sheet 3 34 Property Sheet Chapter 3 5 Modify button Click this button to replace the saved value with the current setting value 6 Add button Click this button to save the current settings ...

Page 103: ...appears when a setting which conflicts with another made previously is made on a property sheet When the Conflict Settings Validation dialog box appears it shows the details of the setting that conflicts with another Go over the details and click the OK button to quit This brings you back to the previous setting Now make a new setting that is compatible with the other one 4608P145CB ...

Page 104: ...8 Conflict Settings Validation Dialog Box 3 36 Property Sheet Chapter 3 ...

Page 105: ...Convenient Functions Chapter 4 4 1 Chapter 4 Convenient Functions ...

Page 106: ...licable to a specific driver that is included with the text TIPS Different procedures apply to start a property sheet depending on the application This chapter is concerned only with the procedure to be used with WordPad A single application may offer two or more different procedures to follow to open a property sheet If for example WordPad is used on the Windows 95 PCL 5e driver the text that fol...

Page 107: ...the application which has been used to create the document Normally printing can be started by selecting Print from the File menu 2 The Print dialog box will appear Check that Digital Copier 35cpm PCL5e is displayed for Name under Printer and click the Properties button NOTE Some applications allow you to set Copies and Collate Sort in the Print dialog box To ensure proper printing operation howev...

Page 108: ...ted so that the printed pages are sorted into copy sets TIP If UnCollated or Group is selected printed pages will be sorted into groups of the same pages 7 Make other settings as necessary and click the OK button 8 In the Print dialog box that will then reappear click the OK button Then the data will be transferred to the machine and printing will soon start 4608P226CA 5 Set the number of copies t...

Page 109: ... the document Normally printing can be started by selecting Print from the File menu 2 The Print dialog box will appear Check that Digital Copier 35cpm PCL5e is displayed for Name under Printer and click the Properties button NOTE Some applications allow you to set Copies and Collate Sort in the Print dialog box To ensure proper printing operation however turn OFF these items of the application an...

Page 110: ...ed printing will be performed on both sides of each page so that the printed pages form a book when they are bound along the long edge If Bind Short Edge is selected printing will be performed on both sides of each page so that the printed pages form a book when they are bound along the short edge 4608P227CA 5 Specify Duplex Print 4 Check for correct paper size 6 Specify Staple 6 Select Elevator T...

Page 111: ... Bind Long Edge is selected Short Edge cannot be selected for punch holes When Bind Short Edge is selected Long Edge cannot be selected for punch holes TIP To make holes in the printed pages for filing select Long Edge or Short Edge in Hole Punch under Finishing 7 Make other settings as necessary and click the OK button 8 In the Print dialog box that will then reappear click the OK button Then the...

Page 112: ...ting can be started by selecting Print from the File menu 2 The Print dialog box will appear Check that Digital Copier 35cpm PCL5e is displayed for Name under Printer and click the Properties button NOTE Some applications allow you to set Copies and Collate Sort in the Print dialog box To ensure proper printing operation however turn OFF these items of the application and make the necessary settin...

Page 113: ...settings as necessary and click the OK button 7 In the Print dialog box that will then reappear click the OK button Then the data will be transferred to the machine and printing will soon start NOTE The exit ports available for selection are limited depending on the paper and functions to be used For more details see the Operator s Manual of the machine 4608P228CA 5 Specify Paper Output exit port ...

Page 114: ...lecting Print from the File menu 2 The Print dialog box will appear Check that Digital Copier 35cpm PCL5e is displayed for Name under Printer and click the Properties button NOTE Some applications allow you to set Copies and Collate Sort in the Print dialog box To ensure proper printing operation however turn OFF these items of the application and make the necessary settings in each property sheet...

Page 115: ...splayed in Paper Size 5 Select 2in1 for Form under Layout With 4in1 page order is either Horizontal Ascendant or Vertical Ascendant 6 Select the print page size in Paper under Layout 4608P229CA 4 Check for correct paper size 5 Select 2 in 1 6 Set the zoom ratio Allows you to check the page order 4608O002AA 4in1 Horiz 4608O004AA 4in1 Vert ...

Page 116: ... and click the OK button 8 In the Print dialog box that will then reappear click the OK button Then the data will be transferred to the machine and printing will soon start NOTES If a document that contains pages of assorted sizes and directions is printed a void image and image overlap could result ...

Page 117: ...enu 2 The Print dialog box will appear Check that Digital Copier 35cpm PCL5e is displayed for Name under Printer and click the Properties button NOTE Some applications allow you to set Copies and Collate Sort in the Print dialog box To ensure proper printing operation however turn OFF these items of the application and make the necessary settings in each property sheet of the printer driver 3 The ...

Page 118: ... with the application is displayed in Paper Size 5 Select Zoom for Form under Layout 6 Select the print page size in Paper under Layout 7 Make other settings as necessary and click the OK button 4608P230CA 4 Check for correct paper size 5 Select Zoom 6 Set the zoom ratio The icon tells you that Zoom has been specified ...

Page 119: ...rred to the machine and printing will soon start NOTE If a paper size that does not match the paper loaded in the machine is selected the machine will give a message that prompts you to add paper in Drawer1 entering a standby state If Bypass has been selected the machine will issue a message that prompts you to load paper in the manual feed port entering a standby state ...

Page 120: ...lly printing can be started by selecting Print from the File menu 2 The Print dialog box will appear Check that Digital Copier 35cpm PCL5e is displayed for Name under Printer and click the Properties button NOTE Some applications allow you to set Copies and Collate Sort in the Print dialog box To ensure proper printing operation however turn OFF these items of the application and make the necessar...

Page 121: ...ry and click the OK button 8 In the Print dialog box that will then reappear click the OK button Then the data will be transferred to the machine and printing will soon start NOTE If the original document for a print job contains a page with a different size or different direction from the others and this document is printed a void image or overlapped image could result 4608P231CA 4 Check for corr...

Page 122: ... Windows 95 1 Start printing from the application which has been used to create the document Normally printing can be started by selecting Print from the File menu 2 The Print dialog box will appear Check that Digital Copier 35cpm PCL5e is displayed for Name under Printer and click the Properties button NOTE Some applications allow you to set Copies and Collate Sort in the Print dialog box To ensu...

Page 123: ...eated with the application is displayed in Paper Size 5 Select Access Code 6 Make other settings as necessary and click the OK button 7 The Print dialog box will reappear Click the OK button 4608P232CA 4 Check for correct paper size 5 Select Access Job Number The icon tells that Access Code has been selected ...

Page 124: ...ton is clicked on the Security dialog box the data is transmitted with Access Code and Lock Job not specified It does not mean the cancellation of data transmission When Access Code is used printing may not be effected unless the access number has been correctly set It is possible by using the utility that comes with the NIC Board option to check on the personal computer screen to see whether the ...

Page 125: ...ensure proper printing operation however turn OFF these items of the application and make the necessary settings in each property sheet of the printer driver 3 The Digital Copier 35cpm PCL 5e Properties dialog box will appear If the Paper property sheet is not displayed click the Paper tab 4 Check that the size of the document created with the application is displayed in Paper Size 5 Select Access...

Page 126: ...er driver 3 The Digital Copier 35cpm PCL5e Properties dialog box will appear 4 Check that the size of the document created with the application is displayed in Paper Size 5 Select Access Code 6 Make other settings as necessary and click the OK button 7 The Print Setup dialog box will reappear Click the OK button to go back to the application 8 Run the print cycle from the application with which th...

Page 127: ... proper printing operation however turn OFF these items of the application and make the necessary settings in each property sheet of the printer driver 3 The Digital Copier 35cpm PCL 5e Properties dialog box will appear 4 Check that the size of the document created with the application is displayed in Paper Size 5 Select Access Code The Security dialog box will appear 6 Type your access number and...

Page 128: ...ting Print from the File menu 2 The Print dialog box will appear Check that Digital Copier 35cpm PCL5e is displayed for Name under Printer and click the Properties button NOTE Some applications allow you to set Copies and Collate Sort in the Print dialog box To ensure proper printing operation however turn OFF these items of the application and make the necessary settings in each property sheet of...

Page 129: ...the starting distribution number for Starting Number 9 Make other settings as necessary and click the OK button 10 In the Print dialog box that will then reappear click the OK button Then the data will be transferred to the machine and printing will soon start 4608P233CA 5 Select Distribution Number 6 Select the page on which to print the distribution number 7 Set the image density of the distribu...

Page 130: ... dialog box will appear Check that Digital Copier 35cpm PCL5e is displayed for Name under Printer and click the Properties button NOTE Some applications allow you to set Copies and Collate Sort in the Print dialog box To ensure proper printing operation however turn OFF these items of the application and make the necessary settings in each property sheet of the printer driver 3 The Digital Copier ...

Page 131: ...on which to print the watermark either 1st Page Only or All Pages 7 Select the desired watermark 4608P234CA Allows you to view a print sample 5 Select Watermark 7 Select the desired watermark 8 Specify the editing function for the watermark 6 Select the page on which to print the watermark The icon tells that Watermark has been enabled ...

Page 132: ...e distance from the center The direction in X is toward the right and the direction in Y is upward 9 After the settings have been made click the OK button to close the dialog box 10 Make other settings as necessary and click the OK button 11 In the Print dialog box that will then reappear click the OK button Then the data will be transferred to the machine and printing will soon start NOTE This fu...

Page 133: ...ng can be started by selecting Print from the File menu 2 The Print dialog box will appear Check that Digital Copier 35cpm PCL5e is displayed for Name under Printer and click the Properties button NOTE Some applications allow you to set Copies and Collate Sort in the Print dialog box To ensure proper printing operation however turn OFF these items of the application and make the necessary settings...

Page 134: ...terleaves 9 Make other settings as necessary and click the OK button 10 In the Print dialog box that will then reappear click the OK button Then the data will be transferred to the machine and printing will soon start 4608P235CA Shows the paper source for OHP transparencies and that for interleaves 5 Select OHP Interleaving 7 Select the paper source for interleaves 8 Select this box if you want th...

Page 135: ...lecting Print from the File menu 2 The Print dialog box will appear Check that Digital Copier 35cpm PCL5e is displayed for Name under Printer and click the Properties button NOTE Some applications allow you to set Copies and Collate Sort in the Print dialog box To ensure proper printing operation however turn OFF these items of the application and make the necessary settings in each property sheet...

Page 136: ...ou want also a back cover 9 Make other settings as necessary and click the OK button 10 In the Print dialog box that will then reappear click the OK button Then the data will be transferred to the machine and printing will soon start 4608P236CA Shows the paper source for text and that for front back cover 5 Select Cover Mode 7 Select the paper source for front cover 8 Select this box if you want d...

Page 137: ...ent procedures are used to access each screen among PCL5e PCL6 and PS Procedure Applicable to Windows 95 1 Start printing from the application which has been used to create the document Normally printing can be started by selecting Print from the File menu 2 The Print dialog box will appear Check that Digital Copier 35cpm PCL5e is displayed for Name under Printer and click the Properties button NO...

Page 138: ...l appear 4 On the Paper property sheet check that Paper Size and other items are set properly 5 Click the Advanced tab and select Lock Job 6 Make other settings as necessary and click the OK button 7 The Print dialog box will appear Click the OK button 4608P237CA 6 Select Lock Job The icon tells that Lock Job has been enabled ...

Page 139: ...tton 9 The data will then be transferred to the machine Printing will not however start at this point yet NOTE When the Cancel button is clicked in the Windows 95 3 1 version driver it means that the data is transmitted with Access Code and Lock Job not specified It does not mean the cancellation of data transmission Specify the password 4608P019CC ...

Page 140: ...ting operation however turn OFF these items of the application and make the necessary settings in each property sheet of the printer driver 3 The Digital Copier 35cpm PCL 5e Properties dialog box will appear If the Paper property sheet is not displayed click the Paper tab 4 Check that the Paper Size and other items are properly set on the Paper property sheet 5 Click the Advanced tab and select Lo...

Page 141: ...es dialog box will appear 4 Check that the size of the document created with the application is displayed in Paper Size 5 Click the Advanced button and select Lock Job 6 Click the OK button to go back to the Paper property sheet 7 Make other settings as necessary and click the OK button 8 The Print Setup dialog box will reappear Click the OK button to go back to the application 9 Run the print cyc...

Page 142: ...the printer driver 3 The Digital Copier 35cpm PCL 5e Properties dialog box will appear 4 Check that the size of the document created with the application is displayed in Paper Size 5 Click the Advanced tab and select Lock Job The Security dialog box will appear 6 Type your password and click the OK button 7 Click the OK button to go back to the Paper property sheet 8 Make other settings as necessa...

Page 143: ... Convenient Functions Chapter 4 Procedure on the Machine Side Unlocking a Job After the data has been transferred to the machine operate the machine to start printing 1 Touch the Job List key 2 Touch the Unlock key 1168P229CD 1168P232CB ...

Page 144: ... 4 3 Enter the password 4 Printing will start TIPS If there is a job that has previously been stored as a locked job that job is first printed There is no need of selecting a job or jobs to be unlocked All locked jobs having the same password are unlocked 1168P233CB ...

Page 145: ...Job Function 4 41 Convenient Functions Chapter 4 Deleting a Job After the data has been transferred to the machine it is deleted without being printed 1 Touch the Job List key 2 Touch the Delete key 1168P229CD 4608P187CA ...

Page 146: ...e deleted 4 Touch the Exit key TIP To cancel the deletion touch the No key then Exit key 5 This deletes the job from the job list TIPS If there is a job that has previously been stored as a locked job that job is first printed No password is necessary to delete a job 4608P188CA 4608P189CA ...

Page 147: ...ecessary for application in actual print jobs Procedure Settings may be stored called up deleted and modified Storing deleting and modifying the setting data can be made from the printer icon property opened from the Printers window The following steps are however concerned with the procedures when the property is opened from the application 4608P224CA ...

Page 148: ...plication and make the necessary settings in each property sheet of the printer driver 3 The Digital Copier 35cpm PCL5e Properties dialog box will appear 4 Click the Settings tab 5 Click the down arrow of Title and from the menu that will appear select the title name to be used 6 Click the Restore button The printer controller then reads the setting data The details of the setting data read can be...

Page 149: ...al Copier 35cpm PCL5e Properties dialog box will appear 4 Make settings in the Paper Advanced and Graphics properties as necessary 5 Type the title name to be stored in the Title box and click the Add button 6 Click the OK button 7 The Print dialog box will then reappear To start printing immediately click the OK button Then the data will be transferred to the machine and printing will soon start ...

Page 150: ...ies and Collate Sort in the Print dialog box To ensure proper printing operation however turn OFF these items of the application and make the necessary settings in each property sheet of the printer driver 3 The Digital Copier 35cpm PCL5e Properties dialog box will appear 4 Click the Settings tab 5 Click the down arrow of Title and from the menu that will appear select the title name to be used 6 ...

Page 151: ...ngs Function 4 47 Convenient Functions Chapter 4 8 In the Print dialog box that will then reappear click the Cancel button NOTE Settings can be deleted from the printer icon property sheet opened from the Printers window ...

Page 152: ...items of the application and make the necessary settings in each property sheet of the printer driver 3 The Digital Copier 35cpm PCL5e Properties dialog box will appear 4 Make settings in the Paper Advanced and Graphics properties as necessary 5 Click the down arrow of Title and from the menu that will appear select the title name to be modified 6 Click the Modify button The setting data is rewrit...

Page 153: ...5 1 Chapter 5 Troubleshooting Chapter 5 Troubleshooting ...

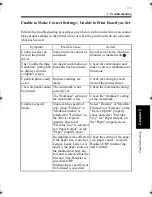
Page 154: ...cable or network cable is disconnected Check that the printer cable or network cable is connected properly to the computer and printer controller Printing does not start despite the completion of printing setup on the computer An error is present in the machine Check the control panel of the machine If an error is displayed identify the error and take the necessary action by referring to Error Lis...

Page 155: ...ss number might have been entered Enter the correct access number Multiple copy sets are mistakenly sorted and stapled together as a single large set The settings in certain DTP software applications may conflict with the printer driver settings In the application turn OFF Collate and set the copy count to one In the printer driver make the desired Collate and copy count settings A large number of...

Page 156: ...made refer to the documentation provided for the machine Symptom Possible Cause Action A PS error print is output Some applications allow you to select either Binary or ASCII mode when the PS driver is being used A PS error could result if an attempt is made to print in the Binary mode Select the ASCII mode ...

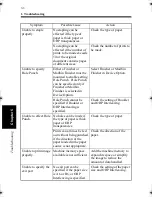
Page 157: ... item of the printer driver The watermark cannot be printed The watermark is not correctly set Check the watermark setting The Darkness setting of the watermark is low Check the Darkness setting of the watermark Unable to specify Staple Staple can be specified only when Finisher or Mailbin Finisher is selected for Finisher on the Device Option property sheet and Elevator Tray is selected for Paper...

Page 158: ...ilbin Finisher in Device Option Hole Punch cannot be specified if Booklet or OHP Interleaving is specified Check the setting of Booklet and OHP Interleaving Unable to effect Hole Punch No holes can be made if the type of paper is thick paper or OHP transparencies Check the type of paper Prints can at times be fed out without being punched if the direction of the paper loaded in the paper source is...

Page 159: ...cified paper source Paper is not be fed from the specified paper source if that paper source is loaded with paper of a different size and direction Load the paper source with paper of the appropriate size and in the appropriate direction Watermark is not printed Watermark may not be printed in graphics applications No watermark can be printed in this case Unable to print exactly as set The paper s...

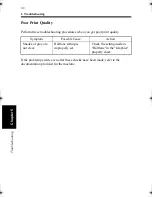
Page 160: ...s when you get poor print quality If the problem persists even after these checks have been made refer to the documentation provided for the machine Symptom Possible Cause Action Shades of gray are not clear Halftone setting is improperly set Check the setting made in Halftone in the Graphics property sheet ...

Page 161: ...l interface being initialized Turn OFF the power then turn it ON again If the error persists consult your Tech Rep 1811 NIC interface being initialized 1812 DL controller internal logic circuitry being initialized 1813 Printer functions being started 1820 NVRAM error Issued when a fault is found in the condition of the setting values saved in the NVRAM of the printer controller Turn OFF the power ...

Page 162: ...1 Troubleshooting 5 10 Chapter 5 Troubleshooting ...

Page 163: ...Appendix A A 1 Appendix A ...

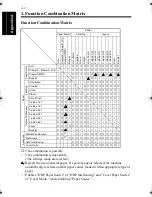
Page 164: ... Cover Paper Source of Cover Mode while disabling Paper Source Paper Paper Source Finishing Layout Auto Drawer2 Drawer5 LCC Drawer1 MPC Bypass Uncollated Collated Group Staple Hole Punch 1 sided 1in1 2 sided 1in1 1 sided 2in1 2 sided 2in1 1 sided 4in1 2 sided 4in1 Zoom Booklet Paper Paper Source Auto Drawer2 Drawer5 LCC Drawer1 MPC Bypass Finishing Uncollated Collated Group Staple Hole Punch Duple...

Page 165: ...over mode Paper Paper Source Auto Drawer2 Drawer5 LCC Drawer1 MPC Bypass Finishing Uncollated Collated Group Staple Hole Punch Duplex Print Layout 1 sided 1in1 2 sided 1in1 1 sided 2in1 2 sided 2in1 1 sided 4in1 2 sided 4in1 Zoom Booklet Advances Distribution Number Watermark OHP Interleaving Cover mode ...

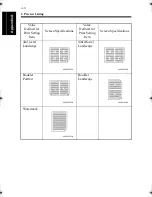
Page 166: ...etting Item Screen Specifications Portrait LandScape HolePunch Long Edge Portrait HolePunch Short Edge Portrait HolePunch Long Edge Landscape HolePunch Short Edge Landscape DuplexPrint Bind Long Edge Portrait DuplexPrint Bind Short Edge Portrait 4608P065CA 4608P066CA 4608P067CA 4608P068CA 4608P147CA 4608P146CA 4608P070CA 4608P069CA ...

Page 167: ...nt Setting Item Screen Specifications DuplexPrint Bind Short Edge Landscape DuplexPrint Bind Long Edge Landscape Staple Corner Portrait Staple Corner Landscape 2in1 Portrait 2in1 Landscape 4in1 Vert Portrait 4in1 Horiz Portrait 4608P148CA 4608P149CA 4608P071CA 4608P150CA 4608P072CA 4608P183CA 4608P142CA 4608P141CA ...

Page 168: ...d for Print Setting Item Screen Specifications Value Defined for Print Setting Item Screen Specifications 4in1 vert Landscape 4in1 Horiz Landscape Booklet Portrait Booklet Landscape Watermark 4608P073CA 4608P074CA 4608P075CA 4608P184CA 4608P076CA ...

Page 169: ...g Item Screen Specifications Installed Drawer Drawer1 2 Installed Drawer Drawer1 2 3 Installed Drawer Drawer1 2 3 4 Installed Drawer Drawer1 2 3 4 5 Installed Drawer Drawer1 2 LCC Installed Drawer Drawer1 2 3 LCC Duplex unit Installed Finisher Job Tray 4608P077CD 4608P078CD 4608P079CD 4608P080CD 4608P081CD 4608P082CD 4608P083CD 4608P084CD ...

Page 170: ...Appendix A Value Defined for Print Setting Item Screen Specifications Value Defined for Print Setting Item Screen Specifications Finisher ShiftTray Finisher Finisher Finisher MailBin Finisher 4608P085CD 4608P086CD 4608P087CD ...

Page 171: ...Value Defined for Print Setting Item Screen Specifications Access Code On Zoom Cover Mode Cover Mode With Image Cover Mode With Back Cover Cover Mode With Image with Back Cover OHP Interleaving OHP Interleaving With Image 4608P125CA 4608P088CA 4608P089CA 4608P090CA 4608P091CA 4608P092CA 4608P093CA 4608P094CB ...

Page 172: ...tting Item Screen Specifications Value Defined for Print Setting Item Screen Specifications Distribution Number Only 1st Page Distribution Number All Page Watermark Only 1st Page Watermark All Page Lock Job 4608P096CA 4608P185CA 4608P098CA 4608P097CA 4608P095CA ...

Page 173: ...on Board 8MB DIMM Max 72MB max 168 pin DIMM 1 slot Transfer Image Density 600 600dpi Interface on machine Unique 8 bit parallel Interface on host Centronics Interface Networks 10Base T 2 UTP BNC 10 100BaseT UTP Network Protocol TCP IP IPX SPX Network Management To be managed from SNMP compatible Web browser Power Requirements 5V 5 6A max Power Consumption 30W max Exterior Dimensions Width 10 1 2 2...

Page 174: ...on Type 1 font 35 Accessories Printer Driver CD ROM for Hi 35pc Printer Controller Engine interface cable 30 cm Short harness with ferrite core except the U S A and Canada Ferrite core except the U S A and Canada Tie band except the U S A and Canada Windows User s Manual Macintosh User s Manual Software License Agreement ...

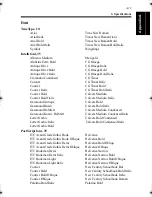
Page 175: ... Italic Garamond Halbfett Univers Medium Condensed Garamond Kursiv Halbfett Univers Medium Condensed Italic Letter Gothic Univers Bold Condensed Letter Gothic Italic Univers Bold Condensed Italic Letter Gothic Bold PostScript font 35 ITC Avant Grade Gothic Book Helvetica ITC Avant Grade Gothic Book Oblique Helvetica Bold ITC Avant Grade Gothic Demi Helvetica Bold Obliqu ITC Avant Grade Gothic Demi...

Page 176: ...3 Specifications A 14 Appendix A Palatino Italic Times Italic Palatino Roman Times Roman Times Bold ITC Zapf Chancery medium Italic Times Bold Italic ITC Zapf Dingbats Symbol ...

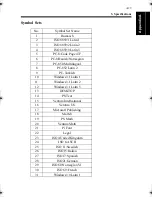
Page 177: ...PC 852 Latin 2 9 PC Turkish 10 Windows3 1 Latin 1 11 Windows3 1 Latin 2 12 Windows3 1 Latin 5 13 DESKTOP 14 PS Text 15 Ventura International 16 Ventura US 17 Microsoft Publishing 18 Math 8 19 PS Math 20 Ventura Math 21 Pi Font 22 Legal 23 ISO 4 United Kingdom 24 ISO 6 ASCII 25 ISO 11 Swedish 26 ISO 15 Italian 27 ISO 17 Spanish 28 ISO 21 German 29 ISO 60 Norwegian V1 30 ISO 69 French 31 Windows3 0 ...

Page 178: ...3 Specifications A 16 Appendix A Selectable Paper Sizes Letter Ledger 11 14 Legal Invoice Executive A6 A5 A4 A3 B6 B5 B4 FLS1 FLS2 FLS3 FLS4 ...

Page 179: ...Appendix B B 1 Appendix B ...

Page 180: ... a particular function such as generating graphics or spreadsheets click To press and release a mouse button quickly Often used to select an object SEE double click control panel A bank of indicators that show the current status of the printer Panel buttons that are located on the control panel make it possible to perform a variety of different operations default Settings that are preset in the ab...

Page 181: ...ots hard disk drive A device that is contained in a computer and peripheral equipment and used to save data and files In the printer controller it is used to save fonts downloaded from the computer Its data is retained even when the main power is turned OFF icon A graphic image on the screen that represents an element interface A standard that governs the ways for two different systems to exchange...

Page 182: ... such as the printer parallel interface A type of standards that govern the ways for two different systems to exchange information in which multiple bits are transmitted at one time Because of that synchronization is necessary which makes the scheme not right for data transmission over a long distance The most common parallel interface is Centronics port A connector through which data is exchanged...

Page 183: ...In line Memory Module TCP IP The standard data transfer protocol over the Internet Data is transferred by breaking up data messages into packets to which IP addresses are attached TrueType font A soft font standard the system has TrueType is a font technology that ensures that the printed output is identical to what you see on screen It is also scalable capable of producing characters in varying s...

Page 184: ...1 Glossary B 6 Appendix B ...

Page 185: ...Appendix C C 1 Appendix C ...

Page 186: ...lt in printer fonts instead of TrueType fonts p 3 25 Always use TrueType fonts p 3 25 Angle p 3 20 Assume header is downloaded and retained p 3 28 B Bitmap compression p 3 29 Booklet p 3 11 C Coarse p 3 22 Collate p 3 7 Compress bitmap images p 3 29 Configuration p 1 6 Connecting the Printer Controller p 1 7 Convenient Functions p 4 2 Copies p 3 9 Cover Mode p 3 17 Ctrl D p 3 29 p 3 30 D Darkness ...

Page 187: ...utline p 3 22 Download header with each print job p 3 28 Duplex Print p 3 10 Duplex Unit p 3 3 E Edit p 3 15 Edit Substitute Table p 3 32 Encapsulated PostScript p 3 28 Error List p 5 9 F Features of the Printer Controller p 1 2 Fine p 3 22 Finisher p 3 4 Font p A 13 Font Substitute p 3 32 Fonts p 3 19 Form p 3 11 Front Cover Paper Source p 3 17 Function Combination Matrix p A 2 G General Property...

Page 188: ...king General Settings Before Using the Printer p 2 10 p 2 46 Mirror Image p 3 25 Modify p 3 34 N Negative Image p 3 25 No bitmap compression p 3 29 Normal p 3 32 O OHP Interleaving p 3 16 OHP Paper Source p 3 16 Operating Environment p 2 2 p 2 16 p 2 32 p 2 39 Orientation p 3 9 P Paper p 3 11 Paper Output p 3 7 Paper Preview p A 4 Paper Property Sheet p 3 5 Paper Size p 3 6 Paper Source p 3 6 p 3 ...

Page 189: ...es of the Paper p 4 5 Printing on OHP Transparencies p 4 29 Printing Pages with a Distribution Number p 4 24 Printing Pages with Watermarks p 4 26 Property Sheets p 3 2 Punch p 3 4 R Resolution p 3 21 p 3 23 p 3 27 Restore p 3 33 Restore Defaults p 3 4 p 3 12 p 3 18 p 3 22 p 3 24 p 3 26 p 3 27 p 3 29 p 3 31 p 3 32 S Scheduling Property Sheet p 2 29 Security Dialog Box p 3 13 Security Property Shee...

Page 190: ... Outputs p 1 9 U Unable to Make Correct Settings Unable to Print Exactly as Set p 5 5 Unable to Print p 5 2 UnCollated p 3 7 Use Printer s settings p 3 25 Use Raster Graphics p 3 21 Use settings below p 3 25 Use Vector Graphics p 3 21 User Name p 3 4 Using the Copy Track Function p 4 18 Using the Lock Job Function p 4 33 Using the Settings Function p 4 43 V Various Printing Functions p 1 2 W Wait ...

Reviews: