44
Henrad CC FF
- Installation
SERVICING
SER
VICING
70 HEAT EXCHANGER REPLACEMENT - continued
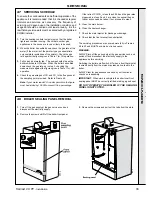
21. Remove the 2 nuts securing the left support bracket to the
chamber side and remove the left support bracket.
22. Supporting the weight of the heat exchanger, slacken the
screw on the right support bracket and allow the bracket to
its lowest position.
23. Lift out the heat exchanger.
24. Re-assemble in reverse order, using new gaskets as
appropriate.
25. Before refitting the fan, ensure the wires have been
reconnected to the:
- CH thermistor (
violet pair)
- HW thermistor (
grey)
- Flame detection electrode (
yellow)
26. When re-assembly is complete, fit the filling loop, close all
drain points, open all isolating valves and ensure that the
boiler is filled, vented of air and pressurised before
attempting to fire it.
27. After a satisfactory test firing, remove the filling loop (this is
a requirement of the water bylaws).
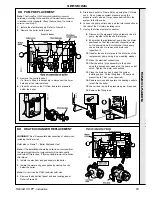
4. Remove the bottom panel.
5. Attach drain pipes to the 2 boiler drain points. Open the CH
drain by turning the grey knobs and the HW drain by
slackening the drain point. Note the marking on the bottom
of the valves. Refer to Frame 68.
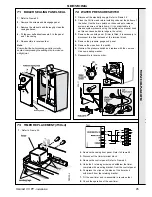
6. While the boiler is draining, release the turret clamp on top
of the boiler, together with the screw securing the turret to
the flue pipe. Remove the turret.
7. Remove the fan, venturi and sensing pipe. Refer to
Frame 49.
8. Unscrew and remove the HW expansion vessel.
9. Undo the 2 extended nuts securing the gas injection pipe
and remove.
10. Disconnect the spark electrode leads and the flame sensing
electrode lead at the burner base. Refer to Frame 58.
11. Remove the 3 screws securing the burner assembly and
withdraw the assembly downward, taking care not to
damage the electrodes. Refer to Frame 60.
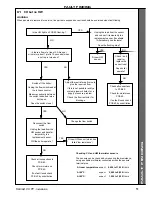
12. Unplug the electrical leads from both CH and HW
temperature sensors and HW overheat thermostat.
13. Unscrew the nut securing the bottom of the HW inlet pipe
together with the hexagon socket screw retaining the upper
end. Rotate the pipe to clear the bulkhead connector and
then pull down to remove.
14. Unscrew the nut on the CH flow and return pipes to the
heat exchanger.
15. Unscrew the nut securing the bottom of the HW outlet pipe
together with the hexagon socket screw retaining the upper
end.
16. Unscrew the locknut on the bulkhead fitting for the HW
outlet pipe.
17. Unscrew the compression nut securing the HW outlet pipe
to the pre-piping frame.
18. Pull down the HW outlet pipe to remove.
19. Unscrew and remove the automatic air vent from the top of
the heat exchanger.
20. Remove the 2 screws securing the heat exchanger to the
support brackets, together with the top clamping screw.
Summary of Contents for CC 100 FF
Page 1: ......


