


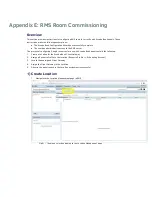


Appendix B: Configuring Acendo Book Panels for Microsoft Exchange & Office 365
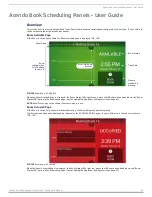
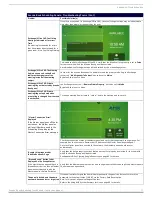
Acendo Book Scheduling Touch Panels - Instruction Manual
81
Microsoft Exchange / Off ice 365: Certificate Validation
The Exchange 2010/2103/2016 or Office 365 Server has a unique
User Name
for each user and a unique
Calendar Email ID
for
each room. The Username and Calendar Email ID is entered for each room in the CALENDAR Settings page (see FIG. 56 on
Microsoft Documentation
The following links provide access to online Microsoft documentation regarding each of these methods for each supported Server
OS:
Exchange 2010
Set a Delegate on a Resource Mailbox:
http://technet.microsoft.com/en-us/library/bb124973(v=exchg.141).aspx
Exchange 2013, Office 365
Delegating Permissions:
http://technet.microsoft.com/en-us/library/jj215781%28v=exchg.150%29.aspx
(go to Create a room mailbox > Use the EAC to create a room mailbox)
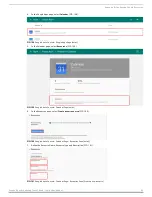
Note: If you selected the option requiring that booking requests are sent to delegates,
use this section to select delegates.
•
To add a delegate, click
Add
. On the Select Delegates page, select a user, click
Add
,
and then click
OK
to return to the New room mailbox page.
•
To remove a delegate, select the user and then click
Remove. Assigning Full-Access Permissions:
http://technet.microsoft.com/en-us/library/jj919240%28v=exchg.150%29.aspx
Configuring Impersonation:
https://msdn.microsoft.com/en-us/library/office/dn722376(v=exchg.150).aspx
Exchange 2016, Office 365
Delegating Permissions:
https://technet.microsoft.com/en-us/library/jj215781(v=exchg.160).aspx
(go to Create a room mailbox > Use the EAC to create a room mailbox)
Note: If you selected the option requiring that booking requests are sent to delegates,
use this section to select delegates.
•
To add a delegate, click Add. On the Select Delegates page, select a user, click Add,
and then click OK to return to the New room mailbox page.
•
To remove a delegate, select the user and then click
Remove. Assigning Full-Access Permissions:
https://technet.microsoft.com/en-us/library/jj919240(v=exchg.160).aspx
Configuring Impersonation:
https://msdn.microsoft.com/en-us/library/office/dn722376(v=exchg.150).aspx
Conf iguring Exchange To Hide/Show Meeting "Organizer", "Title" and
"Details"
For
Exchange 2010
, see information under
Resource Information
in the
Use the EMC to configure resource mailbox properties
section:
https://technet.microsoft.com/en-us/library/bb124255(v=exchg.141).aspx
Exchange 2013, 2016 and Exchange Online
require the use of Exchange cmdlets to change the room mailbox properties.
The cmdlet of interest is the
Set-CalendarProcessing
which will allow you to configure what information Exchange provides to the
Acendo Book panel.
Set-CalendarProcessing
parameters of particular significance:
AddOrganizerToSubject
DeleteComments
DeleteSubject
Microsoft Documentation
The following links provide access to online Microsoft documentation that provide details needed to use the above mentioned
cmdlet for each supported Server OS:
Exchange Server 2010
https://technet.microsoft.com/en-us/library/dd335046(v=exchg.141).aspx
Exchange Online, Exchange Server 2013
https://technet.microsoft.com/en-us/library/dd335046(v=exchg.150).aspx
Exchange Online, Exchange Server 2016
https://technet.microsoft.com/en-us/library/dd335046(v=exchg.160).aspx
Privacy Flag
Acendo Book panels use Exchange, Office 365 or Google "privacy" flag. A meeting marked as private will behave the same way the
global Acendo Book "Privacy Mode" behaves (see the
In order for the Acendo Book panel to be able to read the privacy mode flag in Exchange and Office 365, the Exchange server must
set the room's "
-RemovePrivateProperty
" to
$false
. By default, this is set to
$true
.


