background image


5-12


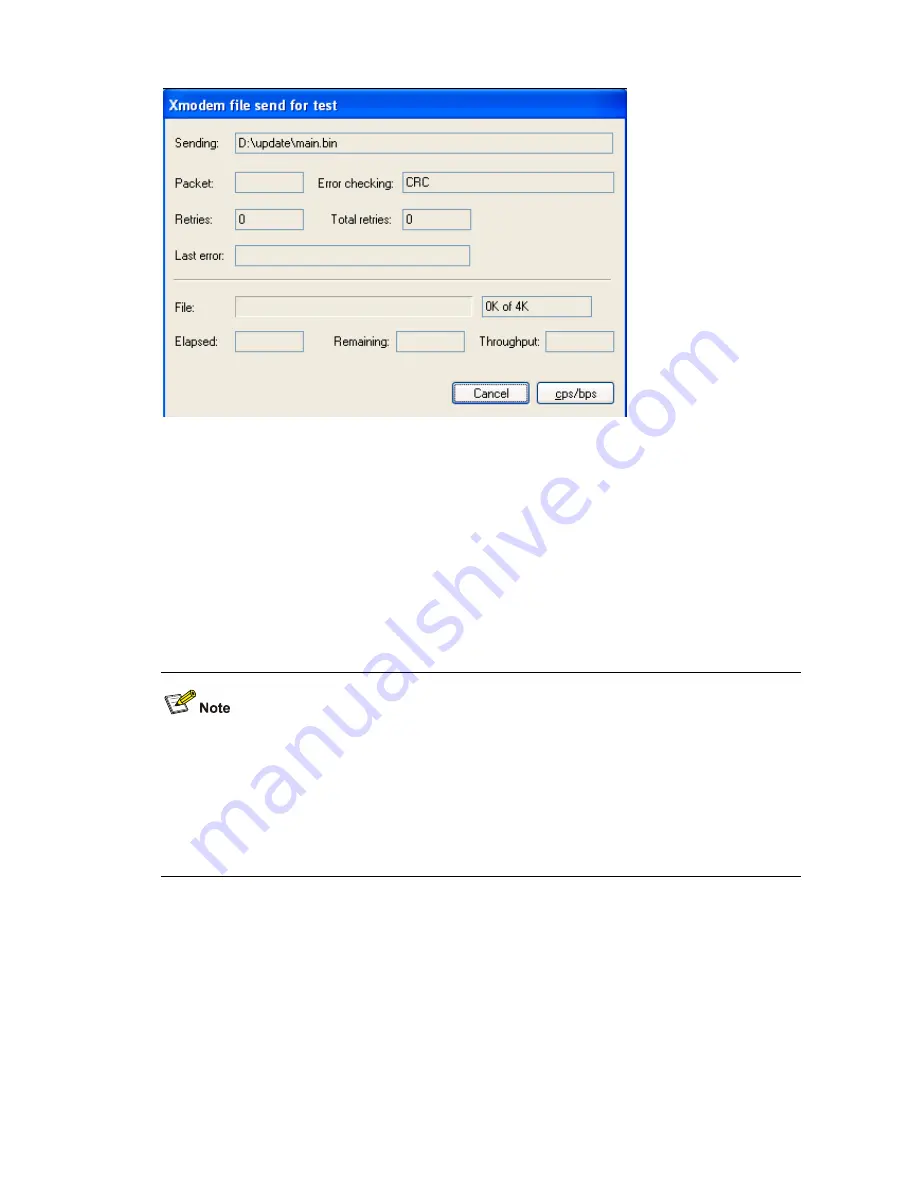
Figure 5-6 

Sending the application file using XMODEM 


After download completion, the terminal displays the following information:  

Download successfully! 

19189956 bytes downloaded! 

Updating Basic BootWare? [Y/N]Y 

Updating Basic BootWare................Done! 

Updating Extend BootWare? [Y/N]Y 

Updating Extend BootWare..............Done! 

Change the baud rate from 115200 bps back to 9600 bps in HyperTerminal and reboot the device.  


z


The file name, size and path shown in the figures are for reference only and may differ from the 
actualities on your device. Before updating the software of your device, check the current 
BootWare version and application version to make sure that the correct file is used for the update.  

z


After downloading files with a changed baud rate, timely change the baud rate back to 9,600 bps in 
HyperTerminal to ensure the normal display on the terminal screen when the system boots or 
reboots.  


Updating Applications Through a Serial Connection 

To update an application file through a serial connection, you need to enter the serial submenu. Select 

2

 from the BootWare main menu to enter the serial submenu. For details about this submenu, refer to 

section Serial submenu on page 5-6.  

You can modify the serial interface baud rate to accelerate the file update. For details, refer to section 
Modifying Serial Communication Parameters on page 5-8. Select 

from the serial submenu. The 

following information appears:  

Summary of Contents for WX3000 Series

Page 1: ...H3C WX3000 Series Unified Switches Installation Manual Hangzhou H3C Technologies Co Ltd Manual Version 6PW100 20091215 ...

Page 2: ...Point SecEngine SecPath Comware Secware Storware NQA VVG V2 G Vn G PSPT XGbus N Bus TiGem InnoVision and HUASAN are trademarks of Hangzhou H3C Technologies Co Ltd All other trademarks that may be mentioned in this manual are the property of their respective owners Notice The information in this document is subject to change without notice Every effort has been made in the preparation of this docum...

Page 3: ...how to power on the switch Chapter 5 Maintaining Software Introduces how to maintain the software of the H3C WX3000 Series Unified Switches including BootWare menu introduction software updating and password recovery process Chapter 6 Troubleshooting Introduces the problems that may occur during the installation and startup processes of the H3C WX3000 Series Unified Switches and how to troubleshoo...

Page 4: ...perations on the switching engines of H3C WX3000 Series Unified Switches It covers the configurations of command line interfaces login VLAN GVRP basic port configuration MAC address table management MSTP 802 1x AAA ACL QoS SNMP RMON NTP and SSH H3C WX3000 Series Unified Switches Switching Engine Command Manual Elaborates on the operation commands for the switching engines of H3C WX3000 Series Unif...

Page 5: ... services are offered to fill resource gaps and ensure the success of your networking projects More information on 3Com maintenance and Professional Services is available at http www h3cnetworks com Contact your authorized reseller or 3Com for a complete list of the value added services available in your area Troubleshoot Online You will find support tools posted on the web site at http www h3cnet...

Page 6: ... at http www h3cnetworks com under support Repair Replacement Request First time users will need to apply for a user name and password Contact Us 3Com offers telephone e mail and internet access to technical support and repair services To access these services for your region use the appropriate telephone number URL or e mail address Find a current directory of contact information posted on the we...

Page 7: ...g for Installation 2 1 Safety Precautions 2 1 Installation Site Checking 2 2 Temperature and Humidity 2 2 Cleanliness 2 2 ESD Prevention 2 3 EMI Prevention 2 4 Laser Safety 2 4 Installation Tools 2 5 3 Installing the Device 3 1 Installing the Device in a 19 inch Rack 3 1 Introduction to Mounting Brackets 3 2 Introduction to Slide Rails 3 3 Installing the Device Using Front Mounting Brackets 3 3 In...

Page 8: ...aches for Software Maintenance 5 3 Software Update Flow 5 4 BootWare Menus 5 4 BootWare Main Menu 5 4 BootWare Submenus 5 6 Updating Software Through a Serial Connection 5 7 Introduction to XMODEM 5 7 Modifying Serial Communication Parameters 5 8 Updating BootWare Through a Serial Connection 5 10 Updating Applications Through a Serial Connection 5 12 Updating Applications Using TFTP 5 13 Updating ...

Page 9: ...ootWare 5 26 Backing Up and Restoring BootWare Through the BootWare Menu 5 26 Backing Up and Restoring BootWare Through the CLI 5 26 6 Troubleshooting 6 1 Troubleshooting Software Loading Failure 6 1 Troubleshooting the Power System 6 1 Troubleshooting the Configuration System 6 1 ...

Page 10: ...upports power over Ethernet plus PoE and 802 11a b g n series access points APs with the maximum output power of 25 W per port Together with the Fit APs developed by H3C the WX3000 series can implement wireless LAN WLAN deployments while providing rich data switching features The WX3000 series is the ideal solution to the provisioning of integrated wireline and wireless access for small and medium...

Page 11: ...4 Power status LED PWR 5 RPS LED RPS 6 Extension slot LED MOD1 7 Extension slot LED MOD2 8 Console port 9 1000Base X SFP ports 10 10 100 1000 Base T Ethernet ports As shown in Figure 1 5 the front panel of the WX3010 provides eight 10 100 1000Base T Ethernet ports two 1000Base X SFP ports and one console port Figure 1 5 Front panel of the WX3010 1 LEDs of 10 100 1000 Base T Ethernet ports 2 LEDs o...

Page 12: ...WX3024 provides an AC power receptacle a DC power receptacle and two extension slots for 10 GE interface modules Figure 1 7 Rear panel of the WX3024 1 DC power receptacle 2 AC power receptacle 3 OPEN BOOK mark 4 CAUTION mark 5 10 GE port slot 1 6 10 GE port slot 2 7 OPEN BOOK mark 8 Grounding screw As shown in Figure 1 8 the rear panel of the WX3010 and WX3008 provides an AC power receptacle Figur...

Page 13: ...n and weight specifications Device model Dimensions H W D Weight WX3024 43 6 440 429 mm 1 7 17 3 16 9 in 7 2 kg 15 9 lb WX3010 43 6 300 269 mm 1 7 11 8 10 6 in 2 9 kg 6 4 lb WX3008 43 6 300 269 mm 1 7 11 8 10 6 in 2 9 kg 6 4 lb Fixed Interfaces and Slots Table 1 4 Fixed interface and slot specifications Item WX3024 WX3010 WX3008 Console interface 1 console interface 9600 bps to 115200 bps 9600 bps...

Page 14: ...em WX3024 WX3010 WX3008 Rated voltage range 100 to 240 VAC 50 60 Hz Maximum voltage range 90 to 264 VAC 47 to 63 Hz Maximum system power consumption without external PoE devices 100 W 50 W 40 W Minimum power consumption 220 V 0 282 A 63 W 220 V 0 165 A 36 5 W 220 V 0 128 A 28 2 W DC power supply DC voltage range 52 V to 55 V PoE Power Supply The WX3000 series supports Power over Ethernet PoE to pr...

Page 15: ...support of the WX3000 series for LEDs Table 1 6 LEDs supported by the WX3000 series LED WX3024 WX3010 WX3008 Power status LED PWR Supported Supported Supported PoE PoE status LED Mode Supported Supported Supported RPS status LED RPS Supported Not supported Not supported Gigabit Ethernet port status LEDs Supported Supported Supported Gigabit SFP port status LEDs Supported Supported Not supported Ex...

Page 16: ...is receiving or transmitting data at 1000 Mbps Solid yellow A 10 100 Mbps link is present on the port Blinking yellow 33 Hz The port is receiving or transmitting data at 10 100 Mbps Blinking yellow 3 Hz The port failed to pass the POST 10 100 1000 Base T Ethernet port status LED yellow green Off No link is present on the port Solid green A 1000 Mbps link is present on the port Blinking green 33 Hz...

Page 17: ...9 A console cable Table 1 8 Console cable pinouts RJ 45 pin Signal Direction DB 9 pin 1 RTS 7 2 DTR 4 3 TXD 3 4 CD 1 5 GND 5 6 RXD 2 7 DSR 6 8 CTS 8 Ethernet interfaces 1 Introduction z The WX3024 provides twenty four 10 100 1000Base T Ethernet ports and four 1000Base X SFP ports Each SFP port and the corresponding 10 100 1000Base T Ethernet port jointly form a Combo interface Only one of the two ...

Page 18: ...rt at different speeds are shown in Table 1 10 The electrical Ethernet port status LEDs are above the RJ 45 sockets The triangular pointer above each LED indicates which port the LED is for z The optical Ethernet ports of the WX3000 series support 100 1000 Mbps full duplex The optical port status LEDs are above the 1000Base X SFP ports each indicating the status of the corresponding optical port T...

Page 19: ...ower specifications of the receiver end refer to Appendix A Transceiver Modules The WX3000 series supports the following optical transceivers Table 1 11 Description of optical transceivers Item WX3024 WX3010 WX3008 Supports SFP FE SX MM1310 A FE SFP transceivers Supports SFP FE LX SM1310 A Supports SFP GE SX MM850 A GE SFP transceivers Supports SFP GE LX SM1310 A Supports SFP GE LX SM1310 BIDI GE ...

Page 20: ...nd WX3008 do not support the RPS unit z An RPS unit is an optional accessory to be separately orderly if needed z For the RPS unit installation information refer to section Connecting the RPS Cable on page 3 19 DC Power Cables Table 1 12 Description of DC power cables Item Length Description CAB 48V Pwr 2m T2 5 2 2 m 6 56 ft 14AWG power cable CAB RPS Non PoE 2m JD5 2 m 6 56 ft JD5 DC power cable C...

Page 21: ...slots are numbered TenGigabitEthernet 1 1 1 and TenGigabitEthernet 1 2 1 Interface Numbering for the WX3010 The WX3010 provides 11 fixed interfaces numbered GigabitEthernet 1 0 1 through GigabitEthernet 1 0 11 among which z GigabitEthernet 1 0 1 through GigabitEthernet 1 0 8 10 100 1000 Base T Ethernet ports with the last part of the port numbers indicated on the front panel z GigabitEthernet 1 0 ...

Page 22: ...njury caused by improper use observe these rules z Pull the power plug s out of the device before cleaning the device Do not clean the device using wet cloth or liquid z Keep the device away from water or dampness Prevent water or moisture from entering the device chassis z Do not place the device on an unstable case or desk The device might be damaged severely in case of a fall z Ensure proper ve...

Page 23: ... aging of insulation materials and thus significantly lower the reliability and service life of the device The temperature and humidity requirements for the WX3000 series are listed in Table 2 1 Table 2 1 Working environment Item Specification Temperature 0 C to 45 C 32 F to 113 F Relative humidity 5 to 95 noncondensing Cleanliness Dust is hazardous to the operating safety of the device Dust build...

Page 24: ... that the device and the floor are well grounded z Keep the equipment room clean z Keep proper temperature and humidity conditions z When touching a circuit board always wear ESD preventive gloves or an ESD preventive wrist strap and wear antistatic work clothes z When mounting removing observing or moving an interface module always take the printed circuit board PCB by the edges without touching ...

Page 25: ...ee wire AC socket with a protection earth PE to effectively filter interference from the power grid z Keep the device away from high power radio transmitters radars and high frequency heavy current devices z Take electromagnetic shielding measures when necessary For example use shielded interface cables z Route the interface cables only indoors to protect signal interfaces against over voltage or ...

Page 26: ...2 5 Installation Tools Flat blade screwdrivers Philips screwdrivers P2 150 mm EDS preventive wrist straps The installation tools are not provided with the device ...

Page 27: ...d a tray z Installing the device with front mounting brackets and slide rails Refer to Table 3 1 for the installation scenarios supported by the device models Table 3 1 Installation scenarios supported by the WX3024 and WX3010 Device Model Front mounting brackets Front and rear mounting brackets Front mounting brackets and a tray Front mounting brackets and slide rails WX3024 Not supported Support...

Page 28: ... hole for fixing the front mounting bracket to the device chassis Figure 3 2 Front mounting bracket of the WX3010 and WX3008 1 Screw holes for fixing the front mounting bracket onto the rack using M6 screws 2 Screw hole for fixing the front mounting bracket to the device chassis The front mounting bracket of the device needs to be separately installed if needed for the installation scenario select...

Page 29: ...igure 3 4 A slide rail 1 Slot hole for fixing the slide rail onto the rear bracket of the rack It allows adjustment of the device mounting screw position according to the device position 2 Heat dissipation holes Holes for heat dissipation between the device and the rack 3 Slot hole for fixing the slide rail onto the front bracket of the rack Installing the Device Using Front Mounting Brackets Foll...

Page 30: ...on the front square holed brackets of the rack Figure 3 6 Attach the front mounting brackets to the rack 1 Front square holed bracket 2 Front mounting bracket Installing the Device Using Front and Rear Mounting Brackets Follow these steps to install the device using front and rear mounting brackets Step1 Put on an ESD preventive wrist strap and verify that the rack is sturdy and properly grounded ...

Page 31: ...bearing screw select one as needed 2 Weight bearing screw There are three holes on each side of the device for the weight bearing screws You can select a proper location as needed The rear mounting brackets will support the weight of the device through firm contact with the weight bearing screws Step4 As shown in Figure 3 9 determine the device installation position in the rack and use screws and ...

Page 32: ...t with the other hand and gently push the device into the rack as shown in Figure 3 10 Figure 3 10 Install the device using front and rear mounting brackets 1 1 Front mounting bracket 2 Front square holed bracket 3 Weight bearing screw 4 Screw for fixing the rear mounting bracket onto the rear square holed bracket 5 Rear mounting bracket 6 Rear square holed bracket ...

Page 33: ... in Figure 3 11 Figure 3 11 Install the device using front and rear mounting brackets 2 1 Rear square holed bracket 2 Weight bearing screw 3 Rear mounting bracket Step6 Fix the front mounting brackets on the front square holed brackets of the rack with screws and cage nuts Make sure that the device is firmly fixed on the rack through the front and rear mounting brackets as shown in Figure 3 12 ...

Page 34: ... to install the device take the WX3024 as example in a rack using front mounting brackets and a tray Step1 Put on an ESD preventive wrist strap and check that the rack is sturdy and properly grounded Step2 As shown in Figure 3 7 use the screws packed with the front mounting brackets to fix the front mounting brackets on both sides of the device Step3 Fix the tray on the rack as shown in Figure 3 1...

Page 35: ...ls Installing a device with front mounting brackets and slide rails Follow these steps to install the device with front mounting brackets and slide rails Step1 Put on an ESD preventive wrist strap and verify that the rack is sturdy and properly grounded Step2 As shown in Figure 3 7 use the screws packed with the front mounting brackets to fix the front mounting brackets on both sides of the device...

Page 36: ... of the device is in firm contact with the slide rails Figure 3 16 Install the device using front mounting brackets and slide rails 1 Step5 Fix the front mounting brackets on the front square holed brackets of the rack using the M6 screws and cage nuts Make sure that the device is firmly fixed on the rack through the front mounting brackets and slide rails as shown in Figure 3 17 ...

Page 37: ... z The workbench is sturdy and well grounded z The workbench is a well ventilated environment Keep at least 10 cm 3 94 in clearance around the device for heat dissipation z No heavy object is placed on the device z At least 15 mm 0 59 in distance is provided between two devices when they are stacked one above the other Wall Mounting You can mount the WX3010 and WX3008 on concrete walls or wood wal...

Page 38: ... of 170 mm 6 69 in Drill two holes according to the sizes of wall anchors and screws so that wall anchors could go into the holes only the edges could remain outside the wall and the screws could be fixed on the wall tightly Step2 Insert wall anchors into the holes and keep only the edges outside the wall Step3 Drive screws into the wall anchors keeping the inside of screw head at least 1 5 mm 0 0...

Page 39: ...vice facing downwards and the two sides with ventilation holes vertical to the ground Magnet Mounting The WX3010 and WX3008 can be installed using magnet mounting Introduction to magnetic accessories Magnetic accessories consists of four permanent magnets and four M3 6 countersunk head screws as shown in Figure 3 21 Figure 3 21 Magnets and countersunk head screws 1 M3 6 countersunk head screw 2 Pe...

Page 40: ...blind nut in the dent of the device bottom and ensure that the permanent magnet and the device are fastened reliably Remove the cushion if any from the dent before installation Step2 Attach the magnet mounted device to the specified location Do not to get your fingers stuck between because the magnetism is very huge Figure 3 22 Magnet mounting 1 2 3 1 M3 6 countersunk head screw 2 Permanent magnet...

Page 41: ... easily influenced by magnetic fields away from magnets Otherwise faults may occur to these electronic devices z The power cords may vary with different standards of different countries so you may need to select a bail latch as needed Connecting the Ground Cable The correct connection of the protection ground cable of the device is an essential safeguard against lightning strokes and interference ...

Page 42: ...ere a grounding conductor can be buried Hammer a 0 5 m 1 64 ft or longer angle iron or steel tube longer into the earth Weld the yellow green grounding cable to the angle iron or steel tube and treat the joint for corrosion protection Figure 3 24 Connect the PGND cable to a buried grounding conductor 1 AC power receptacle 2 Grounding screw 3 PGND cable 4 Earth ground 5 Angle iron 2 If it is not al...

Page 43: ...d it through the return wire RTN of the DC power supply Make sure that the RTN wire is well grounded at the DC output of the DC power cabinet Figure 3 26 Ground the device through the PGND of a power cabinet 1 AC DC power cabinet 2 48 V busbar 3 48 V 4 RTN busbar 5 RTN 6 PGND busbar 7 Earth ground 8 PGND cable 9 Grounding screw 10 DC power receptacle The WX3010 and WX3008 do not support DC power i...

Page 44: ...eceptacle on the rear panel of the chassis and plug the other end to the AC power source Step4 Place the bail latch over the AC power cable to secure the plug in place Figure 3 27 Connect the AC power cable 1 Rear panel 2 Bail latch holder 3 Bail latch 4 AC power cable Step5 Check the RPS LED on the front panel of the device Solid green indicates that the AC power input is normal z Since the WX301...

Page 45: ...ly seated in the DC power receptacle and then fasten the strain release screws Step5 Connect the other end of the RPS cable to an output interface of the RPS unit Figure 3 28 Connect the RPS cable 1 2 3 4 5 6 7 1 DC power receptacle 2 RPS cable plug for the DC power receptacle 3 RPS cable 4 RPS cable plug for the RPS output 5 RPS unit 6 Output interfaces of the RPS unit 7 AC power input interfaces...

Page 46: ...connect the RJ 45 connector of the console cable to the console port of the device Pay attention to the mark on the console port and be sure to plug the connector into the right port Figure 3 29 Connect the console cable 1 2 3 4 5 1 RJ 45 connector 2 Console port 3 DB 9 female connector 4 Serial port on the configuration terminal 5 Console cable If the device has been powered on z When connecting ...

Page 47: ...cal Ethernet interface Follow these steps to connect a 100 1000 Mbps optical interface Step1 Point the end of the optical transceiver without a release lever toward the SFP transceiver socket verify that the optical transceiver is not positioned upside down and gently insert it into the socket Figure 3 30 Insert an optical transceiver Step2 Identify the Rx and Tx ports on the optical transceiver a...

Page 48: ...mission An XFP transceiver requires fiber cables with LC connectors Front panel of an XFP interface module Figure 3 32 Front panel of an XFP interface module Installing an XFP interface module Step1 Put on an ESD preventive wrist strap and verify that the wrist strap is properly grounded Then take the XFP interface module out of the package Step2 Loosen the captive screws on blank panel covering a...

Page 49: ...tional interface module pay attention to the following points z Do not use excessive force in the operation and do not touch the surface mounted components directly with your hands z After removing an optional module if the slot is to remain empty install a blank panel to prevent dust and ensure normal ventilation in the device XENPAK Module Introduction The 10 Gigabit Ethernet transceiver package...

Page 50: ... into the slot along the slide rails until it is firmly seated in the device Figure 3 35 Install an XENPAK module Step4 Fasten the screws on the XENPAK module to secure it in place z Keep the removed cover plate properly for future use z Do not over tighten the screws on the XENPAK module z XENPAK modules are hot pluggable on the device Removing an XENPAK module Step1 Put on an ESD preventive wris...

Page 51: ...evice Installation Verification During the installation of the device always verify the installation before powering on the device z The power supply system meets the device requirements z The ground cable is correctly connected z Both the console cable and power cables are correctly connected z All interface cables are routed indoors If outdoor routing of cables cannot be avoided check that netwo...

Page 52: ...arameters for the console terminal to communicate with the device Follow these steps to set the terminal parameters Step1 Start the PC and select Start Programs Accessories Communications HyperTerminal The Connection Description dialog box appears as shown below Type the name for the new connection and click OK Figure 4 1 Connection description interface Step2 In the Connect To dialog box select t...

Page 53: ...t the serial port parameters as shown below Set the properties of the serial port in the COM1 Properties dialog box as shown in Table 4 1 Table 4 1 Set serial port parameters Item Value Bits per second 9600 bps default Data bits 8 Parity None Stop bits 1 Flow control None ...

Page 54: ...ep4 After setting the serial port parameters click OK to enter the HyperTerminal window Figure 4 4 HyperTerminal window Step5 Configure the properties of the HyperTerminal Select File Properties and click the Settings tab Select VT100 or Auto detect from the Emulation drop down list box and click OK ...

Page 55: ...is properly connected the configuration terminal to be used for configuration is running and the terminal parameters have been set Boot Process After being powered on the device take the WX3024 as an example first implements memory initialization and then runs the extended program of BootWare The following system information is output on the terminal System is starting Booting Normal Extend BootWa...

Page 56: ...stem will start loading and decompressing the application file z To enter the Boot menu you must press Ctrl B within 4 seconds when the system prompts Press Ctrl B to enter extended boot menu z You need to restart the device if you want to enter the Boot menu after the application files are decompressed z For easy reading and understanding the extended Boot menu is referred to as the BootWare main...

Page 57: ...cates that the system has entered user view and you can configure the device now During the startup process the CPLD will be automatically upgraded to the latest version if any The system will display The board cpld update successfully please repower device after the upgrade process At this prompt power off and restart the device so that the new CPLD version takes effect ...

Page 58: ...guration files BootWare Program File The BootWare program file is used to boot applications during the startup of the device A complete BootWare program file includes a basic section and an extended section z The basic BootWare section is used to complete the primary initialization of the system z With rich human computer interaction HCI functions the extended BootWare section is used for initiali...

Page 59: ...d S types can be used to boot the system while an application file of the N type an application file other than the M B or S type cannot z You can rename the application files in the flash memory through the command line interface CLI after the application program is loaded You can modify the file type of the M B and N types application files through the BootWare menu or the CLI after application ...

Page 60: ...e C will appear as the first 26 characters plus 003 Web Files Web files are used by the switching engine to provide Web based functions and are released with version releases each version has a default Web file You are not recommended to modify the file name and settings Web files fall into main and backup files and are managed like the application files on the access control engine Approaches for...

Page 61: ...ce Update End No Does the Comware application need to be updated Usi ng Xmode m Yes Using TF TP Through the BootWare menu Through the CLI Using FTP BootWare Menus BootWare Main Menu When a device is powered on or restated the terminal first displays the following information System is starting Then the following information appears Booting Normal Extend BootWare The Extend BootWare is self decompr...

Page 62: ... Ctrl B within 4 seconds when the system prompts Press Ctrl B to enter extended boot menu z You need to restart the device if you want to enter the Boot menu after the application files are decompressed Press Ctrl B when the system prompts Press Ctrl B to enter extended boot menu Then the system prompts you to enter the BootWare password Please input BootWare password Enter the BootWare password T...

Page 63: ...Download Application Program To SDRAM And Run 2 Update Main Application File 3 Update Backup Application File 4 Update Secure Application File 5 Modify Serial Interface Parameter 0 Exit To Main Menu Enter your choice 0 5 Ethernet submenu Select 3 from the BootWare main menu to enter the Ethernet submenu The following information is displayed Enter Ethernet SubMenu Note the operating device is flas...

Page 64: ...e device operation submenu The following information is displayed DEVICE CONTROL 1 Display All Available Nonvolatile Storage Device s 2 Set The Operating Device 3 Set The Default Boot Device 0 Exit To Main Menu Enter your choice 0 3 Updating Software Through a Serial Connection Introduction to XMODEM To update BootWare and applications through a serial connection use the XMODEM protocol XMODEM is ...

Page 65: ...nter the BootWare main menu select 2 to enter the serial submenu and then select 5 to modify the baud rate The system displays the following BAUDRATE SET Note indicates the current baudrate Change The HyperTerminal s Baudrate Accordingly Baudrate Available 1 9600 Default 2 19200 3 38400 4 57600 5 115200 0 Exit Enter your choice 0 5 Select an appropriate downloading rate If you want to a 115200 bps...

Page 66: ...erminal connection Select File Properties In the Properties dialog box click Configure and then select 115 200 from the Bits per second drop down list box Figure 5 3 Modify the baud rate Select Call Call to reestablish the connection ...

Page 67: ...e back to 9 600 bps in HyperTerminal to ensure the normal display on the terminal screen when the system boots or reboots Updating BootWare Through a Serial Connection Enter the BootWare main menu refer to section BootWare Main Menu on page 5 4 and select 7 to enter the BootWare operation submenu For details about this submenu refer to section BootWare operation submenu on page 5 7 Select 3 from t...

Page 68: ... to the BootWare operation submenu BOOTWARE OPERATION SERIAL SUB MENU 1 Update Full BootWare 2 Update Extend BootWare 3 Update Basic BootWare 4 Modify Serial Interface Parameter 0 Exit To Main Menu Enter your choice 0 4 Select 1 from the BootWare operation submenu The following information appears Please Start To Transfer File Press Ctrl C To Exit Waiting CCCCCCCCCCCCCCCCCCCCCCCCCCCCCCC Select Tra...

Page 69: ...ion and application version to make sure that the correct file is used for the update z After downloading files with a changed baud rate timely change the baud rate back to 9 600 bps in HyperTerminal to ensure the normal display on the terminal screen when the system boots or reboots Updating Applications Through a Serial Connection To update an application file through a serial connection you nee...

Page 70: ...n remarkably shorten the software maintenance time TFTP is a TCP IP protocol used for file transfer between client and server It provides a simple and low overhead file transfer service TFTP provides unreliable data transfer over UDP and does not provide any access authorization and authentication mechanism It employs the timeout retransmission method to implement best effort delivery of data The ...

Page 71: ...bitEthernet 1 0 1 can be used for application update Configuring the Ethernet interface parameters Before updating an application file through the management Ethernet interface you need to configure the interface as follows Select 3 from the BootWare main menu to enter the Ethernet submenu and select 5 to enter the Ethernet interface configuration submenu ETHERNET PARAMETER SET Note Clear field Go...

Page 72: ...s available in the flash memory In case of insufficient space the update cannot proceed and the system will give an error prompt z The new application file replaces the existing file of the same type if any and becomes the only application file of that type In this example main bin replaces the application file with the attribute of M and becomes the only main application file z For details about ...

Page 73: ... engine of the device as 192 168 0 2 and that of the switching engine as 192 168 0 3 to configure the IP address of the switching engine you need to change to CLI of the switching engine by using the oap command Verify the connection by using the ping command z For operations on the switching engine you need to log in to the switching engine using the oap command configure the IP addresses as ment...

Page 74: ...th the same name on the server if any will be replaced without a prompt z The operations mentioned above are to be performed in user view z You can modify the backup configuration file with a text editor and then download the modified file to update the configuration The update takes effect upon system reboot Likewise you can download the application file to the device and overwrite the existing m...

Page 75: ...available by yourself z On the WX3000 series only the management Ethernet interface namely GigabitEthernet 1 0 1 can be used for application update For the rest steps refer to section Configuring the Ethernet interface parameters on page 5 14 section Updating an application file on page 5 15 and section Finalizing application update on page 5 15 Updating and Backing Up an Application Using FTP Thr...

Page 76: ...username set on the server 331 Password required for quest Password Enter the password 230 User logged in ftp After a successful connection you can execute the following commands to maintain the device Use the get and put commands to implement file download and backup ftp get main bin main bin Download the file from the server to the device flash main bin has been existing Overwrite it Y N y 227 E...

Page 77: ...g engine using the oap command configure the IP addresses as mentioned above and verify the connection by using the ping command 2 Enable the FTP server The FTP server feature supports concurrent access of multiple clients Upon receiving a request from an FTP client the FTP server performs the requested operation and returns the result Use the following command to enable FTP server System ftp serv...

Page 78: ...19189956 bytes sent in 11 09Seconds 1727 37Kbytes sec ftp quit 221 Server closing Updating Web Files on the Switching Engine If the application program is successfully upgraded and the switching engine has upgraded Web files the Web files are automatically upgraded after the system reboots manual upgrade is not recommended During the starting process of the switching engine the device searches fil...

Page 79: ...nu Enter your choice 0 3 Displaying All Files Displaying all files through the BootWare menu Select 1 from the file control submenu The following information appears Display all file s in flash M MAIN B BACKUP S SECURE N A NOT ASSIGNED NO Size B Time Type Name 1 19189956 Aug 08 2008 20 00 00 M flash main bin 2 855 Aug 08 2008 20 00 00 N A flash startup cfg Displaying all files in the CLI System di...

Page 80: ... will set the boot file Continue Y N y The specified file will be used as the main boot file at the next reboot Now the file type of main bin has been changed to M B and the file will used as the main application file at the next boot of the device If an M type file already exists it has become an N type file automatically Deleting a File Deleting a file through the BootWare menu Select 3 from the...

Page 81: ...ow to deal with password loss BootWare Password Loss If you have forgotten the BootWare password contact your local dealer The technical support staff will help you log in to the system and set a new password To change the BootWare password enter the BootWare main menu select 5 and follow the instructions The following information is displayed on the terminal please input old password Please input...

Page 82: ...guration with the configuration file stored in the flash memory To restore the original configuration use the display saved configuration command to view the contents of the configuration file copy them and run them z If the password is stored in plain text you can use the display current configuration command to view the password in the current configuration If you use the set authentication pass...

Page 83: ...e Extend BootWare Y N Y Begin to backup the Extend BootWare Done Restoring BootWare To restore the backup BootWare from the flash memory select 2 from the BootWare main menu and follow the instructions Will you restore the Basic BootWare Y N Y Begin to restore Normal Basic BootWare Done Will you restore the Extend BootWare Y N Y Begin to restore Normal Extend BootWare Done Backing Up and Restoring...

Page 84: ...oring bootrom please wait Restore bootrom completed The entire BootWare section has been restored to the system System bootrom restore part This command will restore bootrom file Continue Y N y Now restoring bootrom please wait Restore bootrom completed The extended BootWare section has been restored to the system ...

Page 85: ...p Troubleshooting the Power System For the WX3024 you can check whether the power system of the device has failed by viewing the RPS LED and PWR LED on the front panel for the WX3010 and WX3008 you can check whether the power system of the device has failed by viewing the PWR LED on the front panel When the power supply functions normally the RPS LED stays on or the PWR LED is blinking green If th...

Page 86: ...reen If illegible characters are displayed check whether the terminal parameters are correct Verify the following parameter settings z Bits per second 9600 z Data bits 8 z Parity None z Stop bits 1 z Flow control None z Terminal emulation VT100 ...

Page 87: ... A Specifications of Optional Interface Modules A 1 10G SFP Optical Transceivers A 1 FE SFP Optical Transceivers A 1 GE BIDI Optical Transceivers A 2 FE BIDI Modules A 3 XFP Optical Transceivers A 4 XENPAK Optical Transceivers A 4 ...

Page 88: ...es Data rate 1250 Mbps Connector type Duplex LC Fiber mode MMF SMF Cable specification 50 125 µm 9 125 µm Output optical power 9 5 to 0 dBm 9 5 to 3 dBm Receiving sensitivity 17 dBm 20 dBm Optical saturation 3 dBm FE SFP Optical Transceivers Appearance of an FE SFP optical transceiver is shown in Figure A 1 Table A 2 Specifications of FE SFP optical transceivers Specifications Item SFP FE SX MM131...

Page 89: ...2 Appearance of a GE FE BIDI optical transceiver Table A 3 Specifications of GE BIDI optical transceivers Specifications Item SFP GE LX SM1310 BIDI SFP GE LX SM1490 BIDI Sending end Tx 1310 nm 1490 nm Central wavelength Receiving end Rx 1490 nm 1310 nm Maximum transmission distance 10 km 6 21 miles Data rate 1250 Mbps Connector type Duplex LC Fiber Mode SMF Cable specification 9 125 µm Output opti...

Page 90: ...ons Item SFP FE LX SM1310 BIDI SFP FE LX SM1550 BIDI Sending end Tx 1310 nm 1550 nm Central wavelength Receiving end Rx 1550 nm 1310 nm Maximum transmission distance 15 km 9 32 miles Data rate 155 Mbps Connector type Duplex LC Fiber Mode SMF Cable specification 9 125 µm Output optical power 15 to 8 dBm Receiving sensitivity 31 dBm Optical saturation 3 dBm z BIDI optical transceivers use different ...

Page 91: ...iber Mode MMF SMF Cable specification 50 125 µm 9 125 µm Fiber bandwidth 2000 MHz km Output optical power 7 3 to 1 08 dBm 8 2 to 0 5 dBm Receiving sensitivity 11 1 dBm 12 6 dBm Pressure sensitivity 7 5 dBm 10 3 dBm Optical saturation 1 dBm 0 5 dBm XENPAK Optical Transceivers Figure A 4 Appearance of an XENPAK optical transceiver Table A 6 Specifications of XENPAK optical transceivers Specification...

Page 92: ...Gbps Connector type Duplex LC Fiber Mode MMF SMF Cable specification 50 125 µm 9 125 µm Modal bandwidth 2000 MHz km Output optical power 7 3 to 1 dBm 8 2 to 0 5 dBm Receiving sensitivity 11 1 dBm 12 6 dBm Pressure sensitivity 7 5 dBm 10 3 dBm Optical saturation 1 dBm 0 5 dBm ...

Page 93: ...i Table of Contents Appendix B Installation of Lightning Arrester for Network Interfaces B 1 Tools B 1 Installation Procedure B 1 Precautions B 2 ...

Page 94: ...n the chassis of the switch Keep the arrester as close to the grounding screw of the switch as possible 2 Cut the ground cable of the arrester of a suitable length according to the distance between the arrester and the grounding screw and then fasten the cable on the grounding screw tightly 3 Use the multimeter to verify whether the ground cable of the arrester has a close touch with the grounding...

Page 95: ...etwork interface of the switch z Correctly ground the lightning arrester When connecting the ground cable make sure that the ground cable is of a proper length and has a good touch with the grounding screw of the switch Check the ground cable with a multimeter after connection z Install adequate lightning arresters for network interfaces When there are more than one network interface connecting to...

Page 96: ...i Table of Contents Appendix C Installation of Lightning Arrester for AC Power C 1 ...

Page 97: ...herwise the protection circuit has been damaged Multipurpose power socket connected to the device protected by the arrester Power socket complied with IEC standard connected to the power supply of the equipment room through power cable Overload auto protector which can be manually reset Mainboard either the grounding cable is not well connected or the live and zero lines are improperly connected N...

Page 98: ...he PE terminal of the arrester is not well grounded z Otherwise it means that the power receptacle of the arrester is set to the reverse polarity In this case open the power receptacle of the arrester and correct the polarity After that if the red LED still alarms it means that the arrester is not well grounded yet ...

Reviews: