


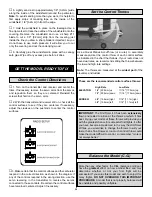


We used Top Flite MonoKote White (TOPQ0204),
Transparent Blue (TOPQ0304), Light Purple (TOPQ0224)
and Black (TOPQ0208) to cover our Old Timer 40.
Fuselage and Tail:
❏
1.
1/4" strips at fin and stab as described
❏
2.
Fin TE, followed by stab TE
❏
3.
Fuselage bottom
❏
4.
Fuselage right side
❏
5.
Fuselage left side
❏
6.
Fuselage top
❏
7.
Stab bottom, followed by top
❏
8.
Fin left side, followed by the right side
❏
9.
Elevator LE
❏
10. Elevator bottoms, followed by the top
❏
11. Rudder LE, right side followed by the left side
❏
12. Die-cut 1/8" 3-ply landing gear fairings
Wing:
❏
1.
Bottom center-section
❏
2.
Bottom right, followed by the left wing panel
❏
3.
Top center-section followed by the right and the left
wing panel
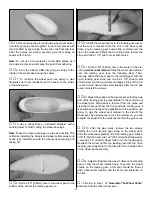
After the model is covered, use fuelproof model paint,
30-minute epoxy thinned with alcohol or finishing resin to
coat areas that may be exposed to raw fuel or exhaust
residue such as the firewall, engine tray, wing saddle and
fuel tank area. Top Flite LustreKote
®
is a high quality paint
that is fuelproof and perfectly matches Top Flite MonoKote.
The paint is well suited to putting a high quality finish on
ABS wheel pants, but does have a tendency to curl
materials such as styrene and butyrate (windshield and side
windows).
Do not paint the clear windshield with LustreKote directly
from the can. It can cause the plastic to curl. We recommend
Formula-U for painting the clear windshield directly from
the can.
We used LustreKote White (TOPR7204), Black (TOPR7208)
and Light Purple (TOPR7224) to paint the wheel pants. The
inside of the engine compartment was first coated with
thinned epoxy and was then brushed with white.
❏
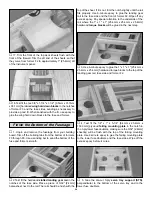
1. Cut the covering from the hinge slots in the elevator
and stab. Also cut the covering from the groove for the
tailgear wire.
❏
2. Reinstall the CA hinges in the elevator without glue.
INSTALLING CA HINGES
The hinge material supplied in this kit consists of a 3-layer
lamination of mylar and polyester. It is specially made for
the purpose of hinging model airplane control surfaces.
Properly installed, this type of hinge provides the best
combination of strength, durability and ease of
installation. We trust even our best show models to these
hinges, but it is essential to install them correctly. Please
read the following instructions and follow them carefully to
obtain the best results. These instructions may be used to
effectively install any of the various brands of CA hinges.
The most common mistake made by modelers when
installing this type of hinge is not applying a sufficient
amount of glue to fully secure the hinge over its entire
surface area; or, the hinge slots are very tight, restricting
the flow of CA to the back of the hinges. This results in
hinges that are only “tack glued” approximately 1/8" to
1/4" into the hinge slots. The following technique has been
developed to help ensure thorough and secure gluing.
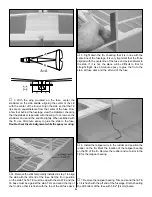
It is best to leave a very slight hinge gap, rather than
closing it up tight, to help prevent the CA from wicking
along the hinge line. Make sure the control surfaces will
deflect to the recommended throws without binding. If you
have cut your hinge slots too deep, the hinges may slide
in too far, leaving only a small portion of the hinge in the
control surface. To avoid this, you may insert a small pin
through the center of each hinge before installing. This pin
will keep the hinge centered while you install the control
surfaces.
Install the Hinges
FINAL HOOKUPS & CHECKS
Painting Your Model
Suggested Covering Sequence
37
Summary of Contents for Old Timer
Page 6: ...6 DIE PATTERNS...
Page 7: ...7 DIE PATTERNS...
Page 44: ...TWO VIEW DRAWING Use copies of this page to plan your trim scheme...
Page 45: ...B C...
Page 46: ...D A...


