❏
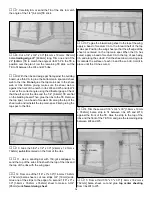
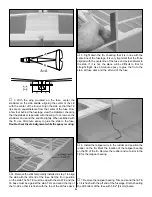
1. Turn the fuse upside-down. On one end of the landing
gear rail make, in the groove, a mark 3/4" [19mm] in from
the fuse side and 3/32" [2.4mm] aft from the forward edge
of the landing gear groove. At the other end of the rail, place
a mark 3/4" [19mm] in from the fuse side and 3/32" [2.4mm]
forward of the aft edge of the groove.
❏
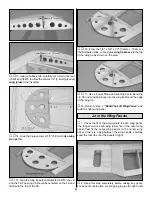
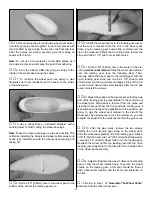
2. At both marks drill a 3/16" [4.8mm] diameter hole
through the landing gear rail and torque block,
perpendicular to the rail. Use a hobby knife to round the
edge of the hole to allow the main landing gear wire to seat
completely.
❏
3. Insert the 3/16" main landing gear in the slot of the
landing gear rail.
❏
4. Position the two nylon landing gear straps over the
main landing gear as shown on the plan. Mark the screw
hole locations on the landing gear rail.
❏
5. Drill a 1/16" [1.6mm] diameter pilot hole at each mark.
❏
6. Temporarily secure the main landing gear to the landing
gear rail with the landing gear straps and four #2 x 3/8" screws.
❏ ❏
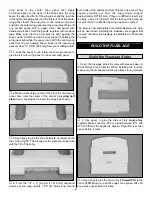
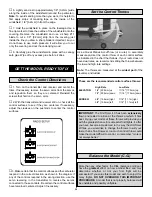
1. Trim one matching set of wheel pant halves along the
molded cut lines. You can use a hobby knife to carefully
score along the cut lines and flex the plastic until the excess
breaks free, or use Hobbico Curved-tip Canopy Scissors to
cut along the lines. Save the leftover ABS cut from the pant
halves. For now, don’t worry about accurately cutting out the
opening in each wheel pant half – just cut an approximate
opening for the wheel.
❏ ❏
2. Use your sanding bar to carefully true the edges of
the wheel pant halves so that when you glue them together,
the seam will be as small and straight as possible. Use 150
or 220-grit sandpaper to remove the flashing and thoroughly
roughen the inside of the wheel pant halves.
❏ ❏
3. Test fit the wheel pant halves together and make
adjustments where necessary for the best possible fit.
❏ ❏
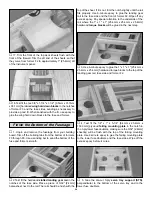
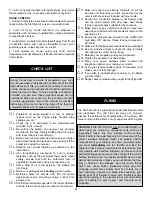
4. Glue the die-cut 3-ply wheel pant mount around
the indentation on the inside of the wheel pant. Note the
wheel pant mount orientation in the photo.
Assemble the Wheel Pants
Mount the Landing Gear
30
Summary of Contents for Old Timer
Page 6: ...6 DIE PATTERNS...
Page 7: ...7 DIE PATTERNS...
Page 44: ...TWO VIEW DRAWING Use copies of this page to plan your trim scheme...
Page 45: ...B C...
Page 46: ...D A...


