


wing panel to the center wing panel first. Apply
30-minute epoxy to the back of the shear web, the wing
spars, the edge and front of the wing joiner and the root ribs
of the right outer wing panel and the left root rib of the center
wing panel. Insert the wing joiner in the center wing panel
and slide the outer wing panel over the wing joiner. Wipe off
any excess epoxy with a paper towel dampened with
denatured alcohol. Hold the panels together with masking
tape. Make sure that the wing joiner is tight against the
shear webs. Small bar clamps work great for holding the
wing joiner tight while the epoxy cures. With the center wing
panel flat on your building board, block up the outer wing
panel at rib W10, 2-5/8" [66.6mm] from your building board.
❏
3. Once the epoxy cures, follow the same procedure to
glue the left outer wing panel to the center wing panel.
❏
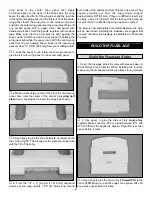
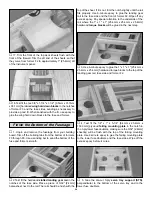
4. Make a mark at the center of the TE of the center wing
panel. Also mark the center of the die-cut 3-ply wing bolt
plate. Use a sanding bar to bevel the edges as shown.
❏
5. Use epoxy to glue the wing bolt plate, centered on the
top of the wing TE. The aft edge of the plate should be flush
with the TE of the wing.
❏
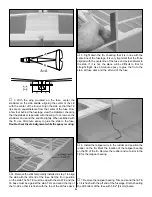
6. From the 1/4" x 4" [6.4mm x 101.6mm] hardwood
dowel, cut two wing dowels 1-7/8" [47.6mm] long. Round
both ends of the dowels and test fit them in the wing. They
should protrude out from the wing dowel support
approximately 3/8" [9.5mm]. If they are difficult to insert into
the wing, use a 1/4" [6.4mm] drill to clean out the holes. Do
not glue them in until after the wing has been covered.
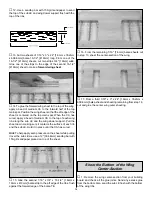
The wing is now completely assembled. Because the wing
will be used when installing the stabilizer, we suggest that
you wait until after the fuselage is assembled to final sand
the wing.
1. Cover the fuselage plan side view with waxed paper or
Great Planes Plan Protector. When installing the formers,
make sure the embossed lettering is always facing forward.
❏
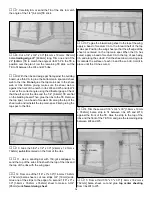
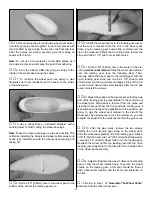
2. Use epoxy to glue the die-cut 3-ply engine tray
together. Make sure tray ET2 is glued between ET1 and
ET3 and that all the edges are aligned. Wipe off any excess
epoxy before it cures.
❏
3. Use epoxy to glue the die-cut 3-ply firewall F1A to the
front of F1B. Make sure all the edges are aligned. Wipe off
any excess epoxy before it cures.
Build the Fuselage Sides
BUILD THE FUSELAGE
21
Summary of Contents for Old Timer
Page 6: ...6 DIE PATTERNS...
Page 7: ...7 DIE PATTERNS...
Page 44: ...TWO VIEW DRAWING Use copies of this page to plan your trim scheme...
Page 45: ...B C...
Page 46: ...D A...


