background image

65

ATP-2000

User Guide

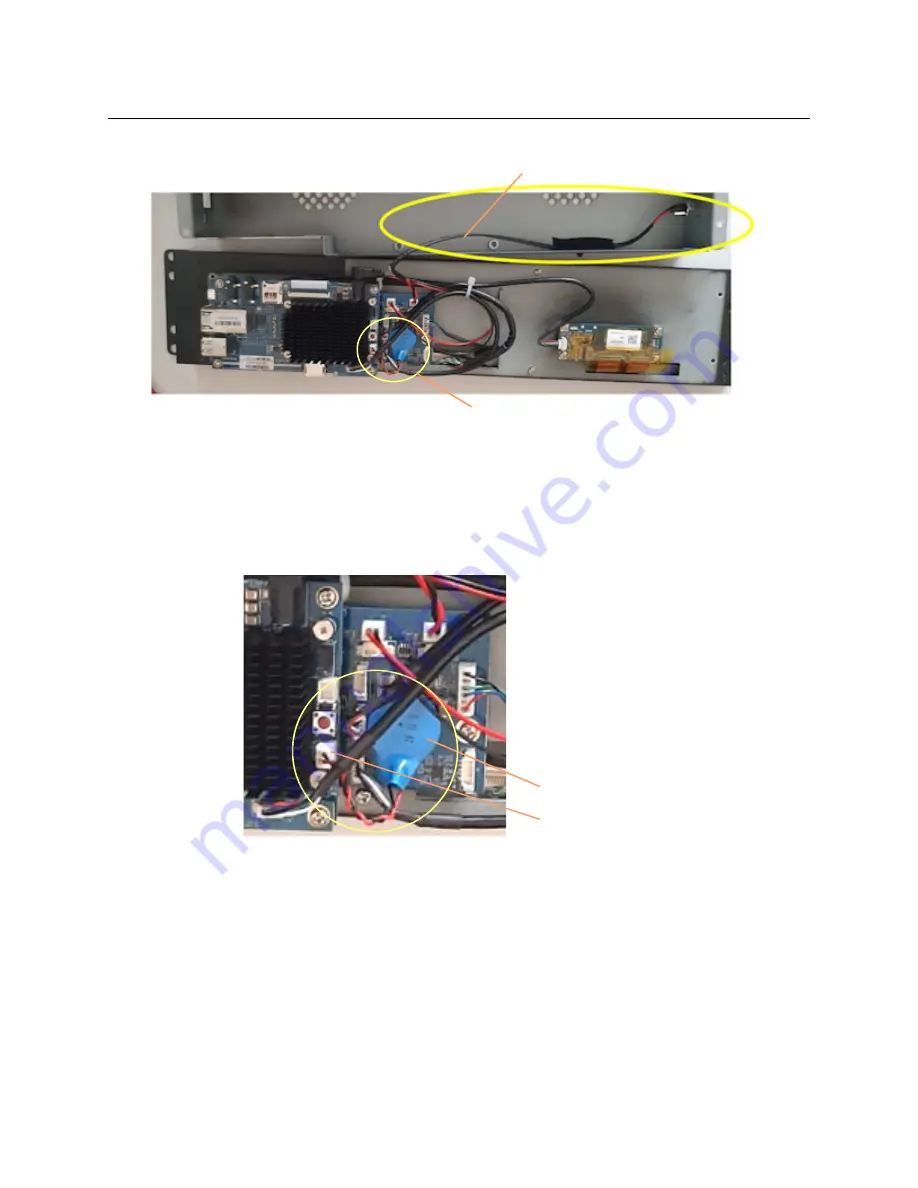
Fig. E-3: Rear Cover Removed

Now proceed to 

Step 3: Remove Battery Unit

.

Step 3: Remove Battery Unit

1 Locate the battery unit in the unit. It is a blue casing with a pair of wires (twisted black/

red) going to it from a white, 2-pin header-style connector.

Fig. E-4: Battery Unit Location

2 Disconnect the black/red twisted wires from the 2-pin header connector, noting the 

orientation of the wires to the connector for reassembly.

Wire

Battery unit, blue casing

White 2-pin header-style connector

Battery unit, blue casing

Summary of Contents for ATP-2000

Page 1: ...User Guide 13 03082 230 AA 24 November 2020 ATP 2000 ADVANCED TOUCH PANEL ...

Page 2: ...ange without notice Terms and Conditions Please read the following terms and conditions carefully By using ATP 2000 documentation you agree to the following terms and conditions Grass Valley hereby grants permission and license to owners of ATP 2000 to use their product manuals for their own internal business use Manuals for Grass Valley products may not be reproduced or transmitted in any form or...

Page 3: ...tion about each device specific screen please see the separate corresponding individual device documentation Related Documentation Use the following related documentation to configure and use an ATP 2000 Advanced Touch Panel You can obtain the latest product documentation from Grass Valley s website see the Documentation Library at https wwwapps grassvalley com docs page Part Number Document Title...

Page 4: ...iv Notices ...

Page 5: ...aking any other equipment connections Identifies an external protective grounding terminal which may be connected to earth ground as a supplement to an internal grounding terminal Indicates that static sensitive components are present which may be damaged by electrostatic discharge Use anti static procedures equipment and surfaces during servicing Indicates that the equipment has more than one pow...

Page 6: ...t use liquid or aerosol cleaners use only a damp cloth Dangerous voltages may exist at several points in this equipment To avoid injury do not touch exposed connections and components while power is on High leakage current may be present Earth connection of product is essential before connecting power Prior to servicing remove jewelry such as rings watches and other metallic objects To avoid fire ...

Page 7: ...e proper ventilation To prevent product overheating provide equipment ventilation in accordance with the installation instructions Do not operate with suspected equipment failure If you suspect product damage or equipment failure have the equipment inspected by qualified service personnel To reduce the risk of electric shock do not perform any servicing other than that contained in the operating i...

Page 8: ...in an ESD bag Cards in an earth grounded metal frame or casing do not require any special ESD protection Battery Handling This product may include a backup battery There is a danger of explosion if the battery is replaced incorrectly Replace the battery only with the same or equivalent type recommended by the manufacturer Dispose of used batteries according to the manufacturer s instructions Befor...

Page 9: ...rence dans le texte doit être remplacé par un fusible du même calibre Identifie une borne de mise à la terre de protection Il faut relier cette borne à la terre avant d effectuer toute autre connexion à l équipement Identifie une borne de mise à la terre externe qui peut être connectée en tant que borne de mise à la terre supplémentaire Signale la présence de composants sensibles à l électricité s...

Page 10: ...limentation avant de nettoyer l équipement Ne pas utiliser de nettoyants liquides ou en aérosol Utilisez uniquement un chiffon humide Des tensions dangereuses peuvent exister en plusieurs points dans cet équipement Pour éviter toute blessure ne touchez pas aux connexions ou aux composants exposés lorsque l appareil est sous tension Avant de procéder à toute opération d entretien ou de dépannage en...

Page 11: ...N utilisez pas l équipement si vous suspectez un dysfonctionnement du produit Faites le inspecter par un technicien qualifié Pour réduire le risque de choc électrique n effectuez pas de réparations autres que celles qui sont décrites dans le présent manuel sauf si vous êtes qualifié pour le faire Confiez les réparations à un technicien qualifié La maintenance doit se réaliser dans un milieu libre ...

Page 12: ...mettre une carte de côté assurez vous de la ranger dans un sac protecteur antistatique Les cartes qui sont reliées à un châssis ou boîtier métallique mis à la terre ne nécessitent pas de protection antistatique spéciale Manipulation de la pile Ce produit peut inclure une pile de sauvegarde Il y a un risque d explosion si la pile est remplacée de manière incorrecte Remplacez la pile uniquement par ...

Page 13: ... for recycling information Grass Valley believes this environmental information to be correct but cannot guarantee its completeness or accuracy since it is based on data received from sources outside our company All specifications are subject to change without notice If you have questions about Grass Valley environmental and social involvement WEEE RoHS REACH etc please contact us at environment g...

Page 14: ... short circuit the battery by adhering to the appropriate safe handling practices Do not dispose of a battery into fire or a hot oven or mechanically crush it or cut it because this can result in an explosion Do not dispose of batteries in a fire as they may explode Batteries may explode if damaged or overheated Do not dismantle open or shred batteries Do not leave a battery in an extremely high t...

Page 15: ...ubstance that may leak out If any leakage touches your skin or clothes wash it off immediately using soap and plenty of water CAUTION Do not apply pressure to the display surface nor to its surroundings because the internal LCD cell structure of the display may be damaged CAUTION Be careful when handling and touching the display because the polarized front surface is soft and easily scratched CAUT...

Page 16: ...ment Emission requirements EN IEC 61000 3 2 2019 Class D Electromagnetic Compatibility Limits for harmonic current emissions EN 61000 3 3 2013 A1 2019 Electromagnetic Compatibility Limits of voltage changes voltage fluctuations and flicker EN 55024 2010 A1 2015 Immunity requirements for information technology equipment FCC CFR 47 Part 15 Class A FCC Part 15 Subpart B Class A ISED Standard s ICES 0...

Page 17: ...area contact with the metal shell Note This equipment has been tested and found to comply with the limits for a Class A digital device pursuant to part 15 of the FCC Rules These limits are designed to provide reasonable protection against harmful interference when the equipment is operated in a commercial environment This equipment generates uses and can radiate radio frequency energy and if not i...

Page 18: ...ument 3 2 Panel Installation 5 Unpacking 6 Rack Mount Installation 7 Vesa Mount Installation 8 Connections 9 Starting Up 11 Powering Off 12 3 Getting Started 13 Start Up Sequence 14 Initial Start up Screen 14 Splash Screen 14 Home Screen 14 Initial ATP 2000 Panel Device Configuration 16 Introduction 16 Accessing the ATP 2000 Control Screen 17 Configure Initial Settings in the Control Screen 18 4 A...

Page 19: ...on on Web Page 39 Software Upgrade 40 Introduction 40 Upgrade Package 40 Step 1 Check Current Software Version 40 Step 2 Import Upgrade Package 41 Step 3 Upgrade the ATP 2000 42 Step 4 Finally Check the Upgraded Software Version 42 Monitoring ATP 2000 Panel Alarms 43 Getting Panel Log Files 45 Replacing the Battery 45 Appendix A Hardware Specification 47 Unit Views 48 Unit Specification 49 Physica...

Page 20: ...Supply Module 60 Physical 60 Electrical 60 Appendix E Battery Replacement 61 Introduction 61 Battery Removal Procedure 62 Preliminaries 62 Step 1 Uninstall ATP 2000 Panel Unit from Rack 63 Step 2 Panel Unit Disassembly 63 Step 3 Remove Battery Unit 65 Step 4 Refit Battery Unit 66 Step 5 Panel Unit Reassembly 66 Step 6 Re Install in Rack 67 Contact Us 69 ...

Page 21: ...xxi Table of Contents ...

Page 22: ...ring and signal routing in modern broadcast environments The panel is used in a GV Orbit system Fig 1 1 ATP 2000 Advanced Touch Panel Benefits and features include Fan less cooling design for low noise and reliability High quality touch screen and symmetrical viewing angle Flexible and optimized soft user control panels Device parameter control Fail safe file system An ATP 2000 initially powers up...

Page 23: ...t battery unit Table 1 2 Software Versions Software Version ATP 2000 software v1 0 0 or later GV Orbit v1 5 0 or later See Note 1 Note 1 The panel is designed to work with a GV Orbit system and requires the system to have its DHCP facility enabled when configured Table 1 3 ATP 2000 Supported Devices Card Software Version Comment XIP 3901 XIP 3901 UDC IP version 1 2 0 build 439 Ability to configure...

Page 24: ...n a GV Orbit system Chapter 4 ATP 2000 Control Screen Web Page on page 21 for information on the panel s configuration web page Chapter 5 Operation on page 27 for operation instructions Chapter 6 Maintenance on page 35 for maintenance instructions For ATP 2000 hardware information see Appendix A Hardware Specification on page 47 Appendix B Unit Dimensions on page 53 Appendix C Connectors Controls ...

Page 25: ...4 Introduction This Document ...

Page 26: ...5 Panel Installation Panel Installation Unpacking 6 Rack Mount Installation 7 Vesa Mount Installation 8 Connections 9 Starting Up 11 Powering Off 12 ...

Page 27: ...our Grass Valley Partner or Grass Valley at once See Grass Valley Technical Support on page 69 2 Check that the equipment has not been damaged in transit If any damage has occurred notify your Grass Valley Partner or Grass Valley directly and the carrier immediately 3 Always retain the original packing materials if possible they could prove useful should it ever be necessary to transport or ship t...

Page 28: ...in the rack with four M6 screws and washers Fasten it to captive nuts of the rack frame mounting strip See Figure 2 2 Fig 2 2 ATP 2000 Rack Mounting CAUTION Support the body of the DC Power Supply Module Do not let it hang by any electrical cords CAUTION Allow 50mm approximately 2 inches clearance at the rear of the ATP 2000 for unit cooling airflow mating connectors and cables Air Venting Grilles...

Page 29: ...t to the Vesa mounting bracket with four M4 x 10mm screws and washers Fasten it to captive nuts of the rack frame mounting strip CAUTION Support the body of the DC Power Supply Module Do not let it hang by any electrical cords CAUTION Allow 50mm approximately 2 inches clearance at the rear of the ATP 2000 for unit cooling airflow mating connectors and cables Note See Environmental on page 49 in Ap...

Page 30: ... to DC 12V See Figure 2 4c Fig 2 4 ATP 2000 Connections 3 Connect the power supply unit to an AC mains supply 4 Apply AC power Note See Connectors Controls Interfaces on page 55 in Appendix C for connector details Note The ATP 2000 unit needs to be connected to the same control management network as the GV Orbit server s c Connect DC Power Lead from Power Supply Unit to DC 12V a ATP 2000 Rear View...

Page 31: ...lly there is no power on off switch CAUTION An ATP 2000 AdvancedTouch Panel contains two micro SD memory cards These are fitted to two micro SD card slots in the unit and should not be removed Fig 2 5 ATP 2000 Connections Two fitted micro SD card memory cards Do not remove ...

Page 32: ...e Screen When the ATP 2000 Advanced Touch Panel is showing its Home Screen in the rack then its rack installation is complete See Start Up Sequence on page 14 for more information about the device s start up sequence To get started see Getting Started on page 13 Note An ATP 2000 panel ships with DHCP enabled The panel requires a GV Orbit system to have its DHCP facility enabled On unit power up an...

Page 33: ...Installation Powering Off Powering Off To power off the ATP 2000 unit turn off the DC power that enters the unit from the side No shutdown procedure is required because the hardware and file system is fail safe ...

Page 34: ...ment 16 Panel Discovery 16 Device List 16 Accessing the ATP 2000 Control Screen 17 From GV Orbit Client 17 From a Web Browser 17 Configure Initial Settings in the Control Screen 18 Step 1 Network Settings 18 Step 2 GV Orbit Server Settings 18 Step 3 Panel Manager Settings 19 Connect to Network 19 This chapter assumes that the ATP 2000 Advanced Touch Panel has been installed in a rack see Panel Ins...

Page 35: ...ge 11 Splash Screen During start up the panel briefly displays an initial screen followed by a Splash screen which shows some unit information including ATP 2000 panel model number ATP 2000 software version Unit s IP address Fig 3 1 ATP 2000 Splash Screen Home Screen After start up the ATP 2000 shows an operating Home screen See Figure 3 2 for an example home screen IP Address of panel Subnet Mask...

Page 36: ... 2000 Home Screen Software version 1 0 Click the Home icon to return to the Home screen Select icon to see panel information Note Screen brightness is controlled from the unit s control screen web page See Accessing the ATP 2000 Control Screen ...

Page 37: ...anel Discovery GV Orbit Client can automatically discover the panel and its IP address if the panel is connected to a network with DHCP enabled and with multicast data packets enabled as part of a GV Orbit system the panel is presented in the Client s Network window If the panel s Panel ID has not yet been set up then the ATP 2000 appears in the unassigned devices section of the Network window The...

Page 38: ...twork window In this case to view the control screen web page 1 Right click on the ATP 2000 item in the Network window and select Control The unit s control screen web page is shown See Figure 3 3 See ATP 2000 Control Screen Web Page on page 21 for a full description Fig 3 3 ATP 2000 Web Page From a Web Browser To initially display the device s control screen web page without a GV Orbit system 1 N...

Page 39: ...ess 3 Click Apply to apply any network settings changes Step 2 GV Orbit Server Settings 1 Configure GV Orbit server settings GVOP Domain GV Orchestration Protocol GVOP Domain number GV Server IP IP address of the GV Orbit server in the system PanelId Panel Id for the ATP 2000 unit in the GV Orbit system This is a RollCall address for example E000 01 00 which must be unique in a system Panel Name E...

Page 40: ...he panel to the GV Orbit system control management network if not already connected The GV Orbit system will discover it This has now set up the minimum settings to get started with the panel For details about the unit s web page and other settings see ATP 2000 Control Screen Web Page on page 21 Note For full functionality the following must have network connectivity with multi cast data enabled o...

Page 41: ...20 Getting Started Configure Initial Settings in the Control Screen ...

Page 42: ...1 ATP 2000 Control Screen Web Page ATP 2000 Control Screen Web Page Introduction 22 Accessing ATP 2000 Control Screen 22 From a Web Browser 22 From GV Orbit Client 22 ATP 2000 Control Screen Web Page 23 ...

Page 43: ...the browser The web page is shown See Figure 4 2 on page 23 From GV Orbit Client 1 Right click on the ATP 2000 item in the Network window and select Control Fig 4 1 ATP 2000 Web Page The ATP 2000 web page is shown in the GV Orbit Client see Figure 4 2 Note GV Orbit Client An ATP 2000 panel device can appear in the Network window of the GV Orbit Client if DHCP is enabled on the ATP 2000 panel there...

Page 44: ... Page Fig 4 2 ATP 2000 Web Page Fig 4 3 ATP 2000 Web Page Zoomed in Note The ATP 2000 web page is wide View the web page in a browser window or a GV Orbit Client window which is at least 1920 pixels wide Web page left hand side Web page right hand side ...

Page 45: ...e Domain number can be entered here if required Default domain is100 GV Server IP Enter the IP Address of the GV Orbit server in the GV Orbit system Panel Id Displays the Panel ID RollCall address of the panel in the GV Orbit system Enter the unique Panel ID here as part of the set up of a panel See Getting Started on page 13 Panel Name Enter a human readable name to identify the panel by Location...

Page 46: ...lush out unfound cards from the card list Logging Download Log Files Click to download ATP 2000 panel s log files to the client computer A zip file is downloaded to the client computer running the web browser The zip file contains a flat list of one or more log txt files Logs include panel software application logs and system logs Log file entry has a date a category warning error and a log messag...

Page 47: ...26 ATP 2000 Control Screen Web Page ATP 2000 Control Screen Web Page ...

Page 48: ...Home Screen 28 Select Items 28 Card Screens 30 Accessing a Parameter Control Screen 30 Card List Grid 31 Generic Parameter Control Screen 32 Generic Parameter Control Operation 32 Change Card Being Controlled 33 Back to Home Card or Card Channel Main Screen 34 ...

Page 49: ...ions with a minimum number of user actions Fig 5 1 ATP 2000 Home Screen Example The Home screen has a fixed layout Select Items From the Home screen items cards and functions can be selected 1 Select Cards on the left hand side of the panel LHS All cards devices that the GV Orbit system can manage are listed on the right hand side of the panel Click the Home icon to return to the Home screen Click...

Page 50: ...cted for Devices Cards Modules LHS RHS For Cards selected on LHS the RHS shows a list of card types to control Select an item type to control For example XIP Note Supported card types are listed in Appendix A Supported Devices on page 45 Early panel software version support a reduced list of devices and the list will be expanded in further software versions Note Items on screen may be grayed out i...

Page 51: ...ticular card type is selected the Card Home screen is shown which lists all cards of the selected type that can be parameter controlled on left hand side and shows the card s adjustable parameters on right hand side Fig 5 4 Generic Card Home Screen Note Card Screens Parameters for a particular device module card type are device specific and the corresponding card home screens and any subsequent ca...

Page 52: ...e card list grid adjusts automatically adding Next and Prev buttons appropriately Fig 5 5 Parameter Control Card Home Screen Card List Grid A list of all cards of the selected type that can be controlled by the user Home icon Parameter control home screen for the selected card Card names on selection buttons take the default form Card N Selected card Card name Frame Slot number Selected card type ...

Page 53: ...ypically in the form of a block diagram Blocks are shown dimmer where parameters are not controllable Fig 5 6 Example Card Parameter Control Screen Main Menu Example for XIP Card Shown 1 Select the high level parameter control screen for card or card channel For example UDC 1 See Figure 5 6 2 Select a card function to control For example HDR Processing See Figure 5 6 Controls are presented for the...

Page 54: ...d 4 Adjust parameter values as required Refer to specific card documentation Change Card Being Controlled The user can change the card being controlled and remain on the same Parameter Control screen on the RHS in order to quickly change parameters across different cards To change the card being controlled at any time 1 Select another card in the Card List on the LHS of the Card Screen The Card be...

Page 55: ...ric Parameter Control Screen Back to Home Card or Card Channel Main Screen 1 Click Main Menu to go back to the Home card or card channel Parameter Control screen Fig 5 9 Click Main Menu Example shown is for XIP Card RHS ...

Page 56: ...t Details Dialog 38 Panel Information on Web Page 39 Software Upgrade 40 Introduction 40 Upgrade Package 40 Step 1 Check Current Software Version 40 Step 2 Import Upgrade Package 41 Step 3 Upgrade the ATP 2000 42 Step 4 Finally Check the Upgraded Software Version 42 Monitoring ATP 2000 Panel Alarms 43 Getting Panel Log Files 45 Replacing the Battery 45 ...

Page 57: ...eBoot from ATP 2000 Web Page Factory Reset To reset the ATP 2000 back to factory settings on the web page 1 Click Factory under the Panel Manager section of the web page See Figure 6 2 2 Click OK to any prompts to reset the panel The panel returns to its shipped state but with the current software version Fig 6 2 Factory Reset from ATP 2000 Web Page At Reboot Panel click Start to restart reboot AT...

Page 58: ...ge Panel Information from Home Screen From the front panel of the ATP 2000 1 Select the settings cog on the front panel A Panel Info pop up dialog is shown displaying device information Fig 6 3 ATP 2000 Unit Panel Info 2 To close the Panel Info dialog either click on the in the top right of the dialog or click on the cog icon on the front panel to deselect it Select the settings cog icon to see pa...

Page 59: ...bit Client 1 Locate the ATP 2000 device in the tree list right click on it and select Info A Details window is shown for the device displaying device information Fig 6 4 ATP 2000 Unit Information in Details Window 2 Close the Details window Device s software version IP address RollCall address called Panel ID on an ATP 2000 s control screen web page ...

Page 60: ...device in the Network window s tree list right click on it and select Control The ATP 2000 s web page is shown in GV Orbit Client See Chapter 4 ATP 2000 Control Screen Web Page on page 21 Fig 6 5 ATP 2000 Web Page in GV Orbit Client 2 Close the tab to close the ATP 2000 web page in GV Orbit Client Click x to close tab showing web page ...

Page 61: ...aded Software Version on page 42 Upgrade Package Upgrade packages for ATP 2000 panels comprise a version of software and supporting files bundled together in a zip file and are available from the software download section of the ATP 2000 web page Step 1 Check Current Software Version 1 Open the Network window 2 Locate the ATP 2000 device to be upgraded right click on it and select Info A Details w...

Page 62: ...Upgrade Package 1 Right click on the Network tree view device item and select Upgrade The Orbit Upgrade window is shown Any software upgrade packages that might have been previously uploaded are shown listed on the left hand side under Available Packages Fig 6 7 ATP 2000 Orbit Upgrade Window Device s software version ...

Page 63: ...elect Upgrade All Files for a quicker upgrade Fig 6 8 Example Orbit Upgrade Window 3 Click the Upgrade button to start the upgrade of the device A message box appears informing you that the upgrade has started and will proceed in the background Click OK 4 When the device has been upgraded this is indicated by a pop up notification message in the WindowsTM system tray Step 4 Finally Check the Upgra...

Page 64: ... GV Orbit Client 1 In the Network window expand the Network tree and locate the ATP 2000 panel device 2 Right click on the ATP 2000 panel device and select Alarm List The Alarm List window is shown for the ATP 2000 device Fig 6 9 ATP 2000 Alarm List Window Note In order for the panel s alarms etc to be visible to GV Orbit Client the following must have network connectivity for example be on the sa...

Page 65: ...Unit type name in the RollCall database IPADDRESS IP address of the panel IPNAME Host name MSG Unit Present NAME The name of the panel This is used in the Network window RESTARTED_AT The date and time when the panel was last started STATE Overall alarm state of the panel UPTIME The period that the panel has been continuously running for VERSION Software build version number ...

Page 66: ...e zip file is downloaded which contains one or more log txt files Replacing the Battery Your Grass Valley ATP 2000 panel contains an internal battery which is a button cell coin cell The battery is used for settings backup and should not need to be replaced during the lifetime of the panel However if the cell needs replacing please follow the procedure described in Appendix E Battery Replacement o...

Page 67: ...46 Maintenance Replacing the Battery ...

Page 68: ... 49 Environmental 49 Display Specification 50 Operating System 50 Defaults 51 Default IP Settings 51 External Connectors 51 This appendix provides specification details of the ATP 2000 including details of the physical characteristics of the panel the operational environment and connectors on the rear panel ...

Page 69: ... Specification Unit Views Unit Views Fig A 1 ATP 2000 Advanced Touch Panel Unit Views Right hand side view and rear top Left hand side view Rear Front Right hand side Left hand side GV label Connectors LAN DC 12V ...

Page 70: ...Power Consumption 30 W max Unit Supply Voltage DC12V 12 V nominal 10 8V min 13 2V max Unit Current Consumption 1 5A typ 2 5A max Connector 1x DC Power Jack Center pin is positive Cell inside CR2032 as part of a battery assembly Environmental Operating temp 0 to 50 C Storage temp 10 to 55 C Relative Humidity 95 at 40 C non condensing Operating Vibration 1Grms 5Hz to 500Hz IEC 60068 2 64 Non operati...

Page 71: ...nd cables Display Type TFT LCD Size 16 3 diagonal Active area 408 96mm x 60 75 mm Resolution 1920 x 285 pixels Pixels per inch 119 ppi Viewing Angle 178 H and 178 V Brightness 540 nits min 700 nits typ i e 540cd m2 min 700cd m2 typ Resolution 1920 x 285 pixels Color depth 24 bit color 16 4M colors Contrast Ratio 1000 1 typ Touchscreen Type PCAP Multi touch 10 touch points Surface Anti glare OS Pro...

Page 72: ...rol panels are supplied with factory Ethernet interface IP default settings with DHCP enabled External Connectors See Connectors Controls Interfaces on page 55 Note There is no unit shutdown procedure for powering down the unit the file system used is fail safe ...

Page 73: ...52 Hardware Specification External Connectors ...

Page 74: ...53 Unit Dimensions Fig B 1 ATP 2000 Product Dimensions mm Left hand side view Rear view Front view Top view Right hand side view Underside view ...

Page 75: ...54 Unit Dimensions ...

Page 76: ...controls on the unit Unit On Off There is no power on off switch on the unit The ATP 2000 Advanced Touch Panel unit turns on when power is applied There is no shutdown procedure for powering down and the file system is fail safe DC Power Connector One 12 V DC power jack connector input on the left hand side of the unit as viewed from the front of the unit Fig C 1 DC Power Connector Center pin for ...

Page 77: ...ed Automatic cross over Fig C 2 Ethernet Network Connector CAUTION Do not connect a telephone cable to the Ethernet connector Tab C 1 Network Interface Link State Link State LAN LEDs Comment LED 2 LED 1 Off disconnected Off Off 10Mbps No activity Off Orange Activity Rx Tx BLINK Off Blink Orange 100Mbps No activity Orange Off Activity Rx Tx BLINK Blink Orange Off 1000Mbps No activity Green Off Acti...

Page 78: ...unit for storage of its operating system application and data These should not be removed Fig C 3 Micro SD Card Slots Do Not Remove Micro SD Cards CAUTION Do not ordinarily remove either of the two micro SD cards fitted to the unit Do not ordinarily fit any micro SD cards into the unit SD BOOT Micro SD Card double slot for two micro SD cards Note Micro SD cards should not normally be removed ...

Page 79: ...d and not used 1x OTG Micro USB On The Go OTG connector 2x USB USB type A connectors On the top side of unit the following connectors are reserved and not used MIC Audio 3 5mm jack microphone input OUT Audio 3 5mm jack stereo left right channels output Fig C 4 Not Used Connectors Etc Do Not Connect to These CAUTION Do not connect anything to the connectors that are Not Used by the ATP 2000 Advance...

Page 80: ...59 Power Supply Unit Power Supply Unit DC Power Supply Module 60 Physical 60 Electrical 60 ...

Page 81: ...ule Dimensions Drawing Electrical ATP PS01 ATP 2000 power supply AC mains to DC power supply unit Physical Dimensions W x H x D 125 x 50 x 31 5 mm Weight 0 28kg AC Input Power Consumption 40 W max Input AC Voltage range 90VAC to 264VAC AC Inlet type IEC 320 C14 Efficiency 89 5 DC Output Output DC Voltage 12 V DC Output DC Current 0 to 3 34A DC Connector 1x DC Power Jack Right angled threaded Cente...

Page 82: ...4 Refit Battery Unit 66 Step 5 Panel Unit Reassembly 66 Step 6 Re Install in Rack 67 Introduction The internal battery is a button cell coin cell and should last for the lifetime of the panel The button cell powers the small internal real time clock function within the panel when it is powered down However if the cell needs replacing please follow the procedure described in Appendix E Battery Remo...

Page 83: ...nts An anti static work surface A soft cloth on which to place the unit display side down to protect the display Replacement battery unit Battery unit Grass Valley Part Number ATP BAT01 Tools Required Small tweezers Medium sized Philips screwdriver Double sided adhesive tape Removal Procedure Steps The battery replacement procedure is described below and assumes that the unit is rack mounted Step ...

Page 84: ...ro SD Card Slots on page 57 for slot location 2 Remove any covering label and retain it 3 There are two micro SD cards fitted to the double slot Fig E 1 Micro SD Card s in Double Slot Both micro SD cards must be removed Care must be taken when handling micro SD cards Repeat for each card present in the panel unit 4 Select one of the micro SD cards and note which slot it is fitted to SD or BOOT 5 G...

Page 85: ...rews 3 Remove these four retaining screws and keep them for the reassembly step 4 Gently lift the cover away from the unit turn it over and place it on the work surface next to the unit There is a wire connecting the rear cover to the unit Do not disconnect See Figure E 3 Rear cover retaining screws Rear cover Rear cover CAUTION Do not lift the rear cover fully away from the unit because there is ...

Page 86: ... blue casing with a pair of wires twisted black red going to it from a white 2 pin header style connector Fig E 4 Battery Unit Location 2 Disconnect the black red twisted wires from the 2 pin header connector noting the orientation of the wires to the connector for reassembly Wire Battery unit blue casing White 2 pin header style connector Battery unit blue casing ...

Page 87: ... 2 pin header style connector Fig E 5 Reconnected Battery Unit 2 Fasten the battery unit down with double sided adhesive tape to the same position as the removed battery unit This has refitted the battery unit Now proceed to Step 5 Panel Unit Reassembly Step 5 Panel Unit Reassembly 1 Relocate the rear cover and secure with the four fastening screws 2 Refit both micro SD cards in their correct card...

Page 88: ... ATP 2000 User Guide Step 6 Re Install in Rack 1 Install the panel into the rack 2 Apply DC power and check the panel unit is functioning This has replace the battery unit in the ATP 2000 panel unit Done ...

Page 89: ...68 Battery Replacement Step 6 Re Install in Rack ...

Page 90: ...n a local phone number for the support center nearest you please consult the Contact Us section of Grass Valley s website www grassvalley com An on line form for e mail contact is also available from the website Corporate Head Office Grass Valley 3499 Douglas B Floreani St Laurent Quebec H4S 2C6 Canada Telephone 1 514 333 1772 Fax 1 514 333 9828 www grassvalley com ...

Reviews: