


English
- 95 -
List Schedule(*)
(*)
,Q WKLV OD\RXW RSWLRQ RQO\
the events of the highlighted
channel will be listed.
Prev. Time Slice (Red button):
Displays the events
of previous time slice.
Next/Prev Day (Pro/- buttons):
Displays
the events of previous or next day.
Event Details (Info button):
Displays detailed
information about selected events.
Filter (Text button):
9LHZV¿OWHULQJRSWLRQV
Next Time Slice (Green button):
Displays the events
of next time slice.
Options (OK button):
Displays event options.
Now/Next Schedule
Navigate (Directional buttons):
Press the
Directional
buttons
to navigate through the channels and events.
Options (OK button):
Displays event options.
Event Details (Info button):
Displays detailed
information about selected events.
Filter (Blue button):
9LHZV¿OWHULQJRSWLRQV
Event Options
Use the directional buttons to highlight an event and
press
OK
button to display
Event
Options
menu. The
following options are available.
Select Channel:
Using this option, you can switch to
the selected channel.
Set Timer on Event / Delete Timer on Event:
After
you have selected an event in the EPG menu, press the
OK
button. Select
Set Timer on Event
option and press
the
OK
button. You can set a timer for future events.
To cancel an already set timer, highlight that event and
press the
OK
button. Then select
Delete Timer
on Event
option. The timer will be cancelled.
Notes:
You cannot switch to any other channel or source while
there is an active timer on the current channel.
,WLVQRWSRVVLEOHWRVHWWLPHUIRUWZRRUPRUHLQGLYLGXDOHYHQWV
at the same time interval.
Teletext Services
Press the Text button to enter. Press again to activate
mix mode, which allows you to see the teletext page
and the TV broadcast at the same time. Press once
more to exit. If available, sections in the teletext pages
will become colour-coded and can be selected by
pressing the coloured buttons. Follow the instructions
displayed on the screen.
Software Upgrade
<RXU79LVFDSDEOHRI¿QGLQJDQGXSGDWLQJWKH¿UPZDUH
automatically via the broadcast signal or via Internet.
Software upgrade search via user interface
On the main menu select
System>Settings
and then
More
. Navigate to
Software upgrade
and press the
OK
button. In
Upgrade options
menu select
Scan
for upgrade
and press
OK
button to check for a new
software upgrade.
If a new upgrade is found, it starts to download
the upgrade. After the download is completed
confirm the question asking about rebooting the
TV by pressing the
OK
to continue with the reboot
operation.
3 AM search and upgrade mode
Your TV will search for new upgrades at 3:00 o’clock if
Automatic scanning
option in the
Upgrade options
menu is set to
Enabled
and if the TV is connected
to an aerial signal or to Internet. If a new software is
found and downloaded successfully, it will be installed
at the next power on.
1RWH'RQRWXQSOXJWKHSRZHUFRUGZKLOHOHGLVEOLQNLQJGXULQJ
WKHUHERRWSURFHVV,IWKH79IDLOVWRFRPHRQDIWHUWKHXSJUDGH
unplug, wait for two minutes then plug it back in.
Troubleshooting & Tips
Tv will not turn on
Make sure the power cord is plugged in securely to
wall outlet. Check if batteries are exhausted. Press the
Power button on the TV.
Poor picture
Check if you have selected the correct TV system.
Low signal level can cause picture distortion. Please
check antenna access.
Check if you have entered the correct channel
frequency if you have done manual tuning.
The picture quality may degrade when two devices
are connected to the TV at the same time. In such a
case, disconnect one of the devices.
No picture
This means your TV is not receiving any transmission.
Make sure the correct source has been selected.
Is the antenna connected properly?
Is the antenna cable damaged?
Are suitable plugs used to connect the antenna?
If you are in doubt, consult your dealer.
No sound
Check if the TV is muted. Press the
Mute
button or
increase the volume to check.
Sound may be coming from only one speaker. Check
the balance settings from
Sound
menu.
Remote control - no operation
The batteries may be exhausted. Replace the
batteries.
Input sources - can not be selected
If you cannot select an input source, it is possible
that no device is connected. If not;
English
- 96 -
Check the AV cables and connections if you are
trying to switch to the input source dedicated to the
connected device.
PC Input Typical Display Modes
The following table is an illustration of some of the
typical video display modes. Your TV may not support
all resolutions.
Index
Resolution
Frequency
1
640x480
60Hz
2
640x480
75Hz
3
800x600
56Hz
4
800x600
60Hz
5
800x600
72Hz
6
800x600
75Hz
7
1024x768
60Hz
8
1024x768
70Hz
9
1024x768
75Hz
10
1152x864
75Hz
11
1280x768
60Hz
12
1360x768
60Hz
13
1280x960
60Hz
14
1280x1024
60Hz
15
1280x1024
75Hz
16
1400x1050
60Hz
17
1440x900
60Hz
18
1440x900
75Hz
19
1920x1080
60Hz
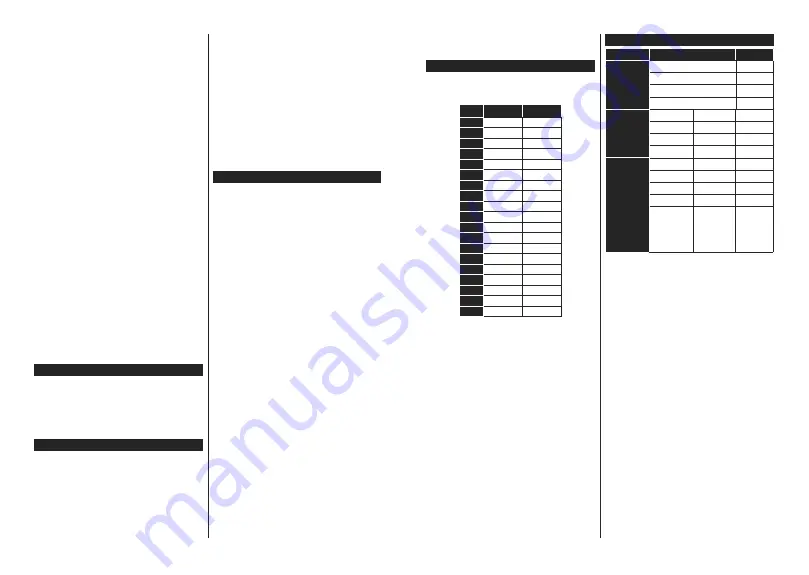
AV and HDMI Signal Compatibility
Source
Supported Signals
Available
Back AV
PAL
O
SECAM
O
NTSC4.43
O
NTSC3.58
O
YPbPr
480i, 480p
60Hz
O
576i, 576p
50Hz
O
720p
50Hz,60Hz
O
1080i
50Hz,60Hz
O
HDMI
480i, 480p
60Hz
O
576i, 576p
50Hz
O
720p
50Hz,60Hz
O
1080i
50Hz,60Hz
O
1080p
24Hz, 25Hz,
30Hz, 50Hz,
60Hz
O
(X: Not Available, O: Available)
In some cases a signal on the TV may not be displayed
properly. The problem may be an inconsistency with
standards from the source equipment (DVD, Set-top
box, etc. ). If you do experience such a problem please
contact your dealer and also the manufacturer of the
source equipment.


