background image


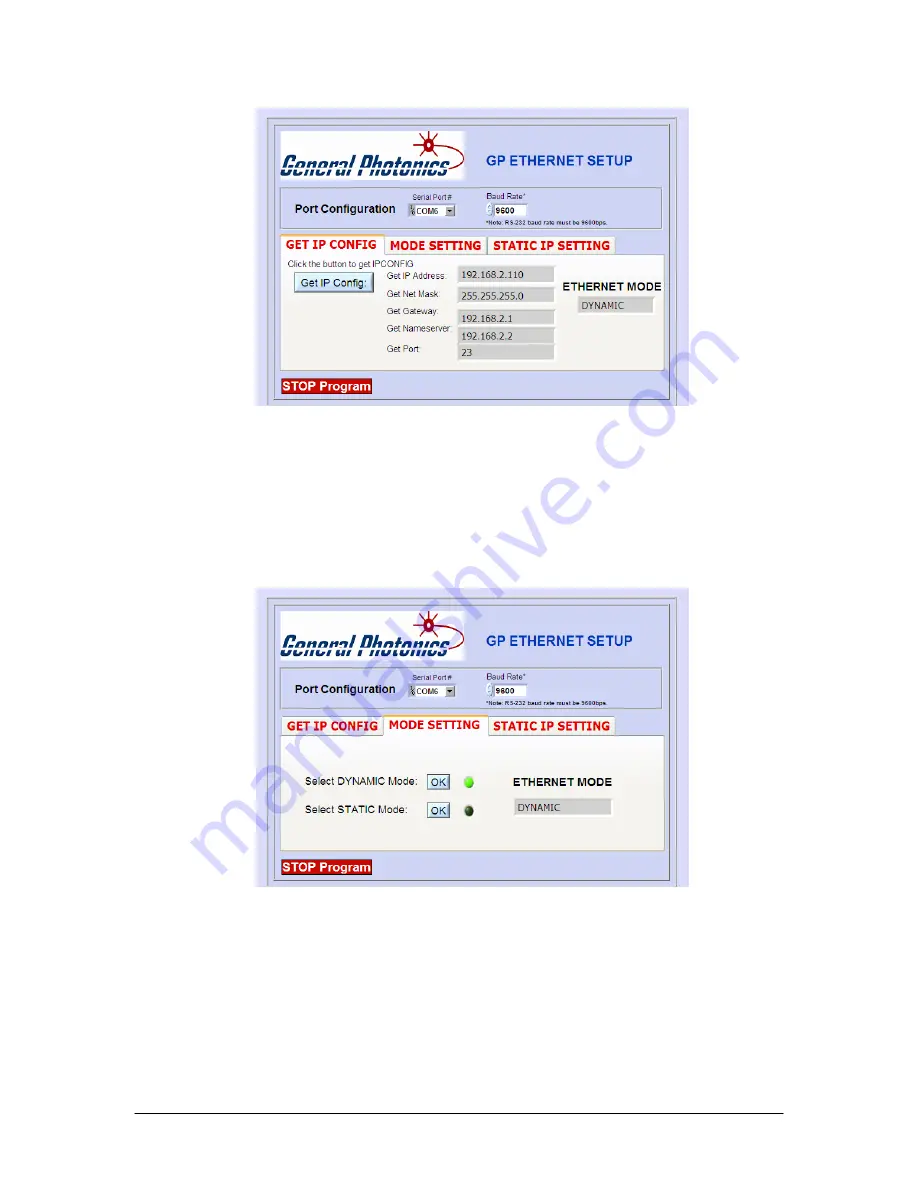
IP Config query screen- Dynamic IP mode result 


Use this function to obtain the IP address, which is needed to control the PDLE-101 
via Ethernet. 
 
The second tab, “MODE SETTING” allows the user to switch the PDLE-101 
between static and dynamic IP addressing modes. 


Ethernet mode selection screen- dynamic 


Document #: GP-UM-PDLE-101-11 


Page 44 of 61 

Summary of Contents for PDLE-101

Page 1: ... PDL Emulator Operation Manual Version 1 1 June 6 2011 General Photonics Corp Ph 909 590 5473 5228 Edison Ave Fax 909 902 5536 Chino CA 91710 USA www generalphotonics com Document GP UM PDLE 101 11 Page 1 of 61 ...

Page 2: ...ent A product found to be defective during the warranty period will be repaired or replaced at no charge at General Photonics option If a problem is found please contact General Photonics for assistance If necessary return the defective product freight prepaid clearly labeled with the RMA number with as complete a description of the problem as possible The repaired or replacement product will be r...

Page 3: ... assumes no liability for customers failure to comply with these requirements Before operation the user should inspect the instrument and review the manual carefully The instrument s rear panel includes a chassis ground terminal for electrical safety Make sure that the instrument is in a secured work environment in terms of temperature humidity electrical power hazard due to fire or shock etc for ...

Page 4: ... control and programming 26 4 4 1 RS 232 operation 26 4 4 1 1 RS 232 connection 26 4 4 1 2 Remote operation and commands 26 4 4 1 3 RS 232 troubleshooting 30 4 4 2 USB control 30 4 4 2 1 Procedure for Installing USB VCP driver 30 4 4 2 2 VCP Uninstall Procedure 39 4 4 2 4 USB Troubleshooting 40 4 4 3 PDLE 101 GPIB and Ethernet Control 41 4 4 4 Remote Control Program Interface 50 Section 5 Technica...

Page 5: ...itching time 3 5 ms max 1 ms typical Residual PMD 0 1 ps max at PDL 0 Return Loss 50 dB Optical Power Damage Threshold 500 mW Operating Temperature 0 C to 40 C Storage Temperature 20 C to 60 C Fiber Type SMF 28 Front Panel Display 2x 20 character LCD display Power Supply 100 240 VAC 50 60 Hz 16W Communication Interfaces RS 232 USB Ethernet GPIB Trigger Signal 5V TTL signal 5mA min Minimum pulse wi...

Page 6: ...with nonzero PDL High speed fiber optic transceivers including those deploying coherent detection technologies for 40Gb s and 100Gb s data transmission must therefore meet stringent PDL tolerance specifications General Photonics PDLE 101 is a PDL emulator specifically designed for PDL tolerance testing of high speed telecommunication systems It is available with wavelength calibrations for either ...

Page 7: ...01 employs a large character backlit liquid crystal display LCD for easy readout In addition to front panel control it can be remote controlled via built in RS 232 USB Ethernet or GPIB interfaces Document GP UM PDLE 101 11 Page 7 of 61 ...

Page 8: ...that does not improve after cleaning the external connectors may indicate that the instrument s internal connector ferrules require cleaning Each connector ferrule is contained in a universal connector interface consisting of a front piece that connects to the external fiber connector and a base piece that is mounted on the front panel of the instrument as shown in Figure 3 To clean a connector fe...

Page 9: ...sonnel The front panel of the PDLE 101 is shown in Figure 4 The power switch Power liquid crystal display LCD push button control pad and optical connectors are mounted on the front panel The AC power plug fuse RS 232 USB Ethernet and GPIB interface connectors and BNC connector for trigger input are mounted on the rear panel as shown in Figure 5 The PDLE 101 includes RS 232 USB Ethernet and GPIB i...

Page 10: ...is pressed up and down arrows and the ENTER key can be used to select functions or settings Arrow keys used to move the cursor and change numbers ENTER Used to select operation modes or begin execution of a function after parameters are set fan Figure 5 Rear panel layout Rear panel description USB USB interface port RS 232 serial communication port Ethernet Ethernet interface port BNC trigger sign...

Page 11: ... before plugging it in again Always replace the fuse with one with the exact rating of the original Figure 6 Fuse compartment Trigger Signal If using a trigger signal connect the trigger source to the BNC connector on the rear panel of the PDLE The trigger is controlled by a TTL compatible optically coupled gate state changing from 0 Volts to 5 Volts The internal optical circuitry provides a guara...

Page 12: ...eneral Photonics immediately The standard model uses 100 240 VAC 50 60Hz 1A Fuse 2 Connect the power cord and plug it into the wall receptacle Make sure the ground pin of the power cord is connected to earth ground 3 On power up the initialization screen which shows the hardware and firmware versions will display for a few seconds before the main display screen appears GENERAL PHOTONICS PDLE 101 V...

Page 13: ...e actual wavelength of the light source The wavelength setting cannot be changed from the main screen It can be accessed from the Settings menu MODE From the main PDL control screen pressing the MODE button brings up the Functions Settings menu Use the keys to select FUNCTIONS or SETTINGS and the ENTER key to access the corresponding menu A FUNCTIONS B SETTINGS From a menu or sub menu the MODE but...

Page 14: ...d upper and lower limit settings Trigger Disabled TRI WAVE F _10 0 Hz Max 20 0 Min _0 1dB If Trigger mode is enabled see SETTINGS section the word WAVE is replaced by TRG followed by either or The direction of the arrow denotes whether the PDLE is set to trigger on the rising or falling edge of the trigger pulse Trigger Enabled TRI TRG F _10 0 Hz Max 20 0 Min _0 1dB Use the keys to move the cursor...

Page 15: ...ion is enabled To stop the sweep and edit the operation parameters press the ENTER key The cursor will move back to the parameter editing area If trigger mode is enabled after the ENTER key is pressed the PDLE will wait to receive a trigger pulse The triangle variation will begin 4 6ms after the trigger edge The timing diagram for a triangle wave set to trigger on a rising edge is shown below If a...

Page 16: ...ting that the PDL switching is triggered by the external trigger pulses rather than occurring at a set frequency Trigger Enabled RAN TRG F Trigger Max 20 0 Min _0 1dB Use the keys to move the cursor position between digits or between parameters Use the keys to increment the selected digit The frequency range is 0 1 Hz to 100 Hz The range for maximum PDL is 0 2 to 20 dB The range for minimum PDL is...

Page 17: ...g diagram for a random variation set to trigger on a rising edge is shown below t 420µs trigger PDL variation To return to the main screen press the MODE button 3 times PDL SINE WAVE VARIATION This is a sinusoidal sweep function The PDLE 101 sweeps the PDL back and forth between the selected minimum and maximum values at the selected frequency Figure 8 PDL sine wave sweep function Document GP UM P...

Page 18: ...e range for minimum PDL is 0 1 to 19 9 dB Note The maximum PDL cannot be set lower than the minimum PDL To set the sweep parameters to a lower range than the current minimum PDL setting reset the minimum value first then reset the maximum After setting the frequency and endpoints press the ENTER key If trigger mode is disabled the sweep will begin immediately after the ENTER key is pressed The cur...

Page 19: ...ected minimum and maximum points executing a square wave at the selected frequency Figure 9 PDL square wave function When the function is first called the instrument will be in parameter setting mode The sweep function is disabled If Trigger mode is disabled the screen will display the waveform type SQU WAVE frequency and upper and lower limit settings Document GP UM PDLE 101 11 Page 19 of 61 ...

Page 20: ...ly after the ENTER key is pressed The PDLE will begin at the lower PDL setting and switch back and forth between the upper and lower PDL settings at the selected frequency Please note that the dwell time at each state is half the period i e if the set frequency is 1 Hz the PDLE will switch states once every 0 5s The cursor will move to the right bottom corner of the screen and remain there as long...

Page 21: ...equency starting with a low to high transition 420µs after the trigger pulse is received If another trigger pulse is received while the PDLE is generating the square wave it will reset and begin generating a square wave 420µs after the new trigger edge The timing diagram is shown below 420µs PDL variation trigger t To return to the main screen press the MODE button 3 times Document GP UM PDLE 101 ...

Page 22: ...ning the periodic variation immediately the PDLE waits until it receives a trigger pulse to begin operation If it receives another trigger pulse while the waveform variation is running it will restart the waveform from the beginning usually the lower limit value When the SET TRIGGER option is selected the displayed screen allows the user to enable disable triggered operation and to select whether ...

Page 23: ...The Get Dynamic IP option sets the instrument for dynamic IP addressing and requests a dynamic IP address from the server If the instrument is able to establish communication with the DHCP server and successfully retrieve a dynamic IP address the dynamic IP address will be displayed on screen GETTING DYNAMIC IP Please Wait IP 191 168 0 65 Dynamic Mode Set If the dynamic IP address request is unsuc...

Page 24: ...168 000 002 SET IP Static e PORT _23 The SET IP Static line writes the settings to memory Use the up and down arrows to move between parameter setting options the cursor will blink on the option letter To set a particular parameter press the ENTER key to move the cursor from the option letter to a parameter setting position Use the left and right arrow keys to move between digits and the up and do...

Page 25: ...s Once written to memory the static IP network parameters can be recalled from the front panel using the GET STATIC IP option under the SETUP menu or via RS 232 using the Ethernet setup LabView program Set GPIB address The GPIB address is stored in non volatile memory On power up the stored address is read and used as the current address When the SET GPIB ADDRESS option is selected the screen disp...

Page 26: ... at both ends of the cable Note The PDLE 101 transmits through pin 2 and receives through pin 3 of its connector A PC transmits through pin 3 and receives through pin 2 of its connector Figure 10 DB9 Male RS 232 connector pin assignment on PDLE 101 rear panel 4 4 1 2 Remote operation and commands The following steps and commands are recommended for remote operation of the PDLE 101 using the RS 232...

Page 27: ...riation Disabled SIN DIS Sine Variation Disabled TRI ENA Triangular Variation Enabled RAN ENA Random Variation Enabled SQU ENA Square Variation Enabled SIN ENA Sine Variation Enabled FUN OP1 Function selection option 1 triangle FUN OP2 Function selection option 2 random FUN OP3 Function selection option 3 sine FUN OP4 Function selection option 4 square SET OP1 Settings selection option 1 trigger S...

Page 28: ...Set PDL Triangle Variation Maximum PDL Range 0 2 dB Max 20 0 dB E00 or other error code TRI MXA Queries PDL Triangle Wave Maximum PDL Units dB Range 0 2 dB Max 20 0 dB Response FF f Example 15 0 Max PDL set to 15 0 dB TRI MNA f f Set PDL Triangle Variation Minimum PDL Range 0 1 dB Min 19 9 dB Note Min PDL must be less than Max PDL E00 or other error code TRI MNA Queries PDL Triangle Wave Minimum P...

Page 29: ...ust be less than Max PDL E00 or other error code SIN MNA Queries PDL Sine Wave Minimum PDL Units dB Range 0 1 dB Min 19 9 dB Response FF f Example 0 7 Min PDL set to 0 7 dB Square Wave SQU ENA Enable Square Wave Variation with current frequency and amplitude settings If trigger is disabled this command will begin the square wave If trigger is enabled will go into Wait for Trigger mode If frequency...

Page 30: ...pond to control commands with one of the error codes listed above If a command is a status request the computer will return either the requested information or an error code of form Enn see the error definition list above 4 While the PDLE 101 is processing a command and sending back a response ASCII code any additional commands sent by the computer will be ignored 4 4 1 3 RS 232 troubleshooting If...

Page 31: ...3 Click Next 4 Click Next Document GP UM PDLE 101 11 Page 31 of 61 ...

Page 32: ...5 Check Specify a location then click Next Document GP UM PDLE 101 11 Page 32 of 61 ...

Page 33: ...6 Use Browse to locate the file directory where the VCP driver is Click OK to proceed to the next screen 7 Click Next Document GP UM PDLE 101 11 Page 33 of 61 ...

Page 34: ...tion during which the USB to serial converter is installed The second part consists of the installation of the serial port driver This should follow automatically once the converter installation is completed 9 Click Next Document GP UM PDLE 101 11 Page 34 of 61 ...

Page 35: ...10 Click Next 11 Use Browse to locate the file directory where the VCP driver is Click OK to proceed to the next screen Document GP UM PDLE 101 11 Page 35 of 61 ...

Page 36: ...12 Click Next 13 Click Finish Document GP UM PDLE 101 11 Page 36 of 61 ...

Page 37: ...been completed confirm that the installation has been successful by looking under Device Manager on the System Properties screen select Control Panel System Properties Hardware Device Manager then Select View Device by type The resulting screens are shown below The device should have installed as a USB Serial Port COMx attached to USB High Speed Serial Converter The USB driver can drive more than ...

Page 38: ...In this example the USB device is connected to COM3 Document GP UM PDLE 101 11 Page 38 of 61 ...

Page 39: ...4 4 2 2 VCP Uninstall Procedure Unplug device Run Add Remove Programs from Control Panel Document GP UM PDLE 101 11 Page 39 of 61 ...

Page 40: ...not be found in Device Manager To troubleshoot this issue run Add Remove Programs from the Control Panel click FTDI USB Serial Converter Drivers and then click the Change Remove button A warning window will tell you that you have to unplug the USB cable if you want to remove the drives Unplug USB cable then press Continue button Restore computer then run VCP installation procedure again Document G...

Page 41: ...er or Listener on a bus with up to 14 other GPIB devices The PDLE 101 uses the CB7210 2 GPIB chip Ethernet The IP address from an ISP is assigned in one of two ways Set to an IP which is only good for a limited time and which is changed according to the policy set by the ISP s DHCP server This is a dynamic IP address Set to an IP address which can be unchanged for months or years at a time This is...

Page 42: ...ure 12 For this configuration a standard straight linked network cable must be used Figure 11 Direct connection PDLE 101 to PC Figure 12 Connect PDLE 101 with DHCP server 2 Set Ethernet configuration and get IP address a Front panel As described in section 4 2 the user can set the PDLE for static or dynamic IP addressing and query the IP address from the SETUP menu Press the SETUP button on the fr...

Page 43: ...e program interface is shown below Select the correct serial RS 232 port from the port configuration box at the top of the screen The baud rate should be set to 9600 Once these two parameters are set click the white arrow to run the program The program has 3 tabs The first GET IP CONFIG is used to query the current IP configuration of the PDLE 101 When the Get IP Config button at the left of the s...

Page 44: ...obtain the IP address which is needed to control the PDLE 101 via Ethernet The second tab MODE SETTING allows the user to switch the PDLE 101 between static and dynamic IP addressing modes Ethernet mode selection screen dynamic Document GP UM PDLE 101 11 Page 44 of 61 ...

Page 45: ...s box will say STATIC The PDLE 101 writes its most recently saved static IP settings and its active mode to memory If it is powered off while in static mode when it is powered back on it will be in static mode and the most recently saved set of IP configuration information can be used for communication If the PDLE 101 is powered off while in dynamic IP mode when it is powered back on it will be in...

Page 46: ...address of the control computer If the last number of the computer s subnet mask is n the available IP address range is n 1 to 254 In this example n 0 so the available IP addresses are 1 to 254 If the computer s IP address is 17 for example the user can set the IP address for the PDLE 101 to any number in the range 1 254 except 17 To find the IP information for the control computer for static IP m...

Page 47: ... Properties on General tab Internet Protocol Properties Document GP UM PDLE 101 11 Page 47 of 61 ...

Page 48: ... DHCP server switch computer and PDLE 101 are correctly connected as shown in Figure 12 Check that the correct cables are used and that everything is powered on Also check that the control computer is set to obtain its IP address automatically Control Panel Network and Dial up Connections Local Area Connection Document GP UM PDLE 101 11 Page 48 of 61 ...

Page 49: ... Properties on General tab Document GP UM PDLE 101 11 Page 49 of 61 ...

Page 50: ... through different control interfaces If the LabView development environment version 8 2 or above is installed on the control computer either the source code vi or the executable versions of the remote control programs can be used without installing further drivers To control the PDLE through the USB port the USB drivers need to be installed see section 4 4 2 Note For simple control of the instrum...

Page 51: ...xecutable and or source code should be copied to the hard drive and run from there Note Always close the control program and LabView as well if using the VI version of the control program before turning off the instrument When the program is first started it will ask whether the communication interface to be used is Ethernet or something else Ethernet If the user selects Ethernet the program will ...

Page 52: ...ddress then re enter the IP address in the IP Address box and click the Establish Connection button again RS 232 USB GPIB To use an interface other than Ethernet make sure that the necessary hardware connections are in place then click the RS232 USB GPIB button on the initial interface query window The program will initiate a port search Connection status indicator IP address box Communication int...

Page 53: ...nnection status indicator is still dark click the Establish Connection button to connect to the PDLE using the detected port If the connection is successful the connection status indicator will turn green and the main screen will show the single PDL setting interface Connection status indicator Port selection menu Communication interface indicator selection button ...

Page 54: ...ion port for other interfaces and clicking the Establish Connection button Single PDL value setting The default screen after communication with the PDLE is established is the single PDL value setting screen This operation mode allows the user to set a single static PDL output value The indicator boxes in the middle of the screen show the latest PDL value and wavelength setting To change the PDL or...

Page 55: ...es triggered operation Trigger edge rise fall selects whether the PDLE triggers on the rising or falling edge of the trigger pulse Triangle Waveform The triangle waveform mode generates a triangular variation with user set endpoints and frequency Click the Triangle Enable Disable button to enter triangle mode The interface screen is displayed above The indicator boxes in the middle of the screen d...

Page 56: ...st been modified Ranges Frequency 0 1 to 10 Hz Max PDL 0 2 to 20 dB Min PDL 0 1 to 19 9 dB If the trigger is off the waveform generation will begin as soon as the triangle mode is enabled button will be green as in the screenshot above If the trigger is on when triangle mode is enabled the PDLE will wait for a trigger pulse and will begin generating the variation on receipt of the trigger pulse Ea...

Page 57: ...whose value has just been modified Ranges Frequency 0 1 to 10 Hz Max PDL 0 2 to 20 dB Min PDL 0 1 to 19 9 dB If the trigger is off the waveform generation will begin as soon as the sine mode is enabled button will be green as in the screenshot above If the trigger is on when sine mode is enabled the PDLE will wait for a trigger pulse and will begin generating the variation on receipt of the trigge...

Page 58: ...the trigger is on the waveform trigger status box will display the waveform type trigger status and selected trigger edge ex RAN TRG Rise and the frequency box will display FRQ Trigger indicating that the frequency corresponds to the frequency of the trigger signal To set the frequency and PDL limit values type the desired values in the corresponding boxes at the bottom of the screen and either pr...

Page 59: ...ncy is set to 0 Hz the PDLE will perform one transition each time it receives a trigger pulse similar operation to triggered random mode If triggered operation is on and the frequency is set to a nonzero value or if triggered operation is off the square wave is generated at the user set frequency see front panel operation section for diagram Click the Square Enable Disable button to enter square w...

Page 60: ...n the screenshot above The first transition will be from low to high PDL Please note that the dwell time at each state is half the period i e if the set frequency is 1 Hz the PDLE will switch states once every 0 5s If the trigger is on and the frequency is set to a nonzero value once the square mode is enabled the PDLE will wait for a trigger pulse and will begin generating the variation at the se...

Page 61: ...nd use of the PDLE 101 or future suggestions please contact General Photonics Corporation at 909 590 5473 telephone or 909 902 5536 fax or by e mail at info generalphotonics com General Photonics will respond to all customer questions within 24 hours during regular business hours General Photonics can also be contacted by mail at General Photonics 5228 Edison Avenue Chino California 91710 USA ...

Reviews: