background image

3.


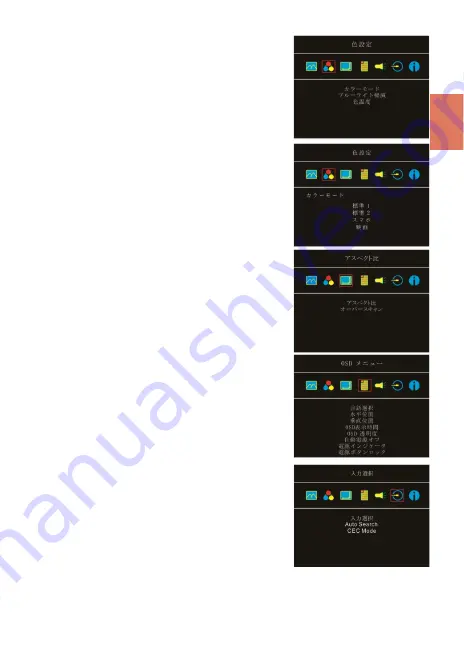
色設定 (

Color Settings)


1)


”色設定”を開いた後、””カラーモード”で、”標準”、”ゲー
ム”、”写真”と”映画”等

4

種のプリセットモードが選択で

きます。


2)


ブルーライト軽減 (

Blue Light Reduction)

:「オン」を選択する

と、ディスプレイのブルーライトが自動で軽減されます。


3)


色温度(

Color Temperature)

: 「寒色」を選択すると、画面の

青みが強くなり、「暖色」を選択すると、画面の赤みが強くな
ります。「ユーザー」を選択すると、手動で

RGB 

値を設定で

きます。


4.


アスペクト比設定(

Aspect Ratio) 


1)


カラーモード

(

Color Effect)

PC

映像出力形式が

RGB 

リミ

テッドレンジの場合は「標準

1

」を選択し

RGB 

フルレンジ

の場合は「標準

2

」を選択することが推奨されます。「スマ

モードを選択すると

より色鮮やかに表示されます。

「映画」モードにすると暗い部分もクリアに表示されます。


2)


オーバースキャン(

Overscan): 

HDMI  Video

信号(たとえば

1080P/720P)

を入力する時だけ、この機能を使用できます。

この機能を使用すると、映像スキャン表示範囲を調整できま
す。


5.

  OSD

メニュー(

OSD Menu)


1)


言語: 

OSD

メニュー表示言語を選択します。


2)


水平位置:

OSD

メニューを左右に移動させます。


3)


垂直位置: 

OSD

メニューを上下に移動させます。


4)

 OSD

表示時間:  

OSD 

表示時間を調整します。


5)

 OSD 

透明度: 

OSD

メニュー背景を透明化します。


6)


自動電源オフ(

Auto Power Off)

: 「オン」を選択すると、

映像

信号が入力されていない場合、モニターは

15

分間待機

モードで動作しその後自動的に電源オフになります。「

オフ

を選択すると、モニターは映像信号が入力されていない状
態でも待機モードを維持します。


7)


電源インジケータ:「オフ」を選択すると、電源ランプが点灯
しなくなります。


8)


電源ボタンロック(

Power Button Lock)

: 「オン」を選択する

と、電源ボタンは機能しなくなります。


6.


オーディオ:オーディオ出力のボリュームを設定します。

0

にす

るとミュート(無音)になります。


7.


入力選択(

Input Source)


1)


入力選択(

Input Source)

HDMI (

信号は


HDMI 

ポートから

入力

)


USB Type

-

C (

信号は

USB Type

-

ポートから入力

)

選択します。


2)


Auto Search 

オン

を選択すると

モニターが

2

つの

映像信号の入力元を順番


に検索


一番早く検出した

映像信号を表示します。

オフ

を選択すると

入力

(Input 

Source)

で設定された映像信号のみを表示します。映像信号

を検出されなければ

モニターに

信号なし

の警告メッ

セージが表示され

他の映像信号を検索しません。


3)


CEC Mode:

オン

を選択すると

モニターが


HDMI CEC 

がある

DVD

プレーヤー・カメ

+

A2:E2

ラ・

PlayStation

ゲーム

機などに接続している場合

モニターはその機器の電源装置と連動できます。


8.


インフォメーション(

Information)

:映像信号の周波数や、

On-Lap

の型番、ファームウェア番

号等のインフォメーションを表示します。


1) 

リセット(

Reset)

: 「はい」を選択すると、出荷時の設定に復元されます。


19


Summary of Contents for On-Lap 1306E-R

Page 1: ...On Lap 1306H R On Lap 1306E R User Manual...

Page 2: ...3 Connect to Smartphone Support USB Type C DP Alt mode 4 Section 4 Connect to PC Game Console or Other Devices Sup porting HDMI Output 4 Section 5 Connect to Headphone or Speaker 5 Chapter 3 Hot Keys...

Page 3: ...IV V V 12 12 13 13 13 15 15 16 17 17 17 18 20 20 20 21 21 22 22 23...

Page 4: ...stubborn stains please use lightly dampened cloth to wipe again Do not use benzene alcohol thinner ammonia abrasive cleaners compressed air or other corrosive solvents These solvents may cause perman...

Page 5: ...in when the same image is displayed for hours In this case the screen is recovered slowly by turning off the power for a few hours Notice This equipment has been tested and found to comply with the li...

Page 6: ...nu facturing organization on ISO9000 level III WEEE Symbol Information This symbol on the product accessories or literature indicates that this product and its electronic accessories e g adapter cable...

Page 7: ...apter 1 Parts of On Lap Product Accessories Section 1 Parts Description Fig Part description of 1306 Cover Stand Fig 1306 Buttons LED Lights Audio Jack Description Fig On Lap 1306 Monitor Connection P...

Page 8: ...MI to Micro HDMI Video Cable 1 2m One plug is micro HDMI male for camera s micro HDMI port the other plug is micro HDMI male for connecting to On Lap 1306 monitor Mini HDMI to Micro HDMI Video Cable 2...

Page 9: ...the top half of the monitor into the Protective Cover Rotate down the Cover Locks to prevent the monitor from sliding out 3 Store the Monitor in the Protective Cover When not in use please put the mo...

Page 10: ...signals through the USB Type C port to the monitor It is not necessary to use a charger and a HDMI cable to connect the monitor in this case Section 3 Connect to Smartphone Support USB Type C DP Alt...

Page 11: ...onnect to Nintendo Switch As shown in fig below for power 1306 on please convert either end of USB Type C Power Video Cable 1 0m by USB C famale to USB A male Adapter to connect to a 5V 2A power adapt...

Page 12: ...se Volume Down at the same time to lock the power button Press these two buttons again to unlock power button Lock OSD button Press both Menu and Increase Volume Up at the same time to lock OSD button...

Page 13: ...mage Select User to adjust the RGB color settings manually 4 Aspect Ratio 1 Aspect ratio When select 16 9 Full Screen the monitor displays a 16 9 image in full screen When select 4 3 the monitor displ...

Page 14: ...s selected only the video source selected in Input Source will be displayed If no such selected video signal inputs the monitor will show no signal warn ing message and won t check other video sources...

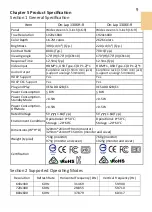
Page 15: ...C Support Yes Yes Plug and Play VESA DDC2B C1 VESA DDC2B C1 Power Consumption 8W 8W Power Consumption Standby Mode 0 5W 0 5W Power Consumption Off Mode 0 5W 0 5W Rated Voltage 5V 1 6A Typ 5V 1 6A Typ...

Page 16: ...24x768 60Hz 48 363 60 004 1152x864 60Hz 53 783 59 959 1280x600 60Hz 37 377 59 900 1280x720 60Hz 45 000 60 000 1280x768 60Hz 47 776 59 870 1280x800 60Hz 49 702 59 810 1280x960 60Hz 60 000 60 000 1280x1...

Page 17: ...provide stable 5V 1 5A current to 1306 and cause the monitor to flicker or fail to be turned on due to insufficient current Please refer to Section 3 in Chapter 2 and use USB Type C Video and Independ...

Page 18: ...1 2 USB USB USB 3 On Lap 5V 2A DC 5V PC USB x2 5V 2A AC 4 On Lap PC PC 5 6 7 8 9 10 30 10 2 2 1 IV...

Page 19: ...11 1 2 3 4 5V 5 6 99 99 0 01 WEEE Rear Dock EU EU B VCCI B V...

Page 20: ...12 1 On Lap 1306 On Lap 1306 LED On Lap 1306...

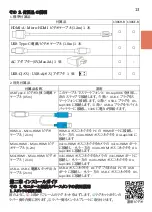
Page 21: ...HDMI micro HDMI On Lap1306 Micro HDMI Micro HDMI 1 2m micro HDMI micro HDMI micro HDMI On Lap1306 Mini HDMI Micro HDMI 2 1m mini HDMI mini HDMI micro HDMI On Lap1306 USB A USB C 2 1m USB A AC PC USB U...

Page 22: ...2 Cover Lock 1 2 Cover Lock 40 12cm 2 1 3 2 14...

Page 23: ...isplayPort Alternate Mode USB Type C DP Alt USB Type C On Lap 1306 5V 1 5A 2 PC On Lap 1306 1 5A On Lap 1306H USB Type C Y 0 5m On Lap 1306 DisplayPort Alternate Mode USB Type C USB Type C 1 0m USB Ty...

Page 24: ...ap1306 DP Alt 2 Nintendo Switch 1306 USB Type C 1 0m USB C USB A 5V 2A 1306 HDMI A Micro HDMI 1 2m SWITCH HDMI A 1306 Micro HDMI 4 HDMI 1 USB Type C 1 0m USB C USB C USB A USB Type C USB A HDMI A Micr...

Page 25: ...5 Headphone out port HDMI A DisplayPort Alternate Mode USB Type C Headphone out port 2 Audio in 5 7 2 LED OSD 1 LED 2 LED On Lap OFF 17 or...

Page 26: ...On Off OSD OSD OSD OSD OSD OSD 2 OSD 2 OSD 2 OSD On Lap LanguageSelect LanguageSelect LanguageSelect 1 OSD 2 Display Settings 1 ECO ECO Mode 50 2 Auto Adjust 18...

Page 27: ...1 RGB 2 2 Overscan HDMI Video 1080P 720P 5 OSD OSD Menu 1 OSD 2 OSD 3 OSD 4 OSD OSD 5 OSD OSD 6 Auto Power Off 15 7 8 Power Button Lock 6 0 7 Input Source 1 Input Source HDMI HDMI USB Type C USB Type...

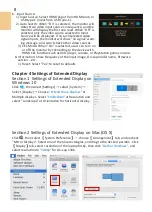
Page 28: ...2 Mac OS X On Lap 1306 1080p 1 Windows10 1920x1080 20...

Page 29: ...12 5ms Typ 12 5ms Typ HDMI 1 USB Type C DP 1 2 1 HDMI 1 USB Type C DP 1 2 1 3 5mm mini jack support analog 2 5mm AUX 3 5mm mini jack support analog 2 5mm AUX HDCP HDMI CEC VESA DDC2B C1 VESA DDC2B C1...

Page 30: ...60 004 1152x864 60Hz 53 783 59 959 1280x600 60Hz 37 377 59 900 1280x720 60Hz 45 000 60 000 1280x768 60Hz 47 776 59 870 1280x800 60Hz 49 702 59 810 1280x960 60Hz 60 000 60 000 1280x1024 60Hz 63 981 60...

Page 31: ...ernate Mode USB Type C DP Alt USB Type C DP Alt 5V 1 5A 3 USB Type C On Lap 1306 On Lap1306 5V 1 5A 2 3 USB Type C 0 5 m 4 USB Type C On Lap 1306 APP 5 1306 USB Type C GeChic Corporation 11F 3 No 138...

Page 32: ...1 On Lap1306 No...

Reviews: