background image

CALIBRATION: Solar 7000 Color Monitor 

5-4

Solar 7000/8000/View Patient Monitor

Revision J

414993-001

Preparation

Remove monitor housing by following the steps given below.

1.

Turn the power switch at the rear of the monitor to OFF.

2.

To aid in disassembly, refer to “Disassembly Guidelines” in Chapter 
7: “Monitor Assembly.” (Remove two screws at the back of the unit. 
Lay the unit on its front display. Do not apply too much pressure on 
the Trim Knob control. Remove three screws from bottom of unit. 
Pull the housing directly up. Set the unit upright again.)

3.

Apply power at the rear power switch and let the unit warm up for at 
least 30 minutes. 

4.

Color units will automatically degauss the display when turned ON.

If the red color is impure (not true red), the screen may need to be 
degaussed again. (Use Service Mode.) Note that once the display is 
manually degaussed, it cannot be degaussed again for at least 10 
minutes.

An external degaussing coil may have to be used if the impure red 
persists after performing following procedure.

Horizontal Frequency 
Adjust

Do the following steps in the order given for the color display.

1.

Set DMM to frequency counter mode by selecting the AC and HZ 
button.

2.

Disconnect the video cable ribbon cable from connector on the main 
processor PCB, pn 800678-00X.

3.

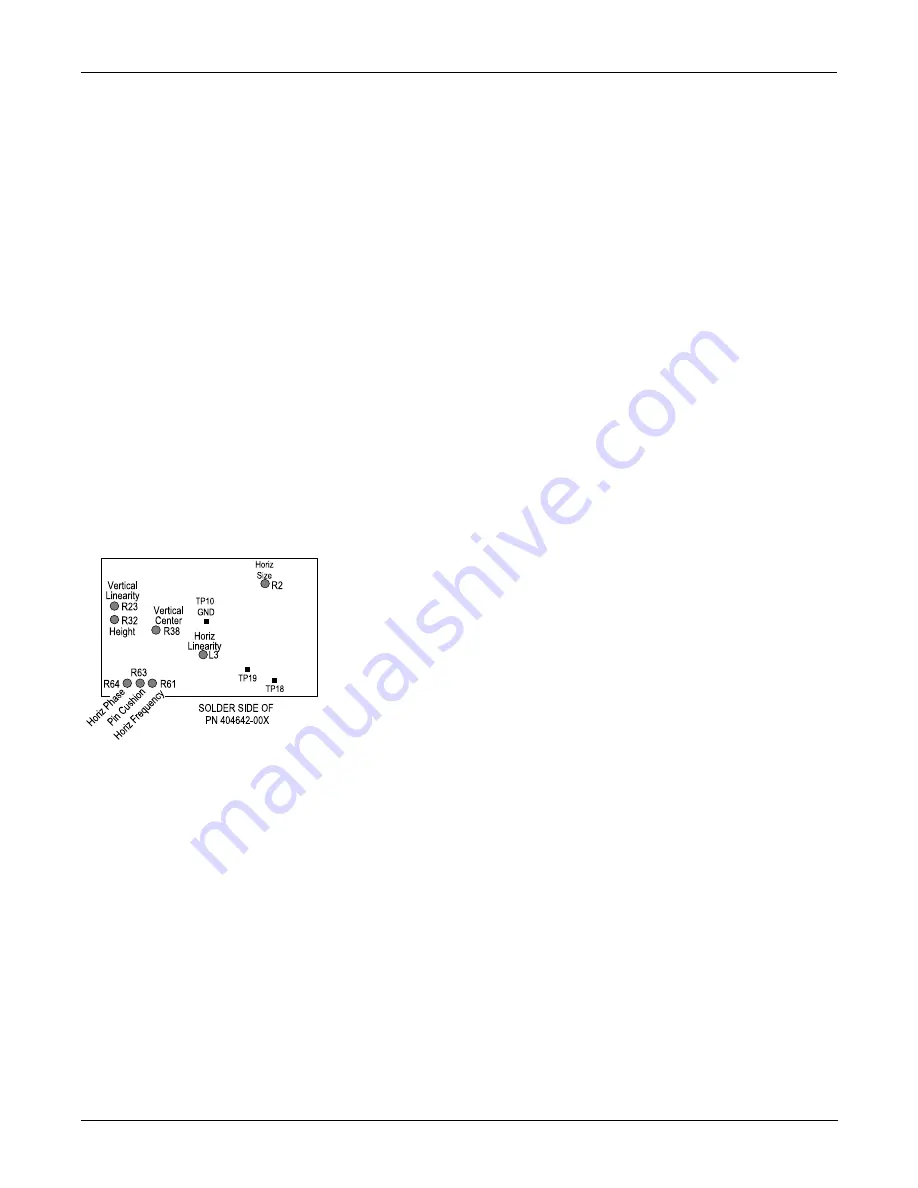
Locate variable resistor R61 on the solder side of the deflection PCB.

4.

Connect positive lead of DMM to TP18 or TP19 on solder side of the 
deflection PCB. Connect negative lead to chassis GND.

5.

Verify 34.53 kHz ±20 Hz for the horizontal frequency. Adjust variable 
resistor R61 to achieve this measurement. The unit must be at 
operating temperature for this adjustment.

6.

Reconnect video connector ribbon cable assembly to connector on the 
main processor PCB.

Summary of Contents for Solar 7000

Page 1: ...Solar 7000 8000 SolarView Patient Monitor Field Service Manual 414993 001 Revision J ...

Page 2: ...SCRIPT OnlineABG OXYMONITOR Pres R Cuff PRESSURE SCRIBE QMI QS Quantitative Medicine Quantitative Sentinel RAC RAMS RSVP SAM SEER SILVERTRACE SOLAR SOLARVIEW Spectra 400 Spectra Overview Spectra Tel ST GUARD TRAM TRAM NET TRAM RAC TRAMSCOPE TRIM KNOB Trimline UNION STATION UNITY logo UNITY NETWORK Vari X Vari X Cardiomatic VariCath VARIDEX VAS and Vision Care Filter are trademarks of GE Medical Sy...

Page 3: ...ification 1 8 2 EQUIPMENT OVERVIEW 2 1 System Components 2 3 What is a Solar 7000 8000 Patient Monitoring System 2 3 What is the Unity Network 2 4 What is a Solar 7000 Patient Monitor 2 5 What is a Solar 8000 Patient Monitor 2 5 What is a SolarView Remote Display Controller 2 6 What is a Tram rac Housing 2 7 What is a DDW 2 7 What is a PRN 50 Digital Writer 2 8 What is a Remote Control 2 9 What is...

Page 4: ...ng Schemes 2 35 Power Up 2 38 For all Solar Monitors 2 38 For Monochrome Solar 8000 2 38 Configuration 2 38 More About Tram net Communication 2 39 Internal Hub 2 39 Tram net Hub Assembly 2 40 More About Ethernet Communication 2 41 Twisted Pair 2 41 Concentrator 2 42 Thin net Thick net 2 42 Node 2 42 Segment and Branch 2 42 Repeater 2 43 Bridge 2 43 3 MAINTENANCE 3 1 Maintenance Schedule 3 3 Manufa...

Page 5: ... 14 Test Completion 3 15 Checkout Procedure 3 16 General 3 16 Required Tools Special Equipment 3 16 Procedure 3 16 General Monitor Check 3 16 Solar 7000 Display Check 3 17 Solar 8000 View Display Check 3 18 Tram rac Housing Check 3 18 Tram net Communication Check 3 20 LAN Network Check 3 20 Remote Control Check 3 20 Video Alarm Check 3 20 Tram net Interface Check 3 20 Octanet Check 3 20 Completion...

Page 6: ...nly 4 11 Block Diagram of Internal Cabling 4 12 Solar 7000 Color Monitor 4 12 Solar 7000 Monochrome Monitor 4 16 Solar 8000 View Processing Unit 4 20 Communication Connectors 4 22 Async COMM Signals 4 22 RMT ALM Signals 4 23 Ethernet Signals 4 23 Tram net Signals 4 24 RS 232 Signals 4 25 RMT VID or VID Signals 4 25 Service Menus 4 26 Boot Loader Service Menu 4 26 Change Ethernet Address 4 26 Chang...

Page 7: ...t 5 5 Color Cross Hatch Adjust 5 5 Color Intensity Adjust 5 6 Color Adjust 5 6 Completion 5 6 CRT Controller PCB Calibration 5 7 Gain Adjust 5 8 Completion 5 9 Solar 7000 Color Power Supply 5 10 Preparation 5 10 Procedure 5 11 Completion 5 11 Solar 7000 Monochrome Monitor 5 12 Monochrome Display Calibration 5 12 Special Tools Equipment 5 12 Preparation 5 13 Horizontal Frequency Adjust 5 13 Focus A...

Page 8: ... 10 Advanced User Procedures 6 11 Procedures 6 11 Programming Time and Date 6 12 From BOOT LOADER 6 12 From SERVICE MODE Menu 6 12 Changing Software Feature Level 6 13 Dial a Lower Level 6 13 Exchange the EEPROM 6 13 Changing Remote Control Function 6 13 Transferring Monitor Defaults 6 14 Storing Monitor Defaults for Transfer 6 14 Copying Stored Monitor Defaults 6 15 Troubleshooting Monitor Defaul...

Page 9: ... CRT Controller or Color Deflection PCB Removal 7 6 Power Supply Removal 7 7 Color CRT Controller PCB Removal 7 8 Ordering Parts for Solar 7000 7 9 Commonly Replaced Assemblies 7 9 Fuse Part Numbers 7 10 Solar 7000 Labels 7 11 Exploded View Color PN 900618 001J 7 12 Parts List PN 900618 001J 7 15 Exploded View Mono PN 900619 001L 7 17 Parts List PN 900619 001L 7 20 Solar 8000 View Disassembly Guid...

Page 10: ...CONTENTS viii Solar 7000 8000 View Patient Monitor Revision H 414993 001 For your notes ...

Page 11: ...Revision J Solar 7000 8000 View Patient Monitor 1 1 414993 001 1 INTRODUCTION ...

Page 12: ...INTRODUCTION 1 2 Solar 7000 8000 View Patient Monitor Revision J 414993 001 For your notes ...

Page 13: ...s may skip revision letters for example jump from revision A to revision C because they did not change in revision B Revision History Revision Date Comment A 28 March 1995 Initial release of this manual B 3 October 1995 Added references to Solar 8000 processing unit C 1 March 1996 Minor corrections D 15 May 1996 Added references to SolarView remote display controller E 23 September 1996 Added refe...

Page 14: ...field repairable Where necessary the manual identifies additional sources of relevant information and technical assistance See the operator s manual for the instructions necessary to operate the equipment safely in accordance with its function and intended use For parts lists and schematic diagrams of the PCB assemblies order the Solar 7000 8000 View Monitor Data Manual PN 414993 007 Intended Audi...

Page 15: ...r on the order of a physician Contact GE Medical Systems Information Technologies for information before connecting any devices to the equipment that are not recommended in this manual Parts and accessories used must meet the requirements of the applicable IEC 601 series safety standards and or the system configuration must meet the requirements of the IEC 60601 1 1 medical electrical systems stan...

Page 16: ...proof type CF equipment type CF equipment is specifically designed for applications where a conductive connection directly to the heart is established The paddles indicate the equipment is defibrillator proof Defibrillator proof type BF equipment type BF equipment is suitable for intentional external and internal application to the patient excluding direct cardiac application Type BF equipment is ...

Page 17: ...ury WARNING indicates a potential hazard or unsafe practice which if not avoided could result in death or serious injury CAUTION indicates a potential hazard or unsafe practice which if not avoided could result in minor personal injury or product property damage NOTE provides application tips or other useful information to assure that you get the most from your equipment Where used indicates to pr...

Page 18: ...ensure that the equipment will always be functional when required Warranty Equipment Identification Every GE Medical Systems Information Technologies device has a unique serial number for identification A sample of the information found on a serial number label is shown below Standard One year Other options are available Contact your sales representative for more information D 0 XX 0005 G XX Month...

Page 19: ...Revision J Solar 7000 8000 View Patient Monitor 2 1 414993 001 2 EQUIPMENT OVERVIEW ...

Page 20: ...EQUIPMENT OVERVIEW 2 2 Solar 7000 8000 View Patient Monitor Revision J 414993 001 For your notes ...

Page 21: ...tient monitoring system operates with the Unity Network or as a system itself At the patient s bed the Solar 7000 8000 patient monitoring system permits connection of many peripheral devices from the Solar 7000 8000 monitor All Solar 7000 8000 Patient Monitoring Systems include a patient monitor at least one patient parameter monitoring module and one or more of the following items Tram rac housin...

Page 22: ...ment equipment into an integrated hospital wide system It creates an extended communication system for efficient information sharing among operating rooms intensive care units the emergency room and other care and diagnostic areas Information entered anywhere on the network via any input device is available anywhere else on the network This is accomplished through the Ethernet communication hardwa...

Page 23: ... monitor consists of a Solar 8000 processing unit with a compatible display purchased from GE Medical Systems Information Technologies or another vendor For details about the GE Medical Systems Information Technologies display refer to the 15 Inch Medical Grade Color Display Service Manual pn 414993 056 The processing unit is the center of the Solar 8000 Patient Monitoring system It provides the u...

Page 24: ...ologies or another vendor For details about the GE Medical Systems Information Technologies display refer to the 15 Inch Medical Grade Color Display Service Manual pn 414993 056 The controller is connected to the Unity network and may be configured to display any patient waveforms broadcasted on the network for better visibility as either a remote full view display or as an in room telemetry displ...

Page 25: ...olds a single Tram module and Tram rac 4A housing which holds a Tram module and two additional Series 7000 input modules Shown below is a Tram rac 4A housing with a Tram module Series 7000 BP dual temperature module and single Series 7000 BP module inserted What is a DDW A Direct Digital Writer DDW allows patient data to be printed on a paper strip Any parameter or trace that can be monitored at t...

Page 26: ... a PRN 50 Digital Writer A PRN 50 Digital Writer thermally records patient data on a paper strip Any parameter or trace that can be monitored on a patient monitor can be graphed by the writer Graphs are initiated automatically when an alarm has been activated or they can be initiated manually from a monitor ...

Page 27: ... For more details about the remote control refer to the Modular Patient Monitor Accessories Service Manual pn 404183 150 What is a Remote Display A color or monochrome secondary display may be attached directly to the Solar 7000 patient monitor to display up to eight patient monitor waveforms for better visibility It is connected to the video out RMT VID connector at the back of the monitor For de...

Page 28: ...et long Note that a 25 pin D type connector at the rear of the patient monitor is marked TRAM NET or ASYNC COMM This connector handles both Tram net and async signals One end of the Tram net hub assembly connects to this connector At the other end of the Tram net hub assembly the signals are separated into async and four Tram net connectors The 25 pin red color coded connector handles async for co...

Page 29: ...nnect with the Tram net communication network For more details about the Tram net interface adapter refer to the Modular Patient Monitor Accessories Service Manual pn 404183 150 What is an Octanet Connectivity Device The Octanet Connectivity Device acquires digital data from eight individually isolated serial ports The data is collected from up to eight of devices not manufactured by GE Medical Sy...

Page 30: ...splay six hours at a time This feature is available with V3 software or later The stored CRG data is used in the overall analysis of a patient Analyzing trend waveforms permits the ability to view both subtle and dramatic changes in the patient s vital signs It also enables the clinician to correlate changes of one parameter with respect to another For more details about the TMSS refer to the Mode...

Page 31: ...to 8 Solar 7000 Monitor Number of seconds trace 6 5 at 25 mm sec Phosphor Solar 7000 Color Monitor P22 Solar 7000 Monochrome Monitor P218 Sweep Speed Solar 7000 Monitor 25 mm sec meets all ANSI AAMI specifications Frequency Response Limited by input response of data acquisition device Linearity Solar 7000 Monitor 1 of picture height Waveform Display Options Full Individual CRG Plus Information Win...

Page 32: ...visual dependent on level Display of Alarm Information All limits are viewable and graphable Silencing Only current alarm for 1 minute Alarm pause 5 minutes in adult ICU mode 3 minutes in neonatal mode 5 minutes 15 minutes or permanent alarm pause in OR mode Continuous Display of Limits All parameters one set of limits Control Specifications Item Description Trim Knob Control Single control operat...

Page 33: ...VAC SolarView Remote Display Controller 90 VAC 190 VAC Cooling Solar 7000 Color Monitor Forced convection Solar 7000 Monochrome Monitor and Solar 8000 Processing Unit Natural convection Heat Dissipation Solar 7000 Color Monitor 680 Btu hr 200 W Solar 7000 Monochrome Monitor 409 Btu hr 120 W Solar 8000 Processing Unit 100 Btu hr 30W SolarView Remote Display Controller 50 Btu hr 15W Operating Condit...

Page 34: ...3 8 in Weight Solar 7000 Color Monitor 22 kg 48 lb Solar 7000 Monochrome Monitor 13 3 kg 29 4 lb Solar 8000 Processing Unit 5 4 kg 12 0 lb SolarView Remote Display Controller 5 4 kg 12 0 lb Minimum Enclosure Requirements Interior Height 10 7 cm 4 2 in Width 38 9 cm 15 3 in Depth 51 8 cm 20 4 in Certification Item Description Safety Standards Solar 7000 Monitor UL544 Listed UL Listed for CSA C22 2 ...

Page 35: ...n against harmful ingress of water Ordinary Equipment enclosed equipment without protection against ingress of water Degree of safety of application in the presence of a flammable anesthetic mixture with air or with oxygen or nitrous oxide Equipment not suitable for use in the presence of a flammable anesthetic mixture with air or with oxygen or nitrous oxide Method s of sterilization or disinfect...

Page 36: ...ower Connection For the Solar 7000 monitor connect the power cord to the power supply inlet and anchor the cord with the restraining clip and screw For the Solar 8000 processing unit or SolarView remote display controller connect the power cord to the power supply inlet and anchor the cord with the restraining clip and screw ...

Page 37: ... the Solar 7000 8000 monitor or SolarView remote display controller connect the Unity network to the Ethernet connector with kit pn 414292 001 as shown below 1 Remove four jackscrews from connectors shown 2 Install two screws from kit to secure ETHERNET connector to chassis 3 Install two screws to connect transceiver bracket to transceiver 4 Use two jackscrews removed earlier to mount transceiver ...

Page 38: ...hub Tram rac housing or remote control SolarView remote display controller does not use this function ETHERNET is the Unity Network connection that provides faster hospital wide communication Remote alarm RMT ALM provides relay contact closure for Level I alarms to an alarm annunciator For the Solar 7000 monitor remote display RMT VID connects to a secondary remote display For the Solar 8000 proce...

Page 39: ...J Solar 7000 8000 View Patient Monitor 2 21 414993 001 Tram rac 4A Housing Shown below is the connection from the Tram rac 4A housing to a Solar monitor with and without a Tram net hub connection Solar 8000 Patient Monitor Solar 7000 Patient Monitor ...

Page 40: ...ar 7000 8000 View Patient Monitor Revision J 414993 001 Tram rac 2 Housing Shown below is the connection from the Tram rac 2 housing to a Solar monitor with and without a Tram net hub connection Solar 8000 Patient Monitor Solar 7000 Patient Monitor ...

Page 41: ... most Tram net connector may be connected to the following a monitor or a Tram net hub The center Tram net connector may be connected to the following a remote control or to another Tram rac 4A housing with a power supply NOTE The Tram rac housing furthest from the monitor must have a power supply Shown below are examples of how to connect dual Tram rac housings to a Solar 7000 patient monitor ...

Page 42: ...EQUIPMENT OVERVIEW Preparation for Use 2 24 Solar 7000 8000 View Patient Monitor Revision J 414993 001 Shown below are examples of how to connect dual Tram rac housings to a Solar 8000 patient monitor ...

Page 43: ...aration for Use Revision J Solar 7000 8000 View Patient Monitor 2 25 414993 001 Tram net Interface Adapter Shown below are examples of how to connect a Tram net interface adapter to a Solar 7000 or Solar 8000 patient monitor ...

Page 44: ...ith a Tram net hub connection For more details about the Octanet Connectivity Device refer to the Octanet Connectivity Device Service Manual pn 418264 003 Solar 7000 Patient Monitor Solar 8000 Patient Monitor Tram rac Housing Tram net Hub Serial Communication RS232 PATIENT ROOM TRAM NET Octanet Connectivity Device Solar 8000 Patient Monitor Adapter Ethernet Communication Peripheral Bedside Devices...

Page 45: ...000 patient monitor Due to continuing product innovation your DDW may be different from that illustrated below PRN 50 The PRN 50 Digital Writer connects between the ASYNC COMM ports of the PRN 50 Digital Writer and the Solar 7000 or 8000 monitor Shown below is the connection of the PRN 50 Digital Writer to Solar 7000 or 8000 monitor Solar 7000 Patient Monitor Solar 8000 Patient Monitor ...

Page 46: ...iter connects between AutoPort on the PRN 50 Digital Writer and the TRAM NET ports of the Solar 7000 or 8000 monitor when using the Octanet Shown below is the connection of the PRN 50 Digital Writer to Solar 7000 or 8000 monitor with a Tram net hub and Octanet connection Solar 7000 Patient Monitor Solar 8000 Patient Monitor ...

Page 47: ...ration for Use Revision J Solar 7000 8000 View Patient Monitor 2 29 414993 001 Remote Control Shown below are examples of how to connect a remote control to a Solar 7000 or 8000 patient monitor with and without a Tram net hub ...

Page 48: ... Storage System Shown below are examples of how to connect a Trend Memory Storage System TMSS to a Solar 7000 or Solar 8000 patient monitor CAUTION Always turn the monitor s main power off before connecting or disconnecting the TMSS Refer to the Model 7024 Product Manual pn 13703AA 000 for installation instructions ...

Page 49: ...ifying the medical electrical system is responsible to insure compliance with IEC 601 1 1 Therefore if GE Medical Systems Information Technologies installs a Solar 8000 system with a computer grade display GE Medical Systems Information Technologies is responsible for meeting the specification As a result GE Medical Systems Information Technologies will only Install medical grade displays that it ...

Page 50: ...1 FPD Flat Panel Display Interconnection To connect a FPD a medical grade power supply is required Connect the FPD to the VID 15 pin connector on the Solar 8000 processing unit Connect the power supply to the power jack of the FPD as shown below Connect both power cords from both units to the AC outlet ...

Page 51: ...vision J Solar 7000 8000 View Patient Monitor 2 33 414993 001 Remote Display Interconnection Shown below are examples of how to connect a remote display to a Solar 7000 patient monitor Display with D style Connector Display with BNC Connectors ...

Page 52: ...t Monitor Revision J 414993 001 Solar 8000 Local and Remote Display Interconnection Shown below are examples of how to connect a local display to a Solar 8000 patient monitor or SolarView remote display controller Display with D style Connector Display with BNC Connectors ...

Page 53: ...elow 1 Determine which display you have in the left column 2 Match your display s connector with the installation required 3 Determine the distance from the remote display to the monitor 4 Select the appropriate type of installation Direct or Wallplate Connection Use the following interconnection scheme for a remote display requiring an interface cable to the patient monitor shorter than 155 feet ...

Page 54: ...ion for Use 2 36 Solar 7000 8000 View Patient Monitor Revision J 414993 001 Multiple Displays Use the following interconnection scheme for a remote display requiring an interface cable to the patient monitor shorter than155 feet ...

Page 55: ...n for Use Revision J Solar 7000 8000 View Patient Monitor 2 37 414993 001 Cabling Over 155 Feet Use the following interconnection scheme for a remote display requiring an interface cable to the patient monitor longer than 155 feet ...

Page 56: ...s completely blank or resets intermittently there is a serious hardware failure Refer to Troubleshooting Procedure in Chapter 4 Troubleshooting For Monochrome Solar 8000 After any cold start the display will default to color video For a monochrome display access the video option by executing the following menu sequence starting from the MAIN menu MONITOR SETUP SERVICE MODE Password Enter day and m...

Page 57: ...ital The 25 pin connector makes a Tram net small area network available for the peripheral devices The Tram net controller resides on the same bus as the main processor which provides efficient data transfer by sharing main memory Internal Hub Tram net is a small network that offers ample flexibility a high rate of communication and relatively inexpensive cabling Data is transmitted at the rate of...

Page 58: ...e hubs in the Tram rac housing and Tram module as well Tram net Hub Assembly If more than one peripheral is connected to Tram net a Tram net hub assembly is required The Tram net hub assembly simply adds connectors as more nodes to the patient monitor s internal hub The nodes of the star in the Tram net system can be patient monitor peripherals like the remote control or Tram rac housing The Tram ...

Page 59: ...ons and other GE Medical Systems Information Technologies equipment throughout the hospital Depending upon the construction of the hospital thick net thin net or twisted pair cabling is used Twisted Pair Twisted pair is the most popular cabling because it is easy to install and flexible to work with It uses the star topology with a concentrator as the hub of the segment Each of the network devices...

Page 60: ...net and thin net cabling a transceiver and a serial drop cable connects to the main trunk The serial drop cable is sometimes referred to as an AUI attachment unit interface transceiver cable For twisted pair cabling the transceiver to connected directly to the network device Segment and Branch Some Ethernet systems are comprised of smaller stand alone Ethernet systems called branches or segments t...

Page 61: ...de on the same segment Bridge A bridge is more selective than a repeater with the data that it passes between segments It also acts as a transceiver between two segments but it only passes signals if a node on one of the segments is attempting to communicate with a node on the other segment Since the majority of communication on the network occurs within a single segment the bridge does not pass a...

Page 62: ...EQUIPMENT OVERVIEW More About Ethernet Communication 2 44 Solar 7000 8000 View Patient Monitor Revision J 414993 001 For your notes ...

Page 63: ...Revision J Solar 7000 8000 View Patient Monitor 3 1 414993 001 3 MAINTENANCE ...

Page 64: ...MAINTENANCE 3 2 Solar 7000 8000 View Patient Monitor Revision J 414993 001 For your notes ...

Page 65: ...ety Tests These should be performed by service personnel upon receipt of the equipment every 12 months thereafter and each time the unit is serviced Checkout Procedure This should be performed by qualified service personnel upon receipt of the equipment every 12 months thereafter and each time the unit is serviced Manufacturer Responsibility WARNING Failure on the part of all responsible individua...

Page 66: ...physical damage to the case the display screen the controls and the keyboard Do not use the monitor if damage is determined Refer damaged equipment to qualified service personnel Inspect all external connections for loose connectors or frayed cables Have any damaged connectors or cables replaced by qualified service personnel Inspect the CRT face for marks scratches or other damage Physical damage...

Page 67: ...solution or Sodium hypochlorite bleach diluted or Mild soap diluted Lint free cloth Dust Remover compressed air To avoid damage to the equipment surfaces never use the following cleaning agents organic solvents ammonia based solutions acetone solution alcohol based cleaning agents Betadine solution a wax containing a cleaning substance or abrasive cleaning agents ...

Page 68: ...ns of the display s manufacturer In general you will need to use a soft clean lint free cloth dampened with a glass cleaner CAUTION To avoid getting liquid into connector openings do not spray glass cleaning or general cleaning solutions directly onto the product s surface Cleaning the Touch Screen Display 1 Turn OFF the mains power switch on the monitor and disconnect it from the power source 2 C...

Page 69: ...nitor Disconnect the monitor from the power source and the network 2 Remove the screws attaching the housing to the chassis at the rear of the unit 3 Pull the chassis out of the housing 4 Using a source of clean dry compressed air blow all lint and debris from between the circuit boards and the other assemblies CAUTION Do not use a vacuum device unless suitable static control procedures are follow...

Page 70: ...connected to the monitor throughout the safety tests WARNING Failure to implement a satisfactory maintenance schedule may cause undue equipment failure and possible health hazards Unless you have an Equipment Maintenance Contract GE Medical Systems Information Technologies does not in any manner assume the responsibility for performing the recommended maintenance procedures The sole responsibility...

Page 71: ...st and Impedance of Protective Earth Connection These tests determine whether the device s exposed metal and power inlet s earth ground connection has a power ground fault condition Perform the test method below that is required by your Country Local governing safety organization Ground Continuity Test Completion of this test is checked by the following steps 1 Disconnect the device under test fro...

Page 72: ... failure in basic insulation 2 The voltage drop between the parts described is measured and the impedance determined from the current and voltage drop It shall not exceed the values indicated For equipment without a power supply cord the impedance between the protective earth terminal and any accessible metal part which is protectively earthed shall not exceed 0 1 ohms For equipment with a power s...

Page 73: ... volts on the DMM and the device under test is powered from 100 120 V 50 60 Hz 300 µA 0 3 volts on the DMM and the device under test is powered from a centered tapped 200 240 V 50 60 Hz single phase circuit 500 µA 0 5 volts on the DMM and the device under test is powered from a non center tapped 200 240 V 50 60 Hz single phase circuit NOTE Center tapped and non center tapped supply circuits produc...

Page 74: ...nts and the UL and IEC limits are different 5 Set the polarity switch to RVS 6 Read the current leakage indicated on DMM NOTE If either reading is greater than the appropriate specification below the device under test fails Contact GE Medical Systems Information Technologies Technical Support 300 microamperes 0 3 volts on the DMM and the device under test is powered from 100 120 V 50 60 Hz 300 µA ...

Page 75: ...0 60 Hz 11 Set the power switch of the device under test to OFF Patient Source Leakage Current Test This procedure only applies to Class I grounded earthed equipment and measures the leakage current from the ECG RESP connector of the device to ground 1 Configure the leakage tester like the circuit shown below with GND switch OPEN and polarity switch NORM 2 Connect an ECG test body to the ECG RESP ...

Page 76: ...act GE Medical Systems Information Technologies Technical Support 11 Set the power switch of the device to OFF NOTE The AAMI and IEC single fault condition ground open is 50 µA whereas the normal condition ground closed is less Patient Sink Leakage Current Test Mains Voltage on the Applied Part This procedure only applies to Class I grounded earthed equipment and measures the leakage current from ...

Page 77: ...elow the device under test fails Contact GE Medical Systems Information Technologies Technical Support 10 µA 0 01 volts on the DMM at 120 VAC using the test body 20 µA 0 02 volts on the DMM at 240 VAC using the test body 50 µA 0 05 volts on the DMM at 120 240 VAC using the ECG cable NOTE The 10 and 20 µA limits are based on internal design standards The 50 µA limit is common to all standards AAMI ...

Page 78: ...irm that all components of the monitoring system are correctly connected as described in Chapter 1 Preparation for Use of this manual 2 Place the Tram module into the top two slots of the Tram rac housing Verify that the power indicator illuminates 3 Configure the monitor display with as many waveforms as possible Refer to the appropriate monitor operator s manual if necessary 4 The waveforms shou...

Page 79: ...000 display only degauss the monitor by executing the following menu selections from the MAIN MENU MONITOR SETUP SERVICE MODE Password Enter day and month from monitor screen with leading zeros July 4 0407 DEGAUSS Degauss the color display periodically and whenever the red color becomes impure not true red Note that the display is automatically degaussed every time the unit is turned ON Once the d...

Page 80: ...nufacturer s documentation Tram rac Housing Check Do the following to check the Tram rac housing 1 Verify power LED is ON at the Tram rac housing 2 Disconnect and reconnect the Tram rac housing communication cable Verify the recovery of the waveforms 3 If the Tram rac housing has additional slots for input modules insert a BP module Connect simulator and verify communication to the monitor Repeat ...

Page 81: ...ND for Tram Waveforms Pin 2 Pin 2 Trace I ECG II2 Tram1 Pin3 Pin 6 Tram BP3 or SPO2 Value Tram1 Pin 4 Reserved for Future Use Pin 5 Pin 4 Tram ART 1 or BP1 Tram Pin 6 Pin 9 Slot 3 Series 7000 Waveform A Left Side or Module Parameter 6 Pin 7 Pin 11 Slot 4 Series 7000 Waveform A Left Side or Module Parameter 8 Pin 8 Pin 8 Signal GND for Series 7000 Waveforms Pin 9 Pin 1 Tram ECG II Tram1 Pin 10 Pin ...

Page 82: ... 12 hard keys Verify a response at the monitor display 2 Plug the remote control into the auxiliary async connector red at the rear of the monitor Check all functions of the Trim Knob control and 12 hard keys Verify a response at the monitor display Video Alarm Check If the monitor has a remote video remote alarm do the following to check it 1 If a remote display is used check the connection from ...

Page 83: ...form is no longer printed with this manual For the latest PM form regarding this product contact GE Clinical Services refer to How to Reach Us at the front of this manual If repairs adjustments were made or any parts replaced describe this in the area provided on the PM form Also include comments regarding any unusual environmental conditions that may affect the operation or reliability of the equ...

Page 84: ...MAINTENANCE Checkout Procedure 3 22 Solar 7000 8000 View Patient Monitor Revision J 414993 001 For your notes ...

Page 85: ...MAINTENANCE Repair Log Revision J Solar 7000 8000 View Patient Monitor 3 23 414993 001 Repair Log Unit Serial Number Institution Name Date Maintenance Repair Technician ...

Page 86: ...MAINTENANCE Repair Log 3 24 Solar 7000 8000 View Patient Monitor Revision J 414993 001 Unit Serial Number Institution Name Date Maintenance Repair Technician ...

Page 87: ...Revision J Solar 7000 8000 View Patient Monitor 4 1 414993 001 4 TROUBLESHOOTING ...

Page 88: ...4 2 Solar 7000 8000 View Patient Monitor Revision J 414993 001 For your notes ...

Page 89: ...is chapter 2 Read the Block Theory of Operation 3 Study the Block Diagram of Internal Cabling 4 Note the uses of the Communication Connectors 5 Familiarize yourself with the Service Menus 6 Read the General Fault Isolation suggestions 7 Use the Troubleshooting Procedure to locate the faulty circuit board or assembly 8 Read Troubleshooting Software Updates if you are planning to execute an update 9...

Page 90: ...s and release the Trim Knob control Keep holding the NBP GO STOP and ZERO ALL keys or two blank keys for the SolarView remote display controller until the BOOT LOADER menu appears on the display Cold Start A COLD START is used only in extreme circumstances because it erases the protected memory and automatically discharges the patient Hold down the NBP GO STOP and ZERO ALL keys on the front panel ...

Page 91: ...CYCLE or reboot the monitor turn the power OFF at the rear of the unit not at the front switch A POWER CYCLE initializes the new software and updates the software revision window Service Mode Menu There are two service menus available The service menu found in the BOOT LOADER is used when downloading the boot code and main processor code The SERVICE MODE menu is imbedded in the monitor MAIN menu a...

Page 92: ...rams The following theory of operation gives you a very broad overview of the various functional circuit boards in the monitor For more comprehensive theory of operation refer to the Solar 7000 8000 View Data Manual pn 414993 007 Solar 7000 Color Monitor Given below is the color Solar 7000 monitor overall block diagram ...

Page 93: ...TROUBLESHOOTING Block Theory Diagrams Revision J Solar 7000 8000 View Patient Monitor 4 7 414993 001 Solar 7000 Monochrome Monitor Given below is the monochrome Solar 7000 monitor overall block diagram ...

Page 94: ...001 Solar 8000 Processing Unit Given below is the Solar 8000 processing unit overall block diagram For details about the GE Medical Systems Information Technologies display refer to the 15 Inch Medical Grade Color Display Service Manual pn 414993 056 or the service manual provided with your display ...

Page 95: ...View Remote Display Controller Given below is the SolarView remote display controller overall block diagram For details about the GE Medical Systems Information Technologies display refer to the 15 Inch Medical Grade Color Display Service Manual pn 414993 056 or the service manual provided with your display ...

Page 96: ... time waveforms from the Solar 7000 monitor to a remote color or monochrome display Likewise the Solar 8000 processing unit and SolarView remote display controller provide the same circuitry to a compatible local display RGB video signals and horizontal and vertical sync signals are available from the video display connector Remote Alarm Circuitry The remote audio signals are generated for the rem...

Page 97: ...om the transformer windings to provide all low voltage power requirements for the monitor as filtered 16 75V and 5V For the Solar 7000 monitors 24V DC is also provided Only when a control line from the main processor PCB is activated to the color Solar 7000 low voltage power supply the power supply will connect 100V to the degaussing coil for the CRT Keycap PCB The keycap PCB interfaces with the u...

Page 98: ... A3P2 A1J6 W3P1 RMT VID ETHERNET TRAM NET ASYNC COMM RMT ALM A1J1 A9P5 A4P2 W2P1 A1J8 A1J7 J5 T J5 B J4 T J4 B J3 T J3 B A9P4 A8J4 XFMR 406488 00X A3 SERVICE LOW VOLTAGE POWER SUPPLY 800974 00X A8 MAIN PROCESSOR PCB 800678 00X A1 SPEAKER 1663 300 S1 FAN A5 W9P1 S1J7 AC SOURCE A9W1 A9W2 414526 00X W2 A9W3 A9P3 W4P1 414604 00X A9 Part of 406488 00X Part of 406488 00X Part of 414527 00X 414528 00X W3...

Page 99: ... A2 YOKE CABLE ASSY 405834 00X A10 KEYCAP PCB 800058 00X A4 HIGH VOLTAGE POWER SUPPLY 406896 00X A12 TRAM CONTROL ASSY 406273 00X A7 A4P1 A4J8 A7P1 405785 00X W5 Part of 408099 00X Part of 406896 00X Part of 408099 00X Part of 406896 00X CRT A10 CRT SOCKET ASSY 408099 00X A11 405305 00X W4 405739 00X W8 Part of 405739 00X W8 Part of 405739 00X W8 A6J6 A11P3 A2J2 A11P2 A12P3 A11P5 402302 001 W7 402...

Page 100: ... 3 1 2 3 4 A6J7 A8J3 5 6 A9P2 A9P1 1 2 3 4 5 6 A8J4 A9P4 A9P3 A11P2 A2J2 1 2 3 4 5 A11P3 1 1 A11P5 A11P4 1 2 A1J8 W2E1 W2P1 W2E2 W2 AUDIO AUDIO_RTN 1 2 3 4 5 6 7 8 9 1 2 3 4 5 6 8 9 7 A2J3 A6J1 W5P1 W5P2 W5 1 2 3 4 A12P1 A12P3 N C N C N C N C N C J4 J2 J7 J1 J5 J6 J3 HV N C 24V 24V 24V_RTN 24V_RTN 16 75V 16 75V_RTN DEG_100VAC1 DEG_100VAC2 RED CATHODE GREEN CATHODE BLUE CATHODE G1 FILAMENT FILAMENT...

Page 101: ...M_RED_VIDEO REM_GREEN_VIDEO REM_BLUE_VIDEO N C N C REM_RED_VIDEO_RTN REM_BLUE_VIDEO_RTN N C REM_SYNC_RTN 5V_RTN REM_MONOCHROME TN_DOWN_0 TN_DOWN_0 TN_UP_0 TN_DOWN_1 TN_DOWN_1 TN_UP_1 TN_UP_1 TN_DOWN_2 TN_DOWN_2 TN_UP_2 TN_UP_2 TN_DOWN_3 TN_UP_0 TN_DOWN_3 TN_UP_3 TN_UP_3 A5 A6J8 A5P1 W1P2 W1 PWR SPLY ENCL 1 2 3 4 5 6 7 8 9 10 A8J1 S1J4 A3P2 XFMR EARTH GND 24 FAN FANRTN 16 75 AC1 24 AC1 5 AC1 100VAC...

Page 102: ...onitor W1 P2 W2E1 W2E2 A1J2 P1 RS232 A9P1 A8J3 A1J6 W3P1 RMT VID ETHERNET TRAM NET ASYNC COMM RMT ALM A1J1 A9P2 A4P2 W2P1 A1J8 A1J7 SERVICE LOW VOLTAGE POWER SUPPLY 408102 00X A8 MAIN PROCESSOR PCB 800678 00X A1 SPEAKER 1663 300 SP1 W1P1 S1J2 AC SOURCE 414528 00X W3 414526 00X W2 Part of 414605 00X A9 J5 T J5 B J4 T J4 B J3 T J3 B 1 of 4 ...

Page 103: ...1 A9P3 A6J7 A6J16 A7P1 A7P2 A6J17 CRT CONTROLLER PCB 401550 00X A6 YOKE CABLE ASSY 88491 00X A7 KEYCAP PCB 800058 00X A4 HIGH VOLTAGE POWER SUPPLY 6116 00X A2 TRIM KNOB CONTROL 406273 00X ASSY A5 Part of 406273 00X A4P1 A4J8 A5P1 CRT 402302 001 W5 W5E1 W4E1 W6P1 W6P2 A6J19 Part of 88491 00X Part of 6116 00X 80681 00X W6 A3 402302 001 W4 Part of 800058 00X Part of 407718 001 2 of 4 ...

Page 104: ... C HORIZONTAL_SYNC VERTICAL_SYNC N C N C GREEN_VIDEO_RTN N C N C N C N C N C N C A1J6 A6J19 W6P2 1 2 A1J8 W2E1 W2P1 W2E2 W2 AUDIO AUDIO_RTN G2 ARCGND N C ANALOG_GND FOCUS N C FILAMENT NBP_GO STOP 8 9 10 1 2 4 3 12 11 6 1 2 3 4 5 6 7 8 9 10 11 12 A8J3 A1J1 A9P1 A9P2 5V 5V_RTN 5V_RTN 16 75V 16 75V 16 75V_RTN 16 75V_RTN POWER_LINE_FREQ ADVANCED_POWER_DWN 5V_RTN 5V DEGAUSS 7 2 3 4 A6J7 A9P3 5 ANALOG_G...

Page 105: ..._RTN TN_ 16 75V TN_ 16 75V TN_ 16 75V_RTN PORT0_422_RX PORT0_422_TX 1 2 3 4 A1J2 P1 DS BUS_ERROR 5V RTN BKPT DSCLK REM_RED_VIDEO REM_GREEN_VIDEO REM_BLUE_VIDEO N C N C REM_RED_VIDEO_RTN REM_BLUE_VIDEO_RTN N C REM_SYNC_RTN 5V_RTN REM_MONOCHROME TN_DOWN_0 TN_DOWN_0 TN_UP_0 TN_DOWN_1 TN_DOWN_1 TN_UP_1 TN_UP_1 TN_DOWN_2 TN_DOWN_2 TN_UP_2 TN_UP_2 TN_DOWN_3 TN_UP_0 TN_DOWN_3 TN_UP_3 TN_UP_3 5 6 7 8 9 10...

Page 106: ...414925 00X A3 TRIM KNOB CONTROL SW1 A3J2 W4P1 W3P2 A3P1 W5 W1 P2 W2E1 W2E2 RS232 W1P2 A2J2 VID ETHERNET TRAM NET ASYNC COMM RMT ALM A1J1 W1P1 W2 W3 W4 W3P1 W2P1 A1J8 A1J7 MAIN PROCESSOR PCB 800678 00X A1 SPEAKER SP1 W5P1 AC INLET AC SOURCE POWER SUPPLY 415838 001 A2 J5 T J5 B J4 T J4 B J3 T J3 B A1J2 P1 SERVICE TRAM NET SIGNALS NOT AVAILABLE FOR SOLARVIEW 1 of 2 ...

Page 107: ..._DOWN_3 TN_UP_3 TN_UP_3 1 2 3 4 5 6 7 8 9 10 11 12 13 14 15 A3J19 RELAY0_NC N C REMOTE_AUDIO N C N C RELAY0_NO RELAY_COMMON REMOTE_AUDIO N C N C RELAY1_NO N C REMOTE_AUDIO_RTN N C N C 1 2 3 4 5 6 7 8 9 A1J3T A3J11 PORT1_422_RX N C PORT1_422_RX TN_ 16 75V PORT1_422_TX TN_ 16 75V N C TN_ 16 75V_RTN PORT1_422_TX REM_GREEN_VIDEO_RTN REM_HORIZONTAL_SYNC REM_VERTICAL_SYNC N C 1 2 3 4 5 6 7 8 9 10 11 12 ...

Page 108: ...bits per second Async COMM Signals One full duplex RS 422 port is provided for asynchronous communication to the DDW or remote control Asynchronous Communication Connector J3 T Pin Name Input Output Range Type Maximum Frequency Rear View of Monitor 1 PORT_422_RX I 0 to 5V RS 422 115 2 kbps 2 NC 3 PORT_422_RX I 0 to 5V RS 422 115 2 kbps 4 TN_ 16 75V O 16 75V PWR DC 5 PORT_422_TX O 0 to 5V RS 422 11...

Page 109: ...O I O 0 to 32V SWITCH DC 7 RELAY_COMMON I 0 V GND DC 8 REMOTE_AUDIO O 5V P P AUDIO 16 KHZ 9 NC 10 NC 11 RELAY1_NO I O 0 to 32V SWITCH DC 12 NC 13 REMOTE_AUDIO_ RETURN I 0V DC 14 NC 15 NC Ethernet Communication Connector J4 T Pin Name Input Output Range Type Maximum Frequency Rear View of Monitor 1 CHASSIS I 0V PWR RTN DC 2 LAN_COLLISION I 1 4V P P ECL 10 Mbps 3 LAN_TRANSMIT O 1 4V P P ECL 10 Mbps ...

Page 110: ...6 75V_RETURN O 0V PWR RTN DC 2 PORT0_422_TX O 0 TO 5V RS 422 115 2 kbps 3 PORT0_422_RX I 0 TO 5V RS 422 115 2 kbps 4 TN_DOWN_0 O 0 TO 5V RS 485 921 6 kbps 5 TN_DOWN_0 O 0 TO 5V RS 485 921 6 kbps 6 TN_UP_0 I 0 TO 5V RS 485 921 6 kbps 7 TN_ 16 75V_RETURN O 0V PWR RTN DC 8 TN_ 16 75V O 16 75 PWR DC 9 TN_DOWN_1 O 0 TO 5V RS 485 921 6 kbps 10 TN_DOWN_1 O 0 TO 5V RS 485 921 6 kbps 11 TN_UP_1 I 0 TO 5V R...

Page 111: ... 3 PORT_2_232_RX I 0 to 5V RS 232 115 2 kbps 4 NC 5 PORT_2_232_ RETURN O 0V PWR RTN DC 6 PORT_3_232_TX O 0 to 5V RS 232 115 2 kbps 7 PORT_3_232_RX I 0 to 5V RS 232 115 2 kbps 8 NC 9 PORT_3_232_ RETURN O 0V PWR RTN DC Video Output Connector J5 B Pin Name Input Output Range Type Maximum Frequency Rear View of Monitor 1 REM_RED_VIDEO O 0 7V P P ANLG 46 8 MHZ 2 REM_GREEN_VIDEO O 0 7V P P ANLG 46 8 MHZ...

Page 112: ...ading new software to the monitor or when the monitor exhibits a serious failure To activate the BOOT LOADER program do the following Hold down the NBP GO STOP and ZERO ALL keys on the front panel For the SolarView remote display controller hold down the two blank keys Press and release the Trim Knob control Keep holding the NBP GO STOP and ZERO ALL keys or two blank keys for the SolarView remote ...

Page 113: ... and may affect the time and date for the entire monitoring network WARNING This menu should rarely be used because patient histories will be lost This procedure is described in Programming Time and Date in Chapter 6 Configuration Clear Configured Memory If you respond with YES in this option you will erase all patient histories and programmed defaults in the protected memory and return to factory...

Page 114: ...for the appropriate version software update procedure for your system Review Errors This menu selection is for advanced troubleshooting by GE Medical Systems Information Technologies engineers Error log data can be transferred over the network to a central station and then loaded onto a diskette for review When troubleshooting a persistent and evasive problem the error logs can be compiled over a ...

Page 115: ...enu the patient monitor will cold start to exit and patient data is lost WARNING Do not enter this menu selection unless loss of patient data is not an issue This menu selection gives a list of video tests that can be used to calibrate the display Refer to the color or monochrome Monitor Calibration in Chapter 5 Calibration Remote Video Solar 8000 View Only This menu selection indicates to the Sol...

Page 116: ... monitor The four variables include stationary or ambulatory telemetry patient monitoring with a monitor that always stays in one room or a monitor that moves from room to room All combinations are explained in Programming Admit Menu in Chapter 6 Configuration Software Level This menu selection displays which software feature level this monitor is using Monitor Defaults Passwd This menu selection ...

Page 117: ...on After initial setup this number should not be changed or communication to the central station will be corrupted Note that the bed number must be registered exactly the same in the central station and the patient monitor Set Internet Address This menu selection allows changes to the internet IP address WARNING Duplication of an internet IP address on a network will cause lost data If you change ...

Page 118: ...egauss the color display periodically or whenever the red color becomes impure not true red Note that the display is automatically degaussed every time the unit is turned ON at the back switch Once the display is manually degaussed it cannot be degaussed again for at least 10 minutes Time and Date This menu selection allows changes to the time and date and may affect the time and date for the enti...

Page 119: ...or error the cause of the problem Try to repeat the user s scenario exactly and compare that to the proper operation of the equipment Check the operator s manual as necessary Visual Inspection A thorough visual inspection of the equipment can save time Small things disconnected cables foreign debris on circuit boards missing hardware loose components can frequently cause symptoms and equipment fai...

Page 120: ...or wear Secure mounting hardware Internal Harnesses and Cables Excessive tension or wear Loose connection Strain reliefs out of place Circuit Boards Moisture dust or debris top and bottom Loose or missing components Burn damage or smell of over heated components Socketed components not firmly seated PCB not seated properly in edge connectors Whenever you swap a main processor PCB remember to excha...

Page 121: ... are significantly out of range have a qualified electrician repair the outlet The voltage measurements should be as follows 1 120 VAC 10 VAC between the line contact and neutral and between the line contact and ground 2 Less than 3 VAC between neutral and ground 240 VAC 50 60 Hz Use a digital voltmeter set to measure at least 300 VAC to check the voltages of the NEMA 6 20R AC wall outlet dedicate...

Page 122: ...or Tram rac housing The LED Troubleshooting Chart presented after this procedure explains how the various LEDs on the pcb assemblies should normally perform Do not perform any invasive procedures listed in this procedure unless you are a trained field or bio medical engineer To aid in disassembly of the unit refer to Disassembly Guidelines in Chapter 7 Monitor Assembly WARNING This procedure is in...

Page 123: ...ing peripheral device The power supply is underloaded Check for a loose power supply connection Check for a failed PCB 5 When power is initially applied to the monitor the BOOT CODE indicates that the serial EEPROM is damaged or missing Ensure serial EEPROM U9 is in place on the main processor PCB Swap main processor PCB with a known good one 6 When power is initially applied to the monitor the BO...

Page 124: ...tical or horizontal Swap deflection PCB with a known good one 2 The display image is too small too large or not stable Check for a poor connection between the CRT and the high voltage supply The deflection is not adjusted properly Perform the Display Calibration in Chapter 5 Calibration Swap deflection PCB with a known good one Swap high voltage power supply with a known good one 3 The display bac...

Page 125: ...nfiguration Swap Tram module with a known good one Swap Tram rac housing with a known good one Verify Tram net Ethernet operation of the main processor PCB with the LED Troubleshooting Chart If red LED DS2 is ON steady try the following Another device using Tram net is faulty Reduce devices using Tram net because the network is overloaded Swap main processor PCB with a known good one If yellow and...

Page 126: ...played consult the operator s manual for correct patient admitting instructions This problem usually implies an operator error The alarm function remains disabled until the patient is correctly admitted into the system 2 Ensure the alarms are enabled Consult the operator s manual for correct alarm settings 3 To test if the speaker is functioning use the LEARN THE MONITOR menu option 4 Perform reco...

Page 127: ...re listed but the central station is listed do the following Check for a loose connection between the central station and the transceiver Check for a faulty transceiver Check for an open transceiver cable connection Check for loose or faulty Ethernet cabling Swap the LAN controller or main processor PCB in the central station with a known good one 2 If the central station displays a NO COMM messag...

Page 128: ...n Verify no duplication of internet IP addresses on the network Verify operation of the main processor PCB with the LED Troubleshooting Chart If red LED DS3 and green DS5 flash at the same time check for an open circuit Check for loose or faulty Ethernet cabling Ensure a terminator exists at both ends of the Ethernet cable and only two are used Swap main processor PCB with a known good one If gree...

Page 129: ...ifier shows the care unit name followed by a vertical slash and then the bed number The solution is to modify the monitor care unit name to match the central station s care unit name 3 To test if the speaker is functioning force an alarm from another monitor Are waveforms displayed complete at the central station If the waveforms are broken up at the central station display do the following 1 Ensu...

Page 130: ...IDE for both graphing locations Does the remote control activate the display At times the remote control will lock up This is caused by an interruption of power to the remote control Try one of the following solutions 1 Check for a loose connection from the monitor to the remote control 2 Try a different Tram net hub port 3 Disconnect and securely reconnect the remote control from the monitor to r...

Page 131: ... on Main Processor PCB PN800678 00X DS3 Red Collision Detect I hear data collisions on Ethernet OFF or Flickers ON infrequently DS4 Yellow Network Activity I hear all talking on Ethernet ON steady or flickers DS5 Green Transmit Enable I am talking on Ethernet Flickers ON with yellow LED Processor LEDs on Main Processor PCB PN800678 00X DS6 Orange Power 5V is OK to PCB ON steady DS7 Green I am OK L...

Page 132: ...to reboot the central station If the central station is monitoring patients do the following 1 At the central station execute the following menu sequence starting from the MAIN menu CENTRAL SETUP SERVICE Enter Password MEI CS 123 SERVICE MONITOR NOTE The commands presented in italics are case sensitive 2 Type ps eaglefs and press the ENTER key Enabling the EAGLEFS program that teaches your central...

Page 133: ...troller until the BOOT LOADER menu appears on the display Repeat the software update procedure for the aborted file from the beginning IF A prompt does not appear at the PC Select the correct disk drive on the PC to get the A prompt Many laptop PCs have a switch that allows a single disk drive to emulate two disk drives Set the drive switch to A and then press the CTRL ALT and DELETE keys simultan...

Page 134: ...er to the appropriate service manual Ensure the Ethernet address has been programmed correctly using the following steps Hold down the NBP GO STOP and ZERO ALL keys on the front panel For the SolarView remote display controller hold down the two blank keys Press and release the Trim Knob control Keep holding the NBP GO STOP and ZERO ALL keys or two blank keys for the SolarView remote display contr...

Page 135: ...Revision J Solar 7000 8000 View Patient Monitor 5 1 414993 001 5 CALIBRATION ...

Page 136: ...CALIBRATION 5 2 Solar 7000 8000 View Patient Monitor Revision J 414993 001 For your notes ...

Page 137: ...nerated by the monitor in the SERVICE MODE menu To perform this procedure you will need the special tools and items listed below Equivalent equipment may be substituted WARNING To avoid electrical shock do not touch the large heatsink connected to the deflection PCB pn 404642 002 while the unit is ON Due to high voltage on the deflection PCB use an insulated screw driver at all times while making ...

Page 138: ...be degaussed again Use Service Mode Note that once the display is manually degaussed it cannot be degaussed again for at least 10 minutes An external degaussing coil may have to be used if the impure red persists after performing following procedure Horizontal Frequency Adjust Do the following steps in the order given for the color display 1 Set DMM to frequency counter mode by selecting the AC an...

Page 139: ...e each box symmetrical horizontally 2 Adjust HORIZONTAL PHASE with variable resistor R64 to center the cross hatch from right to left 3 Adjust HORIZONTAL SIZE with variable resistor R2 to 0 25 0 1 inch from center of the outer cross hatch line to the bezel edge on each side 4 Adjust PIN CUSHION with variable resistor R63 to reduce horizontal bowing at each side at the center of the picture 5 Horiz...

Page 140: ...displayed do the following to adjust the color 1 Locate the CRT controller PCB pn 404641 00X at the back of the assembly as you face the CRT Locate R33 R51 and R52 variable resistors near the top of the PCB labelled BLUE GREEN and RED CUTOFF respectively 2 Adjust BLUE CUTOFF R33 until retrace lines appear and then just disappear 3 Adjust GREEN CUTOFF R51 until retrace lines appear and then just di...

Page 141: ...ecial display generated by the monitor circuits To perform this procedure you will need the special tools and items listed below Equivalent equipment may be substituted WARNING Beware of AC line voltage at the power module When rear power switch is OFF AC line voltage is still present Use an insulated screw driver at all times when making adjustments WARNING Make sure the monitor is not monitoring...

Page 142: ...O TEST YES VERTICAL GRAY BARS 4 Locate TP2 TP4 and TP6 on the CRT controller PCB See figure on next page It may be necessary to remove the two mounting screws to gain access to the tests points NOTE If the two mounting screws are removed from the CRT controller PCB jumper the ground of the PCB to chassis ground All color calibration will be erroneous without proper grounding of this PCB Gain Adjus...

Page 143: ...compressed 4 Connect the positive lead of the oscilloscope to TP6 Observe a stairstep waveform Adjust BLUE CLAMP variable resistor R32 until the most positive portion of the signal is at 47 volts Adjust BLUE GAIN variable resistor R40 until the most negative portion of the signal is at 7 volts 5 Adjust BLUE PEAKING variable capacitor C11 for peaking overshoot of 10 Verify that the steps are linear...

Page 144: ...t Use an insulated screw driver at all times when making adjustments WARNING Make sure the monitor is not monitoring a patient because monitoring will be interrupted Preparation Remove monitor rear power supply panel by following the steps given below 1 Turn power switch at the rear of the monitor to OFF 2 Remove six screws attaching the rear panel to the power supply at the rear of the unit Bewar...

Page 145: ... 6 Connect the positive lead of the DMM to 16 75V at TP2 Adjust variable resistor R32 to 16 75V 0 1V 7 Connect the positive lead of the DMM to 24V at TP3 Adjust variable resistor R40 to 24V 0 1V 8 Set the DMM to frequency counter mode by selecting the AC and HZ button 9 Connect positive lead of the DMM to TP5 labelled CLK Verify a frequency of 60 Hz 2 Hz 10 Connect the positive lead of the DMM to ...

Page 146: ...ays generated by the monitor circuits in the service mode To aid in disassembly refer to Disassembly Guidelines in Chapter 7 Monitor Assembly Special Tools Equipment To perform this procedure you will need the special tools and items listed below Equivalent equipment may be substituted WARNING Due to possible high voltage use an insulated screw driver at all times while making adjustments WARNING ...

Page 147: ... from connector J6 on the CRT controller PCB pn 401550 00X 3 Locate variable resistor R103 on the solder side of the CRT controller PCB 4 Connect positive lead of DMM to TP10 or TP10 on solder side of the CRT controller PCB 5 Connect negative lead to chassis GND 6 Verify 34 53 kHz 20 Hz for the horizontal frequency Adjust variable resistor R103 to achieve this measurement The unit must be at opera...

Page 148: ...variable resistor R92 to make each box in the cross hatch as square as possible 6 Adjust HEIGHT with variable resistor R75 to 0 25 0 1 inch from center of the outer cross hatch line to the bezel edge on the top and bottom 7 Adjust VERTICAL CENTERING with variable resistor R47 to center the cross hatch vertically 8 Vertical linearity height and vertical centering may need to be readjusted because o...

Page 149: ... When rear power switch is OFF AC line voltage is still present Use an insulated screw driver at all times when making adjustments WARNING Make sure the monitor is not monitoring a patient because monitoring will be interrupted Preparation Remove monitor rear power supply panel by following the steps given below 1 Turn power switch at the rear of the monitor to OFF 2 Remove six screws attaching th...

Page 150: ... the rear of the monitor to ON 5 Connect the positive lead of the DMM to 5V to pin 7 or 8 of the exposed connector on the left of the power supply 6 Connect the negative lead to GND at pin 3 or 4 7 Set DMM to DC mode Adjust variable resistor R32 to 5V 0 1V on DMM 8 Connect the positive lead of the DMM to 16 75V at pin 1 or 2 of the exposed connector on the left of the power supply 9 Adjust variabl...

Page 151: ... tools and items listed below Equivalent equipment may be substituted CAUTION Ensure the monitor is not monitoring a patient because monitoring will be interrupted CAUTION Fluorinated and chlororinated cleaning agents may seriously damage the aluminum electrolytic capacitors in this assembly CAUTION Keep circuit board mounted to metal sub chassis at all times to avoid stressing solder joints and s...

Page 152: ...he positive lead of the DMM to the cathode of diode CR32 Connect the negative lead to the anode of diode CR32 Set DMM to DC mode If necessary adjust variable resistor R76 to 5V 0 1V on the DMM 6 Verify or adjust the 16 75 power supply output as follows Connect the positive lead of the DMM to the cathode of diode CR33 Connect the negative lead to the anode of diode CR33 Set DMM to DC mode If necess...

Page 153: ...Revision J Solar 7000 8000 View Patient Monitor 6 1 414993 001 6 CONFIGURATION ...

Page 154: ...6 2 Solar 7000 8000 View Patient Monitor Revision J 414993 001 For your notes ...

Page 155: ...ork Write down the care unit name from the upper left hand corner of the central station exactly Write down the bed name for the new monitor You must know if the monitor will be used for either stationary or ambulatory telemetry monitoring or both You must know if the monitor will be moved from one Ethernet connection to another Select Procedures Choose and perform the procedures listed below in t...

Page 156: ... the Unity Network Ethernet connection must use STANDARD configuration only ROVER configures the monitor to move from room to room for stationary monitoring only COMBO configures the monitor to stay in one room for both stationary and ambulatory telemetry monitoring This monitor displays all Tram module data combined with ECG data for ambulatory patients ROVER COMBO configures the monitor to move ...

Page 157: ...ion will default to STANDARD configuration Be aware that some alarms and parameters may be changed Do the following procedure to change the PATIENT MONITOR TYPE Refer to the operator s manual for a full description of alarm limit and parameter changes for each monitor type 1 To access PATIENT MONITOR TYPE option execute the following menu sequence starting from the MAIN menu MONITOR SETUP SERVICE ...

Page 158: ...nob control to change this character 3 When satisfied with the character chosen press the Trim Knob control This causes the highlight to move to the next character 4 Follow this procedure for all characters Up to seven characters may be entered 5 Turn the Trim Knob control to highlight SET UNIT NAME and press the Trim Knob control to exit Programming Bed Number The bed number identifies a particul...

Page 159: ...View display and set in the factory for the Solar 7000 display For Solar 8000 View Monitors If the connected display requires more than 0 7 volts amplitude the processing unit will need to be programmed Refer to the owner s manual of the display connected to the Solar 8000 processing unit or SolarView remote display controller for the signal amplitude specification The video amplitude adjustment w...

Page 160: ...rogramming Analog Out Levels for the Solar ECG Module The Solar monitor controls the analog out signal MARKER OUT used to trigger a defibrillator the Solar ECG module Refer to the defibrillator manufacturer s manual for the required pulse amplitude and duration Use the BOOT LOADER service menu to configure or change the MARKER OUT signal of the DEFIB SYNC connector on a Solar ECG module 1 To activ...

Page 161: ...rol Communication Confirmation Do the following to confirm communication across the network 1 Admit and generate a waveform at the monitor with a simulator 2 Press GRAPH GO STOP button on the monitor 3 Observe graph output at chosen locations Problems If the DDW does not graph do the following Ensure the DDW is turned ON Check all cables for a good connection Check programmed alarms and manual gra...

Page 162: ...t all software code part numbers for each monitor in the system To accomplish this execute the following menu sequence starting from the MAIN menu MONITOR SETUP SOFTWARE REVISION PRINT if menu option is available Determine if any Solar compatible modules require updating Each of the following modules requires its own diskette of software but it is downloaded in the same manner as any other monitor...

Page 163: ...erienced technicians should attempt these procedures Procedures The following procedures are discussed later in this chapter Programming Time and Date Changing Software Feature Level Changing Remote Control Function Transferring Monitor Defaults Programming Ethernet Address Programming Internet Address Reviewing Error Logs Transferring Error Logs Reviewing Event Logs After completing any of the pr...

Page 164: ...ER 1 To activate BOOT LOADER program doing the following Hold down the NBP GO STOP and ZERO ALL keys on the front panel For the Solar View remote display controller hold down the two blank keys Press and release the Trim Knob control Keep holding the NBP GO STOP and ZERO ALL keys or two blank keys for the SolarView remote display controller until the BOOT LOADER menu appears on the display 2 Dial ...

Page 165: ... zeros July 4 0407 MENU SETUP SOFTWARE LEVEL 2 Rotate Trim Knob control to select the type of environment the monitor will be used in 3 Press the Trim Knob control to exit Your selection will be displayed at the top of the screen after the time Exchange the EEPROM To change the highest software feature level available in a monitor you must purchase the serial EEPROM U9 which contains the software ...

Page 166: ... defaults custom default names 12 SL location 12 SL site Storing Monitor Defaults for Transfer In order to transfer Monitor Defaults they must first be set then stored on the monitor that will be used as the server 1 At the server monitor setup the monitor defaults you wish to store Refer to Monitor Setup in the Solar 7000 8000 Operator s Manual 2 Once your defaults are set execute the following m...

Page 167: ...NITOR SETUP SERVICE MODE Password Enter day and month from monitor screen with leading zeros July 4 0407 2 From the Service menu select COPY UNIT DEFAULTS 3 Select the SELECT UNIT TO COPY MONITOR DEFAULTS FROM option to scroll through a list of units currently on the UNITY network Choose the unit that has the desired server monitor 4 Select the SELECT BED TO COPY MONITOR DEFAULTS FROM option to sc...

Page 168: ...not been saved on the server monitor ERROR COPYING UNIT DEFAULTS UNIT TYPE MISMATCH The server and client monitors are set to different unit types i e ADULT NEO or OR ERROR COPYING UNIT DEFAULTS SOFTWARE VERSION MISMATCH The server and client monitors have either different revisions of software or different software versions i e Solar 7 8000 vs Solar 8000M ERROR COPYING UNIT DEFAULTS DATA CORRUPTI...

Page 169: ...thernet addresses used on your network to avoid duplication Find Label Locate the Ethernet address from the label on the back of the unit next to the communication connectors From BOOT LOADER To activate the BOOT LOADER program do the following Hold down the NBP GO STOP and ZERO ALL keys on the front panel For the SolarView remote display controller hold down the two blank keys Press and release t...

Page 170: ...ytes indicate the manufacturer of the Ethernet hardware In this case 00 00 A1 represents GE Medical Systems Information Technologies The last three bytes represent an unique number like a serial number that identifies it This is the actual node address Internet Address The internet IP address is four bytes long It is typically written in decimal notation with a period between each byte like this 1...

Page 171: ... the BOOT LOADER program do the following Hold down the NBP GO STOP and ZERO ALL keys on the front panel For the SolarView remote display controller hold down the two blank keys Press and release the Trim Knob control Keep holding the NBP GO STOP and ZERO ALL keys or two blank keys for the SolarView remote display controller until the BOOT LOADER menu appears on the display Select CHANGE INTERNET ...

Page 172: ...nd month from monitor screen with leading zeros July 4 0407 REVIEW ERRORS The menu provides four choices two for viewing error logs and two for clearing the error logs Select the VIEW SCOPE ERRORS option to view one error in the log of errors The error log in a monitor holds 50 errors that can be accessed with the NEXT or PREVIOUS command The errors are displayed one error at a time in the upper r...

Page 173: ...tored in the log Subsequent errors are stored sequentially as they occur After the first 50 errors are recorded the next error detected overwrites the oldest error in the log If errors occur infrequently the error log could span a period of weeks If a problem with the network repeats frequently the error log might consist only of errors from the last few hours A sample monitor error log display ap...

Page 174: ...rocess Name is the name of the software task that was operating when the event problem occurred Error Code is a code for the type of event problem that occurred Severity indicates the impact of the event problem on the system Date is the date the event problem occurred Time is the time the event problem occurred Error Number is a sequential number that is used to identify each event problem Defini...

Page 175: ...t was completed This test should only be performed by qualified service personnel 70D Rear power switch was turned off 70E Time was changed from this monitor This helps determine how the system wide time may have been altered 70F Date was changed from this monitor This helps determine how the system wide date was altered 710 Incompatible software was detected If the main processor software finds t...

Page 176: ...tion of Parameters Levels Description Continue the event error was logged the task may have or may not have been finished but the system was able to go on Most log entries will have a severity of CONTINUE Fatal the event error was such that the task is not able to go on Recovery was not possible This always is followed by a WARM START Forced Restart the system was restarted by a known condition in...

Page 177: ...itor another central station or parameter module can be selected in any Care Unit Then a device error log for a particular day may be chosen Once the desired error log is selected it can be copied over the network to a floppy diskette in the central station s floppy diskette drive Since the error logs are text files they can be read into other computers and read using most text editors or word pro...

Page 178: ... previously selected Care Unit are shown When the desired monitoring device name is displayed press the Trim Knob control Select the Error Log Date The final selection is to pick the date of the error logs to be copied to the floppy diskette 1 Rotate the Trim Knob control to change the error log date Note that one of the selections is ALL which will retrieve all stored error logs from the specifie...

Page 179: ...o select the desired function Then press the Trim Knob control to start Once the copy function begins the START COPY button changes to show the function copying Eject Floppy When selected this option just causes a floppy diskette to be ejected from the central station s disk drive NOTE If the floppy diskette does not eject a thin tool such as a straightened paper clip can be inserted in the small ...

Page 180: ...e event logs and provide basic information about what you can learn from them At the monitor execute the following menu sequence starting from the MAIN menu MONITOR SETUP SERVICE MODE Password Enter day and month from monitor screen with leading zeros July 4 0407 REVIEW ERRORS Select the VIEW SCOPE EVENTS option to scroll through the log of events The event log in a monitor holds 500 events that c...

Page 181: ...is stored in the event log Subsequent events are stored sequentially as they occur When the event log is full the next event detected overwrites the oldest event in the log A sample monitor event log display appears as follows For each event the index date and time are shown These are followed by the event code event specific data and a textual description of the event code ...

Page 182: ...CONFIGURATION Advanced User Procedures 6 30 Solar 7000 8000 View Patient Monitor Revision J 414993 001 For your notes ...

Page 183: ...Revision J Solar 7000 8000 View Patient Monitor 7 1 414993 001 7 UPPER LEVEL ASSEMBLY ...

Page 184: ...UPPER LEVEL ASSEMBLY 7 2 Solar 7000 8000 View Patient Monitor Revision J 414993 001 For your notes ...

Page 185: ... silver solder when working on the surface mounted components Use a heatsink when soldering any phototransistors photodiodes or optical isolators Repair breaks in PCB tracks by bridging with wire from pad to pad Do not lay solder across the breaks The heat from the soldering iron may cause the track to detach from the PCB After soldering clean excess flux from the PCB assembly If you replace the m...

Page 186: ...not monitoring a patient because monitoring will be interrupted First turn the unit OFF at the rear power switch and disconnect the AC power cord and all communication cables WARNING Due to possible high voltage present use an insulated screwdriver at all times when making adjustments Disassembly 1 Lay the unit on its front display on either foam or other soft material Do not apply excessive press...

Page 187: ...d over the main processor PCB WARNING When you reassembly the unit do not replace the shield backwards You will short out the battery damage boot code and render the unit useless 2 Disconnect all harnesses from the main processor PCB 3 Remove five screws attaching the main processor PCB 4 Remove the serial EEPROM U9 and insert it into the replacement main processor PCB The serial EEPROM must stay ...

Page 188: ...e following to remove the mono CRT controller or color deflection PCB 1 Remove all attaching harnesses 2 Remove four attaching screws and lift WARNING To avoid electrical shock do not touch the large heatsink connected to the deflection PCB pn 404642 00X while the unit is ON Due to high voltage on either PCB use an insulated screw driver at all times while making adjustments ...

Page 189: ...tage at the power module When rear power switch is OFF ac line voltage is still present Use an insulated screw driver at all times when making adjustments For the monochrome monitor remove the bezel first and then the four screws attaching the power supply cover For color monitors the bezel does not have to be removed to access the power supply Remove the four recessed screws to remove the power s...

Page 190: ...ors only do the following WARNING To avoid electrical shock on color units do not touch the large heatsink connected to the nearby deflection PCB pn 404642 00X while the unit is ON Due to high voltage on either PCB use an insulated screw driver at all times while making adjustments 1 Remove attaching harness 2 Remove two screws and lift the color CRT controller PCB ...

Page 191: ...bles below list the most commonly replaced assemblies ordered in the service spare circuit board kits See the operator s manual for a complete list of accessories and expendable supplies NOTE If you replace the main processor remove the serial EEPROM U9 and insert it into the replacement main processor PCB The serial EEPROM must stay with the unit Color Monitor Spare Kit PN 415194 001 Item Part Nu...

Page 192: ...onitor read the fuse rating at the rear of monitor to select correct fuse replacement Use a single blade screwdriver to pop out of the panel above the AC main outlet to access the fuses WARNING To avoid electric shock always turn OFF unit and remove power cord from AC main outlet before replacing fuses Color Monitor Fuses Description Part Number Fuse 2 0A Slow Blow 1908 504 Fuse 4 0A Slow Blow 190...

Page 193: ...tings Label 414938 002 61 76 Risk of Explosion 415043 001 62 77 Serial Number Label 404525 001 63 79 English Keycap Label Set 414909 001 63 79 German Keycap Label Set 414909 002 63 79 French Keycap Label Set 414909 003 63 79 Swedish Keycap Label Set 414909 004 63 79 Spanish Keycap Label Set 414909 005 63 79 Italian Keycap Label Set 414909 006 63 79 Dutch Keycap Label Set 414909 007 64 80 German NB...

Page 194: ...6 56 39 9 44 51 48 24 56 36 42 42 6 30 2 29 35 55 43 32 56 41 5 55 23 66 50 21 37 56 47 56 SP1 2 PL 2 PL A12 A1 A10 A11 56 48 2 PL A2 4 PL 2 PL 4 PL 4 PL 4 PL 4 PL SEE NOTE 1 2 PL 2 PL 2 PL 2 PL 2 PL A3 2 PL 14 56 40 25 2 PL A5 2 PL W6 W7 3 PL A6 2 PL REF REF 4 PL 63 A7 TORQUE NUT TO 10 0 IN LBS 26 A4 3 54 76 78 79 74 SEE DETAIL A SEE DETAIL B 58 2 PL 1 of 3 ...

Page 195: ...PN 900618 001J Revision J Solar 7000 8000 View Patient Monitor 7 13 414993 001 1 57 60 7 56 39 59 42 37 56 65 6 49 18 46 12 3 PL 49 2 PL 4 PL 4 PL A3 A8 4 PL 2 PL 2 PL 38 REF 52 53 4 PL 68 REF 2 PL 69 67 45 8 SEE DETAIL C 70 72 75 71 82 2 of 3 ...

Page 196: ...OCK 4 LOOSE ITEMS MAY BE SHIPPED WITH THE UNIT IF SPACE PERMITS OR PACKAGED AND SHIPPED SEPARATELY NOTES COLOR MONITOR 15 16 62 20 17 19 SEE NOTE 4 REAR VIEW ASSEMBLY 52 53 60 24 57 REF REF REF REF REF 46 REF 59 REF 42 REF 70 REF 71 72 82 RS232 RMT VID ETHERNET TRAM NET ASYNC COMM RMT ALM 50 SEE NOTE 1 REAR VIEW OF CRT ITEM 43 DETAIL A POWER MODULE ITEM 46 DETAIL C BOTTOM VIEW of BEZEL ITEM 3 DETA...

Page 197: ... Insert Foam Top 406664 001 1 17 Insert Foam Bottom 406664 002 1 18 A8 Low Voltage Power Supply 800974 001 1 19 Shipping Carton 415117 001 1 20 Bag Anti Static 405183 001 1 21 A2 Color CRT Controller PCB 404641 009 1 22 Solar 7000 8000 View Patient Monitor Field Service Manual not Shown 414993 001 1 23 A6 Color Deflection PCB 404642 005 1 24 A1 Main Processor PCB 800678 002 1 25 Screw PNH Phillips...

Page 198: ...con High Voltage 70437 001 1 52 Washer Lock Serrated 400041 001 1 53 Plug Equipotential 400040 001 1 54 Keycap Kit 414841 001 1 55 Screws PNH Phillips 4 40 x 1 4 45000 404 4 56 Screws PNH Phillips 6 32 1 4 45000 604 23 57 Screws PNH Phillips 8 32 x 1 2 4502 812 2 58 Screws BDGH Phillips 4 40 x 1 4 45074 408 2 59 Cable Clamp 4528 106 1 60 Foot W Threadlock 418987 001 4 61 Spring Extender 4552 002 1...

Page 199: ...9 001L 10 56 56 39 9 44 48 24 5 55 23 50 47 56 41 SP1 2 PL 2 PL REF A2 A1 56 2 PL SEE NOTE 1 2 PL 2 PL 2 PL 3 PL A6 28 32 45 34 25 43 35 55 29 41 57 14 11 4 6 56 37 46 21 40 W6 A3 2 PL 4 PL 4 PL 2 PL W8 SEE DETAIL B W4 W5 13 2 PL 8 PL 4 PL 4 PL A5 TORQUE NUT TO 10 0 IN LBS 8 3 A4 26 36 3 PL 61 62 63 SEE NOTE 3 65 66 SEE DETAIL A 2 4 PL 54 1 of 3 ...

Page 200: ...UPPER LEVEL ASSEMBLY Exploded View Mono PN 900619 001L 7 18 Solar 7000 8000 View Patient Monitor Revision J 414993 001 1 27 49 69 7 12 3 PL 4 PL 2 PL 18 38 42 30 REF A8 52 53 59 60 2 of 3 ...

Page 201: ... TRAM NET ASYNC COMM RMT ALM DETAIL A BOTTOM VIEW OF BEZEL ITEM 3 SEE NOTE 1 50 1 LABEL ITEM 50 TO BE MARKED SOLAR 7000 SERIAL NUMBER AND APPROPRIATE BARCODE 3 LOOSE ITEMS MAY BE SHIPPED WITH THE UNIT IF SPACE PERMITS OR PACKAGED AND SHIPPED SEPARATELY NOTES 15 16 20 17 19 SEE NOTE 3 MONOCHROME MONITOR INSERT TIE WRAP THROUGH BRAIDED WIRE AT LOCATION SHOWN REAR VIEW OF CRT ITEM 43 DETAIL B 10 REF ...

Page 202: ...001 1 16 End Cap Insert Foam Left 404854 002 1 17 Bag Anti Static 405183 001 1 18 A8 Low Voltage Power Supply 408102 002 1 19 Shipping Carton 415118 001 1 20 End Cap Insert Foam Right 404854 001 1 21 Permanent Magnet Ceramic 405593 001 1 22 Solar 7000 8000 View Patient Monitor Field Service Manual Not Shown 414993 001 1 23 A6 Mono CRT Controller PCB 401550 006 1 24 A1 Main Processor PCB 800678 002...

Page 203: ...pe 4556 001 1 47 SP1 Speaker 3 Inch 8 Ω 1663 330 1 48 Screws BDGH Phillips 6 32 x 1 4 45074 608 3 49 Foot W Threadlock 418987 001 4 50 Label Blank 404525 006 2 51 Label Icon High Voltage 70437 001 1 52 Washer Lock Serrated 400041 001 1 53 Plug Equipotential 400040 001 1 54 Screw PNH Phillips 6 32 x 3 8 45000 606 4 55 Screw PNH Phillips 4 40 x 1 4 45000 404 4 56 Screw PNH Phillips 6 32 1 4 45000 60...

Page 204: ...when working on the surface mounted components Use a heatsink when soldering any photo transistors photodiodes or optical isolators Repair breaks in PCB tracks by bridging with wire from pad to pad Do not lay solder across the breaks The heat from the soldering iron may cause the track to detach from the PCB After soldering clean excess flux from the PCB assembly If you replace the main processor ...

Page 205: ...mblies from the monitor assembly WARNING Make sure the monitor is not monitoring a patient because monitoring will be interrupted First turn the unit OFF at the rear power switch and disconnect the AC power cord and all communication cables WARNING Due to possible high voltage present use an insulated screwdriver at all times when making adjustments Disassembly 1 Remove the four screws attaching c...

Page 206: ...moval 1 Squeeze and pull the harness clip from the chassis as shown below 2 Disconnect J7 harness from the main processor PCB and remove five screws attaching the PCB 3 After removing the PCB disconnect harness J1 and J8 4 Remove the serial EEPROM U9 and insert it into the replacement main processor PCB The serial EEPROM must stay with the unit ...

Page 207: ...line voltage is still present Capacitors C1 C4 may remain fully charged up to 30 seconds Use an insulated screw driver at all times when making adjustments 1 Verify power cord is disconnected 2 Remove one end of the harness from the power supply assembly to the main processor PCB CAUTION Keep circuit board mounted to metal sub chassis at all times to avoid stressing solder joints and surface mount...

Page 208: ...Revision J 414993 001 4 For easier removal first tip the power supply towards the front of the unit up at a 45 angle 5 Pull power supply out towards front of unit as shown below CAUTION Fluorinated and chlorinated cleaning agents may seriously damage the aluminum electrolytic capacitors in this assembly ...

Page 209: ...at the address or telephone number listed on the How to Reach Us page found in Chapter 1 Introduction of this manual Commonly Replaced Assemblies The table below lists the most commonly replaced assemblies in the Solar 8000 View monitor See the operator s manual for a complete list of accessories and expendable supplies NOTE If you replace the main processor remove the serial EEPROM U9 and insert ...

Page 210: ...ts included in this chapter To reference item numbers refer to the exploded views provided later in this chapter Your model will not use all the labels listed Fuses Description Part Number Qty Fuse 4 0A Slow Blow 1908 506 2 Solar 8000 View Processing Unit Labels Item Description Part Number 15 Rear Communication Label 415854 001 16 Solar 8000 Front Label 415487 001 16 Solar 8000N Front Label 41548...

Page 211: ...UPPER LEVEL ASSEMBLY Exploded View PN 900691 001P Revision J Solar 7000 8000 View Patient Monitor 7 29 414993 001 Exploded View PN 900691 001P ...

Page 212: ... A1 Main Processor PCB 800678 002 1 20 Screw Sems Phillips 4 40 x 1 4 45074 408 2 21 Screw Sems Phillips 6 32 x 1 4 45000 604 12 22 Screw Sems Phillips 8 32 x 1 4 45000 804 4 23 Screw FLH 4 40 x 1 4 Gray 4776 833 4 24 Screw BDGH 6 32 x 1 4 45074 608 7 25 Bushing Split Heyco 4579 251 2 26 Spring Clip 4556 001 1 27 W1 Harness Power Supply 415735 001 1 29 Shipping Box Not Shown 422774 001 1 30 Box In...

Page 213: ......

Page 214: ......

Reviews: