The maximum water pressure ≤ 3 bar.
The maximum water temperature ≤ 70°C according to safety device setting.
Always use materials that are compatible with the water used in the system and with the materials used in the unit.
Ensure that components installed in the field piping can withstand the water pressure and temperature.
Drain taps must be provided at all low points of the system to permit complete drainage of the circuit during maintenance.
Air vents must be provided at all high points of the system. The vents should be located at points that are easily accessible
for service. An automatic air purge valve is provided inside the unit. Check that this air purge valve is not tightened so that
automatic release of air in the water circuit is possible.
Before continuing installation of the unit, check the following:
The units are equipped with an expansion vessel of 8L that has a default pre-pressure of 1.5 bar. To assure proper operation
of the unit, the pre-pressure of the expansion vessel might need to be adjusted.
1) Check that the total water volume in the installation, excluding the internal water volume of the unit, is at least 40L. See 14
"Technical specifications" to find the total internal water volume of the unit.
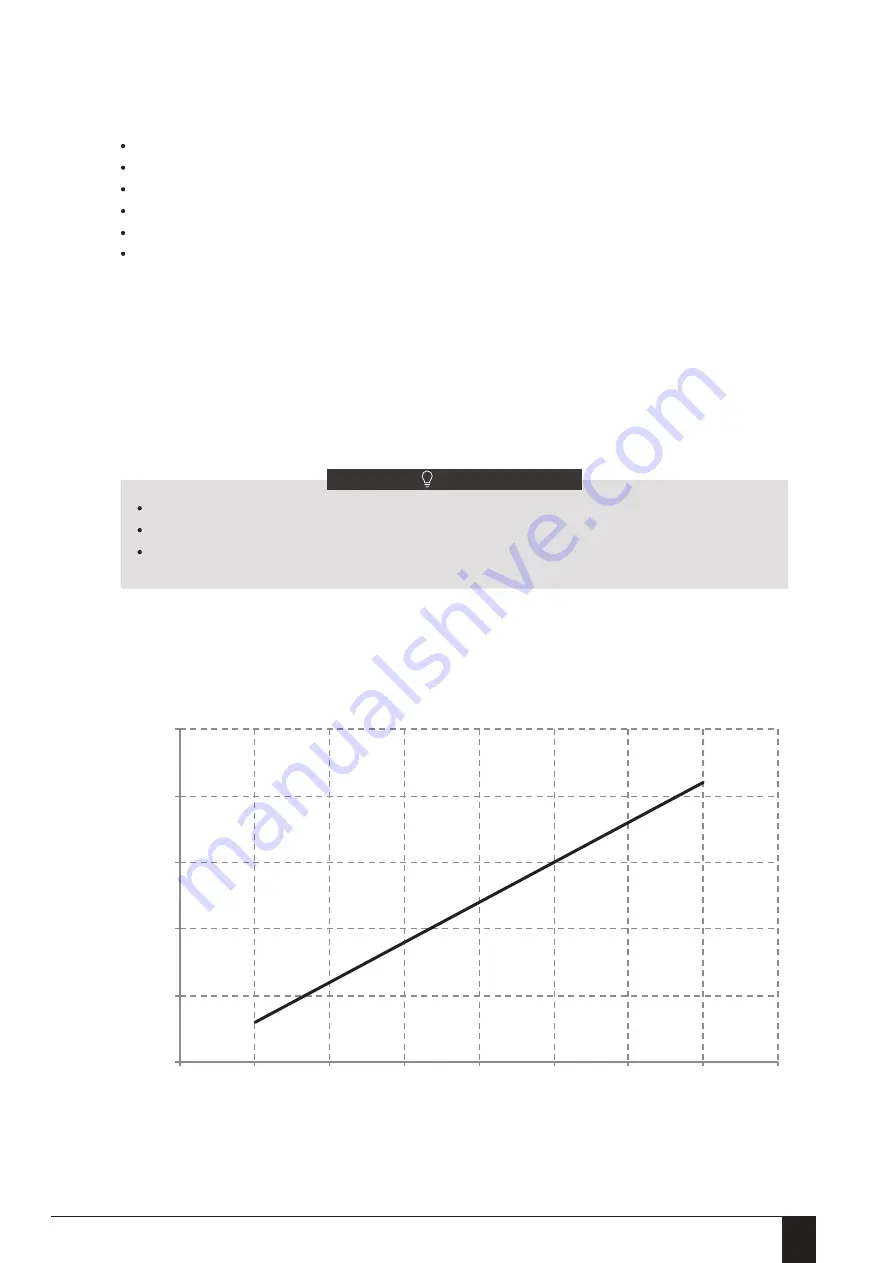
The expansion vessel volume can follow the figure below:
2) Expansion vessel volume must fit the total water system volume.
3) To size the expansion for the heating and cooling circuit.
9.4.2 Water volume and sizing expansion vessels
NOTE
In most applications this minimum water volume will be satisfactory.
In critical processes or in rooms with a high heat load though, extra water might be required.
When circulation in each space heating loop is controlled by remotely controlled valves, it is important that this
minimum water volume is kept even if all the valves are closed.
0
5
10
15
20
25
0
50
100
150
200
250
300
350
400
E
x
p
a
n
sio
n
v
e
sse
l (
L
)
System water volume (L)
© All rights reserved - Galmet Sp. z o.o. Sp. K.
Installation and operation manual - air-water heat pump Prima
121
WZÓR
Summary of Contents for Prima
Page 175: ...i 1 Galmet Sp z o o Sp K Prima 175 W Z R...
Page 176: ...3 1 3 1 Prima Galmet Sp z o o Sp K 176 W Z R...
Page 177: ...12 8 3 RCD 30 Galmet Sp z o o Sp K Prima 177 W Z R...
Page 181: ...5 6 EN378 5 CO2 50 CO2 12 24 50 CO2 500 CO2 12 500 CO2 Galmet Sp z o o Sp K Prima 181 W Z R...
Page 195: ...8 10 PCB B PCB B 4 6 PCB A PCB A 9 3 Galmet Sp z o o Sp K Prima 195 W Z R...
Page 206: ...9 4 3 3 3 3 2 60 9 4 4 Prima Galmet Sp z o o Sp K 206 W Z R...
Page 207: ...0 3 98 83 98 83 2 2 0 9 5 2 Galmet Sp z o o Sp K Prima 207 W Z R...
Page 208: ...30 9 7 2 30 0 1 9 7 1 9 6 9 7 B1 13 0 039 30 C 80 20 Prima Galmet Sp z o o Sp K 208 W Z R...
Page 215: ...9 1 9 2 9 1 9 2 9 3 Galmet Sp z o o Sp K Prima 215 W Z R...
Page 224: ...MENU BACK ON OFF UNLOCK C PCB E8 E0 E2 13 4 10 5 1 99 Prima Galmet Sp z o o Sp K 224 W Z R...
Page 235: ...11 11 1 50 11 2 10 5 11 12 10 1 24 9 4 4 pH pH 8 0 pH 7 0 Galmet Sp z o o Sp K Prima 235 W Z R...
Page 247: ...MCE P6 15 15 1 2 3 U V W 4 L1 L2 L3 5 Galmet Sp z o o Sp K Prima 247 W Z R...
Page 249: ...15 1 2 3 4 5 CO2 6 7 8 9 Galmet Sp z o o Sp K Prima 249 W Z R...
Page 250: ...11 12 13 14 25 OFN 15 b 10 Prima Galmet Sp z o o Sp K 250 W Z R...
Page 251: ...17 b c d e g h 80 i j k 18 19 20 16 Galmet Sp z o o Sp K Prima 251 W Z R...
Page 252: ...20 21 Y 4 A Prima Galmet Sp z o o Sp K 252 W Z R...
Page 253: ...XT3 XT3 8 10 4 6 K XT3 Galmet Sp z o o Sp K Prima 253 W Z R...
Page 254: ...XT3 XT3 12 14 16 1 K 40 200 230 12 14 16 3 Prima Galmet Sp z o o Sp K 254 W Z R...


