3. TARGET TRACKING (TT)
3-23
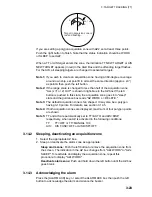
0.5-1 nm
Target in acquision zone is
red and flashing.
A
B
If you are setting a polygon acquisition zone with AZ2, set at least three points.
Push the right button to finish. Note that the status indication should be WORK
or SLEEP to set AZ2.
When a TT or AIS target enters the zone, the indication TT NEW TARGET or AIS
NEW TARGET appears (in red) in the Alert Box and the offending target flashes.
For the AIS, all sleeping targets are changed to activated targets.
Note 1:
If you wish to create an acquisition zone having a 360-degree coverage
around own ship, set point B in almost the same direction (approx. ±3°)
as point A then push the left button.
Note 2:
If the range scale is changed to less than half of the acquisition zone,
"Azx (x=1 or 2) OUT" is shown in light-blue in the AZ box.If the left
button is pushed in this state, the acquisition zone goes into "sleep"
state and the guidance box reads "AZ WORK L = DELETE."
Note 3:
The default acquisition zone is fan shaped. It may also be a polygon
having 3-10 points. For details, see section 3.14.5.
Note 4:
If both acquisition zones are displayed, maximum of four polygon points
are shown.
Note 5:
TT and AIS are automatically set to TT=AUTO and AIS=DISP,
respectively, when an AZ is activated in the following conditions:
TT:
TT=OFF or TT=MANUAL 100
AIS: AIS FUNC=OFF or AIS DISP=OFF
3.14.2
Sleeping, deactivating an acquisition zone
1. Select the appropriate AZ box.
2. Sleep or deactivate the alarm zone as appropriate:
Sleep alarm zone:
Push the left button to remove the acquisition zone from
the screen. The indication in the AZ box changes from "AZx WORK" to "AZx
SLEEP." To reactivate and display the acquisition zone, repeat this
procedure to display "AZx WORK."
Deactivate alarm zone:
Push and hold down the left button until the AZ box
goes blank.
3.14.3
Acknowledging the alarm
Press the [ALARM ACK] key, or select the ALARM ACK box then push the left
button to acknowledge the alarm and silence the buzzer.


