About Actions (for Windows users)
105
6.
Press the [Scan] button on the ScanSnap.
D
Scanning starts.
D
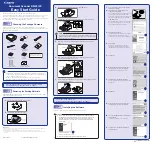
When scanning is completed, the [Scan to Picture Folder] dialog box appears.
If you clear the [Show preview] check box in Step
, the scanned image data is
directly saved in the pictures folder.
7.
Check the scanned image in the [Scan to Picture Folder] dialog box.
You can rename the file in this dialog box.
For details about the [Scan to Picture Folder] dialog box, refer to ScanSnap Manager
Help.
8.
Click the [Save] button.
D
The scanned image data is saved in the pictures folder.
In [Specify destination folder], you can change the destination folder to a folder other than
the pictures folder.
z
When the [Scan to Picture Folder] dialog box is displayed, you cannot perform a scan.
Close the [Scan to Picture Folder] dialog box before scanning the next document.
z
Do not move, delete or rename the scanned image data in other applications when the
[Scan to Picture Folder] dialog box is displayed.
Preview