FT500 SFI / FT500LITE SFI
12
5. First steps with FT500 / FT500LITE read
before installation
This chapter is a step-by-step guide that must be followed to start
FT500 / FT500LITE basic setup before electric installation, as the
function of each wire may vary according to engine setup (number of
cylinders, injectors control mode, ignition coils and auxiliary outputs).
1. Connect the flash drive in the PC USB port and install the
FTManager software. Remember to check if the software and
the ECU are in the lastest version at www.fueltech.net.
2. Connect FT500 / FT500LITE to the computer using the USB
cable included on the package. The ECU will be powered up;
3. With the ECU in hands go through chapter 6, that introduces all
basic information about menu navigation and operation;
4. Chapter 7 guides the user through all the menus where data
regarding the engine must be setup (crank trigger signal, injectors
and ignition control modes, etc.);
6. Getting to know the ECU
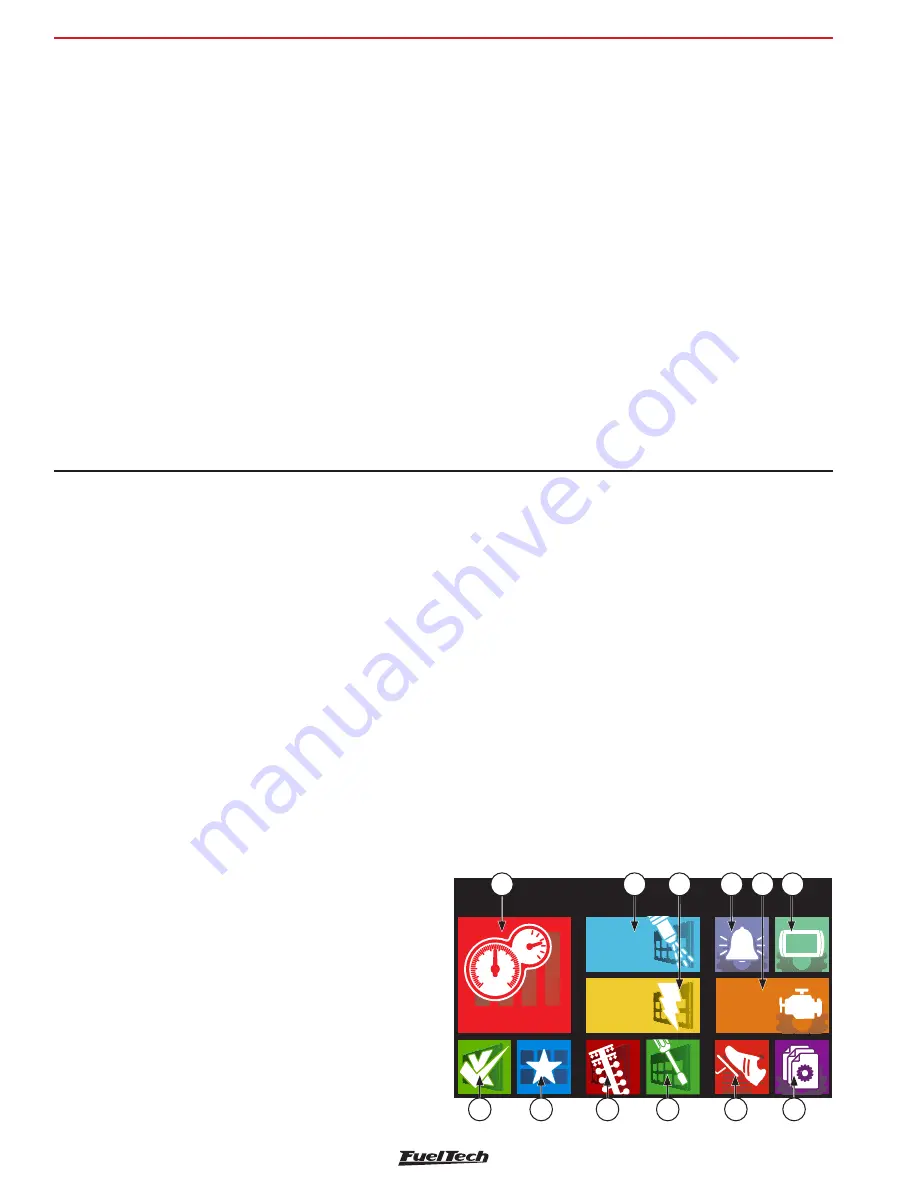
6.1 Main menu
Navigation through touchscreen is intuitive, because the ECU display
makes the access to information very easy, eliminating physical
buttons. So, all changes on maps, setups and functions are done by
light touches on the screen.
To enter menus, press the screen twice, just like a double click. This is
a feature that prevents the user from entering the wrong menu when
managing the ECU inside the car.
1 - Dashboard:
Shows real time engine information (RPM,
Temperature, pressure, timing, injection time, etc.)
2 - Fuel Tables Adjust:
Main fuel map, overall fuel trim, RPM
compensation, TPS idle fuel table accel fuel enrich and
decay, engine and intake temp, compensation battery voltage,
compensation, post start enrich, ect.
3 - Ignition Tables Adjust:
Main ignition map, overall ignition
trim, MAP / TPS compensation, air and engine temperature
compensations , individual cylinder trim, timing split, etc.
4 - Alert Settings:
Access to shift alert settings, safe mode RPM
limiter, alerts by fuel and oil pressure, TPS, etc.
5 - Engine Settings:
Engine basics info as inition mode, RPM signal,
pedal/throttle settings, idle actuador, injectors deadtime, ignition
dwell, wiring harness diagram.
6 - Interface Settings:
LCD backlight and alert sounds, dashboard
configs, meansurement units, touchscreen calibration serial
number and version.
5. The last step before the electric installation is to check harness
connections. Go to the “Engine Setting” menu then click the last
option “Wiring harness diagram”. Check and write down the
connections and use it as guide to know how functions were
allocated to the pins. TIP: take photos with a mobile phone.
6. Chapters 8 to 14 guide through details related to the electrical
installation of injectors, coils, 12V inputs, grounds, sensors,
etc. Chapter 25 shows full wiring diagrams as example for your
installation;
7. Chapter 15 gathers information on sensors settings for
temperature, pressure, RPM, speed, etc.
8. With the electric installation finished, proceed to chapter 15.14
and check all the information needed for the first start of the
engine, ignition calibration, sensors checking, etc.
9. Lastly, chapters 17 to 24 show detailed descriptions about all
functions of the ECU. It is a very interesting reading; it also details
every function and operation that the FT can perform.
First steps with FT500 / FT500LITE read before installation
7 - File Manager:
Used to generate FuelTech Base Map, copy, delete
and manager map files.
8 - Sensors and Calibration:
Setup and calibrate FT500 sensors,
eletronic throttle, O2 sensor, etc.
9 - Other Functions:
Internal datalogger, RPM limiter decel fuel
cut-off, thermatic fans, progressive nitrous, boost control idle
speed, etc.
10 - Drag Race Features:
Burnout mode 3-step, 2-step, spool assist
table, Gear shift output, time based enrichment and timing Pro-
Nitous.
11 -Favorites:
Shortcuts to the most used menus and fuctions.
12 -Diagnostic Panel:
Check inputs and outputs status and all
information of what the ECU is reading and doing is real time.
Main Menu
Fuel
Tables Adjust
Ignition
Tables Adjust
Engine
Settings
Dashboard
1
2
10
9
8
7
6
5
4
3
12
11


