


Headlight Aiming, Preliminary
Checks
Before checking or adjusting the headlight aim, do
the following.
•
Check that the hood is closed and latched.
•
Remove any large amounts of mud or ice from
the underside of the fenders.
•
Check the springs for sagging or broken
leaves.
•
Check the suspension for proper functioning of
the leveling mechanism. On cabs with air sus-
pensions, make sure that the height is properly
adjusted.
•
Check for damage to the hood and hinge as-
sembly. Repair as necessary.
•
With the vehicle unloaded, check that the tires
are inflated to the recommended air pressure.
•
Clean the headlight lenses. Use a soft cloth
with mild, non-caustic soap or detergent, and
water.
Headlight Aim Check
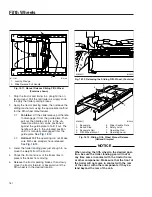
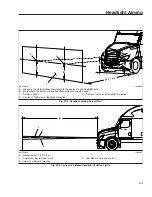
1.
Park the vehicle on a level surface, 25 ft (7.6 m)
away from, and perpendicular to, a vertical
screen or wall. Shut down the engine and set the
parking brake. Chock the tires.
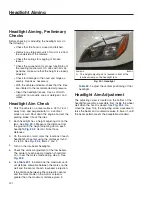
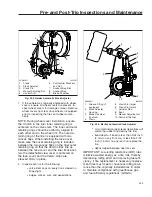
2.
Each headlight has a height adjusting dot on the
lens. See
. Measure the distance from
the ground to the height adjusting dot on each
headlight (
, Item A). Note those
distances.
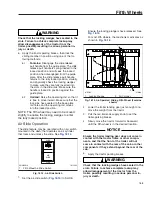
3.
On the screen or wall, mark the locations of each
headlight bulb center using the distances found
in step 2. See
, Items 2 and 3.
4.
Turn on the low-beam headlights.
5.
Check the vertical adjustment of the low beams.
The center of each beam projection should fall
on or near the marks made during step 3. See
6.
Use
to determine the maximum verti-
cal distance allowable between the marks on the
wall and the center of each low-beam projection.
If the distance between either projection center
and the mark made on the wall or screen is
greater than the maximum distance given in
, adjust the vertical positioning of that
headlight.
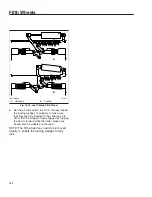
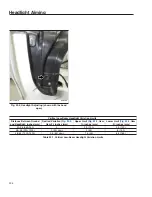
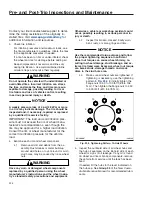
Headlight Aim Adjustment
The adjusting screw is located on the bottom of the
headlight assembly, accessible from inside the wheel
well when the hood is closed. See
. Re-
move the plug. Turn the adjusting screw clockwise to
raise the beam and counterclockwise to lower it, until
the beam pattern meets the acceptable standard.
f546613
09/21/2016
A
A. The height adjusting dot is located in front of the
low-beam lamp on the headlight lens.
Fig. 20.1, Headlight
Headlight Aiming
20.1
Summary of Contents for NEW CASCADIA 2016
Page 1: ... NEW CASCADIA Driver s Manual Part Number STI 500 Publication Number STI 500 8 ...
Page 5: ......
Page 11: ......
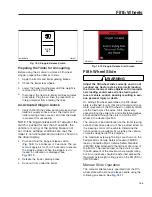
Page 38: ...f611444 10 31 2016 Fig 3 23 Sample Alert Messages Instruments 3 20 ...
Page 39: ......
Page 93: ......
Page 94: ...8 Cab and Sleeper Features Windows 8 1 Mirrors 8 1 Cab Amenities 8 1 Sleeper Amenities 8 2 ...
Page 99: ......
Page 125: ......
Page 134: ...14 Steering System Power Steering System 14 1 ...
Page 145: ......
Page 146: ...16 Manual Transmissions and Clutch Eaton Fuller Manual Transmissions 16 1 Clutch 16 1 ...
Page 149: ......
Page 150: ...17 Drive Axles Interaxle Lock Tandem Axles 17 1 Driver Controlled Differential Lock DCDL 17 2 ...
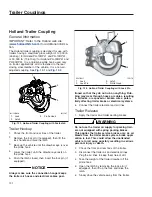
Page 164: ...19 Trailer Couplings Holland Trailer Coupling 19 1 ...
Page 177: ......
Page 191: ......
Page 198: ...25 Specifications Fluids and Lubricants 25 1 ...