background image

8

•  Keep packaging materials, especially plastic 

and plastic bags, away from children. Risk of 

suff ocation.

•  Remove all plastic from the device before use.

•  Place the mains cable in such a manner that 

it does not impede and that it cannot be 

unplugged accidentally.

•  Disconnect the battery charger from the 

power supply after the charging process.

•  Keep the charger in a place that cannot be 

accessed by children or unauthorised persons.

•  Do not operate the device close to combustible 

material or in an explosive environment.

•  Always wear suitable working clothes, 

protective gloves and goggles. Battery acid is 

corrosive! Immediately rinse any acid splashes 

with lots of water and consult a physician, if 

required. If battery acid gets into the eyes, 

immediately rinse under running water for at 

least 10 minutes and consult a doctor.

•  Batteries may not be tilted, as acid may leak 

from the degassing openings.

•  Do not cover the charger, keep the 

ventilation openings clear, otherwise the 

charger may overheat and be damaged. Never 

set the charger up for operation on a surface 

that is insulating (e.g. polystyrene). There is a 

risk of heat built up!

•  If you wish to charge a vehicle battery in the 

installed state, fi rst park the vehicle safely, 

put on the parking break and switch off  the 

ignition. Cut the battery off  from the on-board 

network of your vehicle. To do this, read the 

manual of your vehicle or ask your specialist 

workshop.

•  Hold the power cable only at the power plug 

when disconnecting from the power socket.

•  Do not expose the charger to the vicinity of 

fi re, heat and extensive temperatures over 

+ 40° C!

•  Store these instructions carefully and, if 

necessary, pass them on to other users.

5. EXPLANATION OF SYMBOLS

Corresponds to EC directives

Labelled electrical products may not be disposed 

of in the household waste

Recommended battery capacity

Read the operating instructions

Devices with this symbol may only be operated 

indoors (dry environment)

Corresponds to the requirements of § 

21 of the German Product Safety Law 

(Produktsicherheitsgesetz) 

6. OPERATING INSTRUCTIONS

Before using the device make sure that you 

have read the operating instructions for the 

battery and the vehicle and you have under-

stood all of the safety precautions.
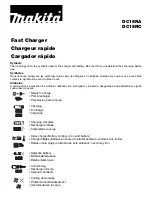
6.1 OVERVIEW

1   Mains plug

2   Ammeter for charging current

3  Carry handle

4  Fuse 30 A

5   Selector switch battery voltage 12/24 V

6  Fuse 5 A

7   Selector switch slow/fast

8   Mains switch ON/OFF

9   Positive cable red (+)

10  Negative cable black (-)

Figure 1: Overview

Summary of Contents for 16518

Page 1: ...GmbH 16518 06 2022 R f 16518 Chargeur d atelier CB 20 Manuel de l op rateur 11 Art no 16518 Workshop charger CB 20 Operating instructions 7 Art nr 16518 Werkplaatslader CB 20 Gebruiksaanwijzing 15 Cod...

Page 2: ...2...

Page 3: ...2 00 m L nge Ladekabel 1 80 m Eingang 220 240V AC 50 60 Hz Ausgang 12V 24V DC Ladestrom langsam 5 5 A 12V 8 5 A 24V schnell 9 5 A 12V 14 5 A 24V Umgebungstemperatur 5 C bis 40 C Kinder d rfen nicht mi...

Page 4: ...berhitzungundsomitzueinerBesch digung kommen kann Stellen Sie das Ladeger t im Betrieb nicht auf eine isolierende Unterlage z B Styropor Gefahr von Hitzestau Wenn Sie eine Fahrzeugbatterie in einge b...

Page 5: ...des Ladeger tes an den Plus pol der Batterie an Danach schlie en Sie das schwarze Minuskabel an der Karosserie blanke Stelle an weit entfernt von der Batterie Vergaser und Kraftstoffleitungen Stecken...

Page 6: ...rsetzen Sie die Sicherung durch eine neue gleichwertige 5 x 20 T 5 A 6 3 2 BEI BERSPANNUNG Bild6 T5ASicherung SolltenandereFehleroderDefekteauftretenkontaktierenSie unseren Kundendienst siehe Abschnit...

Page 7: ...nput 220 240V AC 50 60 Hz Output 12V 24V DC Charging current slow 5 5 A 12V 8 5 A 24V fast 9 5 A 12V 14 5 A 24V Ambient temperature 5 C to 40 C Children must not play with the device Cleaning and user...

Page 8: ...h to charge a vehicle battery in the installed state first park the vehicle safely put on the parking break and switch off the ignition Cutthebatteryofffromtheon board network of your vehicle To do th...

Page 9: ...to the positive pole of the battery first Thenconnecttheblacknegativecable tothecarbody exposed part far away from the battery the carburettor and fuel lines Always maintain this sequence Now plug the...

Page 10: ...Afuse If other faults or defects occur contact our customer service department see section 9 or consult a specialist electrical workshop 6 3 3 OTHER FAULTS Neveropenthedeviceyourselftoattempt to repai...

Page 11: ...00 m Longueur du c ble de chargement 1 80 m Entr e 220 240V CA 50 60 Hz Sortie 12V 24V CC Courant de charge lent 5 5 A 12V 8 5 A 24V rapide 9 5 A 12V 14 5 A 24V Temp rature ambiante de 5 C 40 C Lesenf...

Page 12: ...es d a ration car cela pourrait provoquer une surchauffe et ainsi un endommagement de l appareil Ne mettez pas le chargeur en marche sur un support isolant par exemple du polystyr ne Risque de surchau...

Page 13: ...l aper u Ensuite branchez le c ble moins noir la carrosserie endroit bril lant et ce suffisamment loin de la batterie du carburateur etdesconduites carburant Respectezimp rativementcette suite op rat...

Page 14: ...A Si d autres erreurs ou d fauts surviennent contactez notre service la client le voir section 9 ou faites appel un lec tricien 6 3 3 AUTRES ERREURS N ouvrez jamais l appareil vous m me pour essayer d...

Page 15: ...DC Laadstroom langzaam5 5A 12V 8 5A 24V snel 9 5 A 12V 14 5 A 24V Omgevingstemperatuur 5 C tot 40 C Kinderen mogen niet met het apparaat spelen Kinderen mogen het apparaat niet zonder toezicht reinige...

Page 16: ...werking niet op een isolerende onderlaag zoals styro por gevaar voor hittestuwing Als u een voertuigaccu in ingebouwde staat wilt opladen parkeer het voertuig dan eerst veilig trek de handrem aan en...

Page 17: ...tdaarna de zwarte massakabel aan op de carrosserie blank gedeelte zover mogelijk uit de buurt van de accu carburateurenbrandstofleidingen Houdaltijddezevolgorde aan Steek nu de netstekker positie 1 in...

Page 18: ...of defecten optreden neem dan contact op met onze klantenservice zie paragraaf 9 of ga naar een gespecialiseerde elektro werkplaats 6 3 3 ANDERE FOUTEN U mag het apparaat in geen geval zelf openen om...

Page 19: ...resso 220 240V AC50 60 Hz Uscita 12V 24V DC Corrente di carica lenta 5 5 A 12V 8 5 A 24V rapida9 5A 12V 14 5A 24V Temperatura ambiente da 5 C a 40 C I bambini non devono giocare con il dispositivo Non...

Page 20: ...l polistirolo pericolo di accumulo di calore Se si carica una batteria montata parcheggia re il veicolo in sicurezza tirare il freno a mano e disinserire l accensione Staccare la batteria dalla rete d...

Page 21: ...nero alla carrozzeria in un punto non verniciato lontano dalla batteria dal carburatore edaitubidelcarburante Rispettaresemprequestasequenza Ora collegare la spina di alimentazione pos 1 dello schema...

Page 22: ...5 A 6 3 2 IN CASO DI SOVRATENSIONE Figura6 FusibileT5A Qualora si verificassero altri errori o guasti contattare il nostrocentrodiassistenzaclienti vedicapitolo9 orivolgersi a un elettrofficina specia...

Page 23: ...23...

Page 24: ...24 EAL GmbH Otto Hausmann Ring 107 42115Wuppertal Deutschland info eal vertrieb com www eal vertrieb com 49 0 202 42 92 83 0 49 0 202 42 92 83 160...

Reviews: