EPSON Stylus COLOR 760
Revision C
Adjustment
Adjustment
113
3.
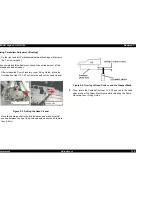
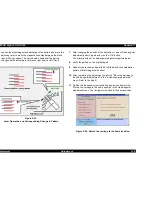
Move the carriage to the center and set the thickness gauge
(t=1.14mm) on the fixed position of Front Paper Guide as you can
see in the following figure 5-2.
Figure 5-2. Setting the Thickness Gauge
4.
Move the carriage to the position that the printhead overlaps the
thickness gauge.
5.
Move the right Parallelism adjustment bushing to the rear until the
thickness gauge moves with the carriage when you move the
carriage about 20 mm right and left. (Gap will be narrowed.)
6.
From this thickness with which the thickness gauge starts moving
with the carriage, move the gear of the right Parallelism adjustment
bushing one notch toward front side. (Gap will be widen).
7.
With the PG lever set front (gap is small) and then rear, move the
carriage right and left and make sure that the thickness gauge does
not move for the both settings.
[Left Parallelism Adjustment]
8.
Perform Steps 2 to 7 for the left Parallelism adjustment bushing.
[Checking parallelism]
9.
Perform steps 1 to 4 again.
10.
Make sure that the thickness gauge does not move right and left
along with the carriage when the carriage is moved about 20 mm.
11.
Move the right Parallelism adjustment bushing one notch to the rear
(Gap will be narrowed).Then check that the thickness gauge moves
along with the carriage. If the thickness gauge does not move, go
back to Step 1 and repeat the adjustment.
12.
If the gap is adjusted correctly, move the right parallelism
adjustment bushing one notch toward front side (Gap will be widen).
C H E C K
P O I N T
n
Put the thickness gauge on the flat side of the rib of the
Front Paper Guide.
n
When you move the Carriage, move it, pulling the
timing belt with your hand.
In this case, be careful not damage the Linear Scale for
CR encorder sensor.
Summary of Contents for Stylus Color 760
Page 1: ...EPSONStylusCOLOR760 Color ink jet printer SEIJ99004 SERVICE MANUAL ...
Page 8: ...C H A P T E R PRODUCTDESCRIPTION ...
Page 27: ...C H A P T E R OPERATINGPRINCIPLES ...
Page 53: ...C H A P T E R TROUBLESHOOTING ...
Page 72: ...C H A P T E R DISASSEMBLYANDASSEMBLY ...
Page 109: ...C H A P T E R ADJUSTMENT ...
Page 142: ...C H A P T E R MAINTENANCE ...
Page 152: ...APPENDIX C H A P T E R ...


