EPSON Stylus COLOR 760
Revision C
Disassembly and Assembly
Disassembly Procedures
108
4.2.4.9 Removing the PE Detector Assembly
1.
Remove the housing. (Refer to Section 4.2.1.)
2) Remove the ASF Assembly. (Refer to Section 4.2.4.5.)
3) Remove the Right Upper Paper Guide to forward releasing the Torsion
Spring 117.6. Refer to Figure 4-49.
4) Remove the CR Timing Belt and CR Encoder Slit Plate (Refer to Section
4.2.4.6.)
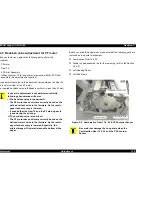
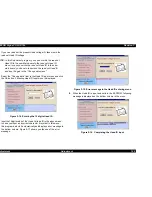
5) Disconnect the PE Detector connector from the PE Detector Circuit Board.
Refer to Figure 4-61.
Figure 4-61. Removing the PE Detector connector
6) Move the CR unit around the center portion of CR Shaft, releasing the CR
lock lever with tweezers or small screw driver.
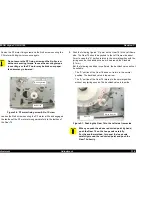
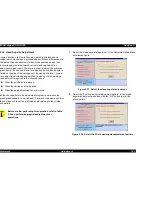
7) Release four fixed hooks securing the PE Detector Assembly from the front
and sliding it upward. Refer to Figure 4-62.
Figure 4-62. Removing the PE Detector Assembly
Printer Mechanism
viewed from the back
PE Detector
connector
C H E C K
P O I N T
During assembly, make sure that the tip (sensor part) of the
detector lever is in the hole of Right Paper Guide Assembly.
Refer to Figure 4-57.
Four hooks fixing the
PE Detector Assy
Summary of Contents for Stylus Color 760
Page 1: ...EPSONStylusCOLOR760 Color ink jet printer SEIJ99004 SERVICE MANUAL ...
Page 8: ...C H A P T E R PRODUCTDESCRIPTION ...
Page 27: ...C H A P T E R OPERATINGPRINCIPLES ...
Page 53: ...C H A P T E R TROUBLESHOOTING ...
Page 72: ...C H A P T E R DISASSEMBLYANDASSEMBLY ...
Page 109: ...C H A P T E R ADJUSTMENT ...
Page 142: ...C H A P T E R MAINTENANCE ...
Page 152: ...APPENDIX C H A P T E R ...


