To load the paper into the unit, use this procedure:
l
Be sure the printer is turned off; then open the front protective lid to
move the print head to the middle of the platen.
l
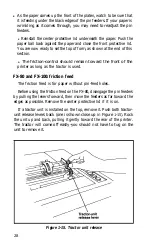
Pull the paper bail and the friction-control lever toward the front of
the printer (refer back to Figure
1-12).
l
Insert the paper under the paper separator and the platen and push
the paper through to the front.
l
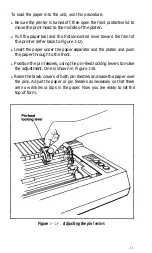
Position the pin feeders, using the pin-feed locking levers to make
the adjustment. One is shown in Figure
1-18.
l
Raise the black covers of both pin feeders and ease the paper over
the pins. Adjust the paper or pin feeders as necessary so that there
are no wrinkles or dips in the paper. Now you are ready to set the
top of form.
Figure
1-18.
Adjusting the pin
feeders
31
Summary of Contents for FX-80
Page 1: ......
Page 22: ......
Page 23: ......
Page 26: ......
Page 31: ...Figure 1 1 The FX 80 and FX 100 printers 14 ...
Page 32: ...Figure 1 2 Printer parts 1 5 ...
Page 38: ...Figure 1 8 DIP switch vent 21 ...
Page 42: ...Figure 1 11 Ribbon insertion 25 ...
Page 51: ...Figure 1 20 Paper thickness adjustment 34 ...
Page 85: ......
Page 92: ......
Page 95: ......
Page 97: ...80 ...
Page 109: ......
Page 117: ...Figure 7 3 Staggering STAIR STEPS 100 ...
Page 119: ...Table 7 1 Line spacing commands 102 ...
Page 129: ...112 ...
Page 147: ...130 ...
Page 181: ...Figure 12 4 Corner of the FX 80 design ...
Page 189: ...Figure 12 10 Most distinct version Figure 12 11 Reversed version 172 ...
Page 215: ...198 ...
Page 231: ...214 ...
Page 249: ......
Page 269: ......
Page 272: ...iv ...
Page 283: ......
Page 290: ......
Page 305: ...282 ...
Page 311: ...288 ...
Page 323: ...300 ...
Page 339: ......
Page 343: ...320 ...
Page 349: ...326 ...
Page 353: ...330 ...
Page 354: ...Schematic 331 ...


