You can store up to eight channels of tab stops, numbered from 0 to
7. You use a format that is similar to the one for a single set:
CHR$(27)"b"CHR$(N)CHRR$(n
1
) . . . CHR$(n
k
)CHR$(0)
where N stands for a reference number between zero and seven under
which this channel will be stored. If you have already stored a set
using ESCape “B”, the FX has labelled it as channel 0.
If your system won’t send lowercase letters, substitute CHR$(98)
for the “b”. As for ESCape “B”, you can store up to 16 stops, and you
can use numbers between 1 and 254. You use either 0 or a number
smaller than n
k
to terminate the setting process.
Because the channels are stored, you must make the printer recall
one before you can use it. You use this format:
CHR$(27)"/"CHR$(n)
where n stands for the number of the channel (0 - 7). After you have
used this format, you perform tabbing by using CHR$(ll) as usual.
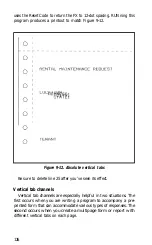
Of the two reasons we mentioned for using channels, the program-
ming of a multipage report form is the simpler. The program shown
demonstrates the way you could set up an outline to be filled in by
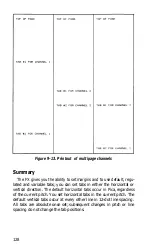
someone else or at a later date. Figure 9-13 shows the printout of that
program.
NEW
10 LPRINT CHR$(27)"b"CHR$(l)CHR$(l5)CHR$(40)CHR$(l);
' SET TABS AT 15,40 FOR CHANNEL #l
20 LPRINT CHR$(27)"b"CHR$(2)CHR$(25)CHR$(30)CHR$(l);
40
' SET TABS FOR CHANNEL #2 AT 25,
30
50
LPRINT CHR$(27)"b"CHR$(3)CHR$(30)CHR$(45)CHR$(l);
60
' SET TABS FOR CHANNEL
#3
AT 30,45
100 ' ****** START OF MAIN PROGRAM ******
110 FOR Z=l TO
3
: READ X
120 LPRINT "TOP OF PAGE"
130 LPRINT CHR$(27)"/"CHR$(X);
140
' SET CURRENT CHANNEL "PAGE"
150 LPRINT CHR$(ll)"TAB #l FOR CHANNEL"X
160 LPRINT CHR$(ll)"TAB #2 FOR CHANNEL"X
170 LPRINT CHR$(l40);
180 NEXT Z
190 DATA 1,2,3
2000 LPRINT CHR$(27)"@"
10000
END
127
Summary of Contents for FX-80
Page 1: ......
Page 22: ......
Page 23: ......
Page 26: ......
Page 31: ...Figure 1 1 The FX 80 and FX 100 printers 14 ...
Page 32: ...Figure 1 2 Printer parts 1 5 ...
Page 38: ...Figure 1 8 DIP switch vent 21 ...
Page 42: ...Figure 1 11 Ribbon insertion 25 ...
Page 51: ...Figure 1 20 Paper thickness adjustment 34 ...
Page 85: ......
Page 92: ......
Page 95: ......
Page 97: ...80 ...
Page 109: ......
Page 117: ...Figure 7 3 Staggering STAIR STEPS 100 ...
Page 119: ...Table 7 1 Line spacing commands 102 ...
Page 129: ...112 ...
Page 147: ...130 ...
Page 181: ...Figure 12 4 Corner of the FX 80 design ...
Page 189: ...Figure 12 10 Most distinct version Figure 12 11 Reversed version 172 ...
Page 215: ...198 ...
Page 231: ...214 ...
Page 249: ......
Page 269: ......
Page 272: ...iv ...
Page 283: ......
Page 290: ......
Page 305: ...282 ...
Page 311: ...288 ...
Page 323: ...300 ...
Page 339: ......
Page 343: ...320 ...
Page 349: ...326 ...
Page 353: ...330 ...
Page 354: ...Schematic 331 ...

