background image

78

 - Création d'un scénario (EMP SlideMaker)

5

Terminez le  scénario en ajoutant ou en supprimant un fichier ou des pages et en 

redéfinissant l'ordre de leur projection.

Au moment de la projection avec EasyMP, les images sont affichées les unes après les 

autres en partant du haut dans l'ordre dans lequel elles figurent dans la fenêtre du 

scénario.

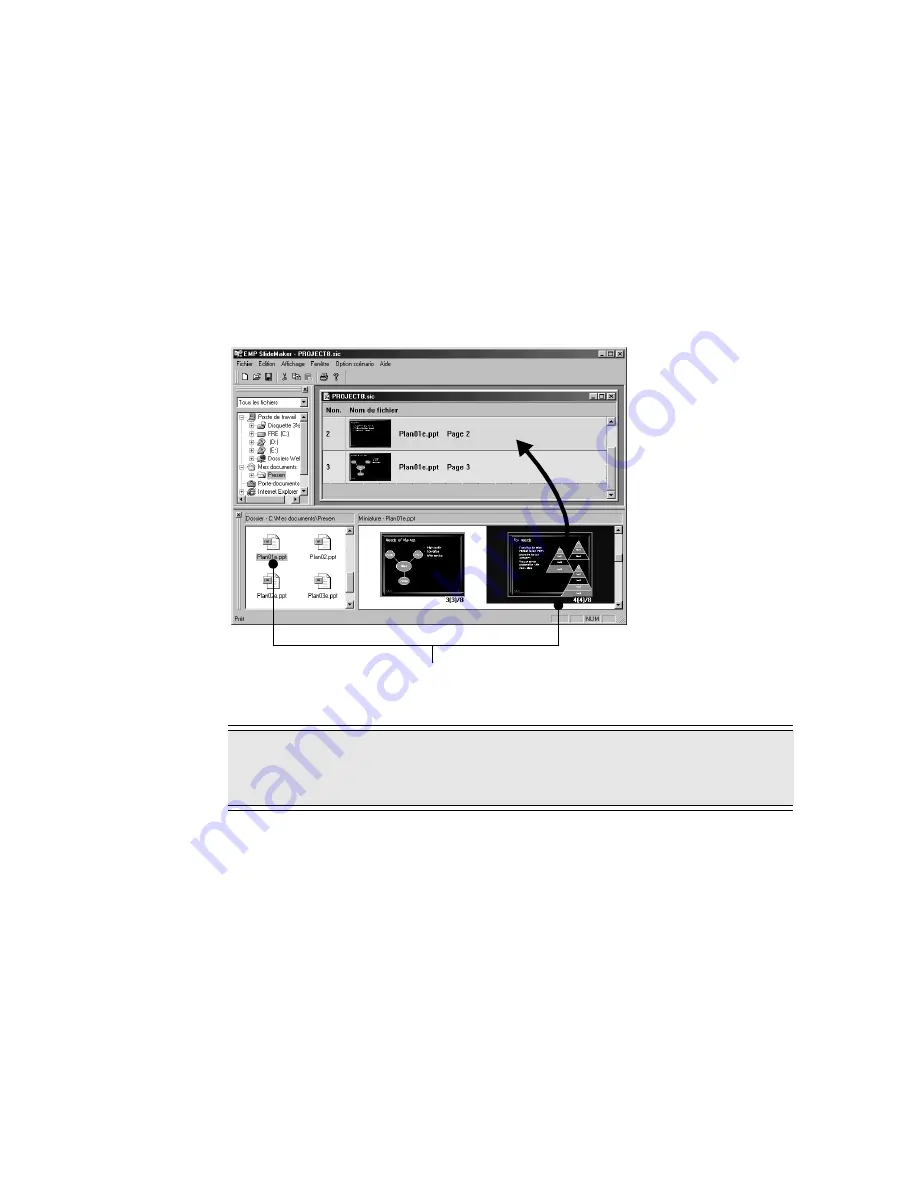
Pour ajouter un fichier ou une page, cliquez sur la cellule juste au-dessous de celle qu'il 

faut ajouter. Quand la couleur de cette cellule passe au jaune, double-cliquez sur le 

fichier ou la page à ajouter.

Pour supprimer un fichier ou une page, cliquez à droite sur la cellule à supprimer. 

Sélectionnez [

Couper

] dans le menu (contextuel) qui apparaît.

Pour modifier l'ordre, faites glisser la cellule à déplacer et déposez-la à l’endroit souhaité 

dans la fenêtre du scénario. Ou, faites apparaître le menu contextuel, sélectionnez 

[

Couper

] puis  [

Coller

].

Remarque

Il est impossible de coller simultanément plusieurs fichiers ou vues miniatures dans 

un scénario.

Pour ajouter, faire glisser le fichier ou la page 
souhaitée et le déposer dans la fenêtre du scénario.

Summary of Contents for EMP-505

Page 1: ...English User s Guide Deutsch Français ...

Page 2: ......

Page 3: ...English EasyMP User s Guide English ...

Page 4: ...ns information on using the projector safely and also includes World Wide Warranty Terms and a Troubleshooting check sheet Be sure to read this manual thoroughly before using the projector EMP 715 505 Owner s Manual This manual describes the installation procedure and basic usage and connection method when the projector is connected to a computer or video equipment It describes the items to check ...

Page 5: ... General Information Symbols Point This indicates restrictions or other related important information Be sure to read thoroughly Memo This indicates helpful information that the user should know Button Name This indicates a button name displayed on the operation panel remote control or screen Example Enter See Page This indicates a reference to related information Others ...

Page 6: ...ution Do not unplug the power cord while EasyMP operations are in progress e g while switching between images or while the operation indicator of the card slot is lit in orange Otherwise the projector may be damaged or may not be able to switch to the EasyMP screen Do not remove the memory card while data is being written to it e g immediately after screen capture or while the operation indicator ...

Page 7: ...re 10 Memory Cards That Can Be Used 10 Removing and Inserting the Memory Card 11 How to Remove the Memory Card 11 How to Insert the Memory Card 12 How to Remove the CompactFlash Card From the PC Card Adapter 13 How to Insert the CompactFlash Card Into the PC Card Adapter 13 Installing Uninstalling the EasyMP Software 14 Installation 14 Uninstallion 15 Starting the EasyMP Software 16 Starting EasyM...

Page 8: ... Projecting Scenarios 34 Operations During Presentation 35 Editing Scenarios 36 Displaying Files 38 Setting the Display Conditions 42 Advanced Use 45 Connecting the Projector With the Computer Using a USB Cable 46 Conditions of Computers That Can Be Connected 46 Connecting the Projector to the Computer and Installing the USB Driver 47 Accessing the Memory Card from the Computer 48 Appendix 49 When...

Page 9: ...sentation see page 21 Sending a Scenario Created scenarios are stored on the memory card see page 30 Projecting a Scenario The scenario sent to the memory card can be projected which allows the presentation to be made using only the projector without connecting it to a computer see page 34 Editing a Scenario The order in which scenario pages are projected can be changed and specified scenario page...

Page 10: ...8 Introduction to Functions ...

Page 11: ...tion describes the preparation required for the use of EasyMP in addition to its basic operations Operation Environment 10 Removing and Inserting the Memory Card 11 Installing Uninstalling the EasyMP Software 14 Starting the EasyMP Software 16 ...

Page 12: ...or If more memory cards are required be sure to use the following ATA compatible TYPE II memory cards CompactFlash card A PC card adapter is required in order to mount the card ATA flash card Memory Stick A PC card adapter is required in order to mount the card SmartMedia A PC card adapter is required in order to mount the card Microdrive A PC card adapter is required in order to mount the card Op...

Page 13: ...remove and insert the memory card supplied with this product When using commercially sold memory cards refer to the instruction manual provided with the memory card For information on how the memory card can be inserted into and removed from the computer s PC card slot refer to the instruction manual provided with the computer How to Remove the Memory Card 1 Press the eject button located below th...

Page 14: ...ackwards it cannot be fully inserted Do not attempt to insert it forcibly The operation indicator of the projector s card slot shows the current status as follows Off The memory card is not being accessed or one has not been inserted Lit in orange Accessing Do not remove the memory card Lit in red A memory card that cannot be used has been inserted The projector can recognize memory cards in FAT12...

Page 15: ...ompactFlash Card From the PC Card Adapter Hold the CompactFlash card as shown below and pull it out from the PC card adapter How to Insert the CompactFlash Card Into the PC Card Adapter With the EPSON logo facing upward insert the CompactFlash card into the PC card adapter Insert the memory card horizontally into the card slot of the projector with the EPSON logo on the PC card adapter facing towa...

Page 16: ...d with the projector The SETUP program will automatically start up 2 Select the language and then click the OK button The installation will start Follow the instructions that appear on the screen Point If the SETUP program does not start up click Start then select Run to open the Run dialog box In the Open box enter the location of the EasyMP Software CD ROM Specify Drive name of CD ROM SETUP exe ...

Page 17: ...puter Control Panel then Add Remove Programs Next select EMP SlideMaker and click the Add Remove button Point Even after EMP SlideMaker has been uninstalled the EMP SlideMaker folder is not deleted Make sure that the EMP SlideMaker folder does not contain any required scenario files and then delete it if it is unnecessary ...

Page 18: ... screen appears the next time the power is turned on If the projector was being used through a computer or video equipment start EasyMP according to the following procedure Starting EasyMP When the EasyMP button of the remote control is pressed while the projector is on EasyMP starts up and the EasyMP file list screen appears EasyMP file list screen ...

Page 19: ...emote control or on the projector s operation panel twice even while EasyMP is being used The power to the projector will then be turned off Point If a memory card is not inserted the message There is no memory card is displayed and the EasyMP functions cannot be used If a scenario with an autorun setting is stored on a memory card the projection of that scenario will start once the power to the p...

Page 20: ......

Page 21: ...ion This section describes the procedures for creating scenarios and sending them to the personal computer so that they can be used for presentation Files That Can Be Merged Into a Scenario File 20 Creating Scenarios EMP SlideMaker 21 ...

Page 22: ...ion Remark Microsoft PowerPoint ppt PowerPoint 97 SR 2 or later 2000 Image bmp dib BMP DIB jpg Any version is fine However files in the CMYK color mode format or the progressive format cannot be projected Point All effects set in the Slide Show menu of PowerPoint become invalid However the same settings for Slide Transition and Hide Slide can be performed when scenarios are created using EMP Slide...

Page 23: ...wing items before creating a scenario In advance create the source files e g the PowerPoint data and the image files that will be merged into the scenario Files other than those listed in Files That Can Be Merged Into a Scenario File on the previous page cannot be used Please note that the scenarios to be created with EMP SlideMaker are not compatible with scenarios created with EMP Scenario of th...

Page 24: ...n into image files If Non compress is selected the image in each cell is stored as an image file in BMP format Images in BMP format can be projected at high quality but the file size will be large since they are not compressed Also it takes more time to project them as compared with the Standard image quality Of all the settings the Non compress image quality achieves image projection at the highe...

Page 25: ...e of a PowerPoint file click the file s icon All pages of the PowerPoint file are displayed in the thumbnail window Double click the thumbnail of the desired page The selected page will be displayed in the scenario window To use all pages of a single PowerPoint file for a scenario double click the desired PowerPoint file icon in the file window Point If PowerPoint is not installed in the computer ...

Page 26: ...u that appears To change the order drag drop the cell to be moved within the scenario window Or display the shortcut menu select Cut and then select Paste 6 To switch to another image source such as a computer or video cassette recorder while projecting the scenario right click on the cell where you want to switch the input source and select Insert Source Control The control cell that switches the...

Page 27: ...ssing the Enter button on the remote control when projecting Displays Cell When this is checked the corresponding cells are displayed When unchecked cells are hidden and a prohibitive symbol is attached to them The same setting can also be performed by selecting Show Hide in the menu that appears after right clicking the cell Effect Effects can be applied when switching screens during projection i...

Page 28: ...ario is saved To save a scenario using another scenario name select Save As and enter a new scenario name Point When a scenario is saved a file named scenario name sic as well as the JPG and PNG data of each screen image is saved in the scenario folder Memo See Help for each function of the EMP SlideMaker menu ...

Page 29: ... the pointer Scenarios will not be created from any of the other files If a simplified scenario has been created the scenario will be created from all pages in the specified PowerPoint file Hide any pages that you do not wish to project using Cell Properties after creating the simplified scenario Memo The created scenario will be named SCNxxxx where xxxx are numbers The image quality of the scenar...

Page 30: ...ts for the desired screen image are set while creating the scenario the effects are available during scenario projection 1 Right click the cell for which you want to set effects and then select Effect 2 The Effect dialog box is displayed The same settings are available by selecting Effect in the menu for the projector s main unit Specify the desired settings while referring to the following table ...

Page 31: ...Rectangle Specify the edge shape and color of the rectangle displayed when the 2 button on the remote control is pressed while a scenario is being projected Spotlight Specify the size of the spotlight displayed when the 3 button on the remote control is pressed while a scenario is being projected When a spotlight is used only a part of the image is brightened and the rest is darkened Bar Specify t...

Page 32: ...ter is required place the memory card in the card adapter and insert it into the computer 2 Select Scenario Option then Send Scenario 3 A dialog box for specifying the destination drive will appear Select the drive in which the memory card is inserted and then click the OK button Point Created scenarios cannot be sent unless they are saved using either the Save or Save As function Once a scenario ...

Page 33: ...es stored on the memory card will be displayed in the scenario file list at the left To automatically project a scenario when EasyMP is started set up Autorun by selecting the desired scenario from the scenario file list then clicking the button The scenario for which Autorun has been set up will be displayed in the Autorun scenario file list at the right To repeatedly project a scenario from the ...

Page 34: ...ve been sent and project the scenarios using the EasyMP functions see page 34 Point The Autorun settings cannot be specified using the projector If two or more files have been set up for Autorun they will be projected in the order that they are registered in the Autorun scenario file list ...

Page 35: ...English Giving Presentations The section explains how to project scenarios and files sent to memory cards in the projector Projecting Scenarios and Files EasyMP 34 ...

Page 36: ...on on the remote control The EasyMP file list is projected showing the contents of the memory card inserted in the projector 2 By tilting the Enter button on the remote control move the cursor to position it on the scenario file to be projected and then press the Enter button The selected scenario is projected After all images in the scenario are projected the display automatically returns to the ...

Page 37: ...ss the Esc button to continue projection Pause Freeze Each time the Freeze button on the remote control is pressed the projection is paused restarted A V Mute Each time the A V Mute button on the remote control is pressed the projection and sound are stopped restarted If a user logo has been specified through the setting menu of the projector s main unit the logo is displayed while the image and s...

Page 38: ...enu on the left side is enabled 2 Position the cursor on the Edit Scenario icon and then press the Enter button on the remote control 3 The following edit screen appears Specify the order of pages in the scenario file as well as whether to display or hide the page To change the order of images position the cursor on the desired screen image and then press the Enter button on the remote control Nex...

Page 39: ...osition the cursor on the Return icon and then press the Enter button on the remote control The scenario is saved with the changes and the file list is displayed To cancel the changes to the scenario position the cursor on the Cancel icon and then press the Enter button on the remote control Memo If the cursor is positioned on the Execute icon and the Enter button on the remote control is pressed ...

Page 40: ...files saved using the Capture function JPG and BMP files saved during scenario creation Bitmap BMP files of SXGA 1280 x 1024 or less JPG files of SXGA 1280 x 1024 or less excluding certain special JPG formats The Capture function can be executed by selecting Capture then Image Capture in the projector s Setting menu Files That Can Be Projected With the Preview Function Point Only 24 bit color BMP ...

Page 41: ...ted in the projector 2 Position the cursor on the image file to be previewed and then press the Enter button on the remote control The contents of the selected image file will be projected Previewing Image Files Memo When manipulating files in the memory card from a computer via a USB connection the display is updated to the latest contents by pressing the EasyMP button Image file to be previewed ...

Page 42: ... previewed and then press the Esc button on the remote control While the folder is being selected the cursor moves to the menu at the left Memo Position the cursor on the desired file and then press the Esc button on the remote control to preview the image file Or position the cursor on the Execute icon and press the Enter button on the remote control to preview the image file Previewing the List ...

Page 43: ...them one by one press the Esc button on the remote control position the cursor on the Execute icon and then press the Enter button on the remote control An enlarged view of the first image appears While in enlarged preview you can display the next image file return to the previous image file or cancel the enlarged preview see page 35 Point If files that cannot be projected exist they are displayed...

Page 44: ...ching time display order and background color 1 Position the cursor on the scenario file or folder for which the display conditions are to be set and then press the Esc button on the remote control While the scenario file or folder is being selected the cursor moves to the menu at the left 2 Position the cursor on the Option icon and then press the Enter button on the remote control The Display Co...

Page 45: ... image file in the folder The details of each display condition are listed below Re execute Sets whether or not scenario projection and enlarged preview of image files in a folder are to be performed repeatedly If a scenario file is selected only this item is displayed Screen switching time Sets the time before advancing to the next screen If Not specified press the Enter button on the remote cont...

Page 46: ......

Page 47: ...English Advanced Use This section explains how to connect the projector with the computer using a USB cable Connecting the Projector With the Computer Using a USB Cable 46 ...

Page 48: ... system used as described below When Windows 98 is used While referring to Connecting the Projector to the Computer and Installing the USB Driver see page 47 install the USB driver contained in the EasyMP Software CD ROM supplied with the projector When Windows Me is used Install either the standard USB driver provided with the operating system or the USB driver contained in the EasyMP Software CD...

Page 49: ...n turn it on 3 If the computer s power has not been turned on turn it on and start Windows The Add New Hardware wizard starts up 4 Quit the Add New Hardware wizard by clicking the Cancel button 5 Insert the EasyMP Software CD ROM into the CD ROM drive of the computer The SETUP program starts up 6 Click the Cancel button to exit the SETUP program 7 Click Start and then select Run The Run dialog box...

Page 50: ...or is displayed as one of the drives of the computer and can then be accessed from the personal computer 1 Start up EasyMP by pressing the EasyMP button on the remote control The EasyMP file list is projected showing the contents of the memory card inserted in the projector 2 Double click My Computer on the desktop The My Computer window appears 3 The memory card appears as a Removable disk File m...

Page 51: ...English Appendix This appendix describes problems that may occur during operation of the projector along with the corrective actions to be taken When a Problem Occurs 50 Index 53 ...

Page 52: ...d into the card slot in the projector s main unit No displayable files is displayed Check whether or not files that cannot be displayed are stored in the memory card Files that can be displayed by EasyMP include scenario files sit JPEG files JPG and bitmap files BMP Other file formats cannot be used JPEG files with the file extension JPEG can be recognized as JPEG files in Windows However they can...

Page 53: ...resolution exceeding SXGA 1280 x 1024 is specified JPEG or bitmap files with resolutions exceeding SXGA 1280 x 1024 cannot be displayed Adjust the resolution using EMP SlideMaker or another utility Insufficient image file colors is displayed Check whether or not a bitmap other than one of 24 bit colors is specified Bitmaps 256 colors 16 colors etc of other than 24 bit colors cannot be displayed Ch...

Page 54: ...es in PowerPoint 97 or PowerPoint 2000 first before using them PowerPoint files ppt cannot be pasted into a scenario or thumbnails cannot be displayed MS Office s JPEG Converter may not have been installed Display the Graphic Filter option of Converters and Filters from the Office 97 Installer select all or select the JPEG filter and then install the JPEG Converter For Office 2000 the JPEG Filter ...

Page 55: ...Maker 21 E Zoom 35 F File list screen 16 Freeze 35 H High Quality 22 I Image Quality 22 Installation 14 J JPG 20 M Memory card 10 Memory stick 10 Microdrive 10 N Non compress 22 O Operation indicator 12 P Pause 35 PC card adapter 10 13 PowerPoint 20 Preview 34 Progressive format 20 R Rectangle 29 Repeat settings 31 S Scenario 21 34 Send Scenario 30 SmartMedia 10 Spotlight 29 Standard 22 T Thumbnai...

Page 56: ...54 Index U Uninstallion 15 USB 46 Z Zoom Image 35 ...

Page 57: ...Français EasyMP Guide de I utilisateur Français ...

Page 58: ...projecteur en toute sécurité et comment obtenir si nécessaire un service après vente ou une assistance technique vous y trouverez aussi une check list de dépannage Lisez ce manuel attentivement avant d utiliser votre projecteur Manuel d utilisation de l EMP 715 505 Ce manuel explique comment installer le projecteur il donne également des informations sur l utilisation élémentaire du projecteur et ...

Page 59: ...ses accessoires Pictogrammes d information générale Remarque Donne des restrictions ou autres points apparentés importants Veuillez lire attentivement Note Donne à l utilisateur des informations utiles Nom de bouton Indique le nom d un bouton ou d une touche figurant sur le panneau de commande la télécommande ou l écran Exemple Enter Voir page Renvoie à des informations apparentées Divers ...

Page 60: ...Ne débranchez pas le cordon d alimentation pendant que des opérations EasyMP sont en cours ex pendant le passage d une image à une autre ou quand le témoin de fonctionnement du logement pour carte est allumé en orange Sinon le projecteur risque d être endommagé ou de ne plus pouvoir passer à l écran EasyMP Ne retirez pas la carte mémoire pendant l écriture de données sur celle ci ex immédiatement ...

Page 61: ...equise 64 Ordinateurs pouvant exécuter EasyMP Software 64 Cartes mémoire pouvant être utilisées 64 Retrait et insertion de la carte mémoire 65 Retrait de la carte mémoire 65 Insertion de la carte mémoire 66 Retrait de la carte CompactFlash de l adaptateur pour cartes PC 67 Insertion de la carte CompactFlash dans l adaptateur pour cartes PC 67 Installation et désinstallation d EasyMP Software 68 In...

Page 62: ...chiers EasyMP 88 Projection d un scénario 88 Opérations possibles pendant la présentation 89 Modification d un scénario 90 Affichage des fichiers 92 Définition des conditions d affichage 96 Paramétrage avancé 99 Raccordement du projecteur à un ordinateur à l aide d un câble USB 100 Ordinateurs pouvant être raccordés 100 Raccordement du projecteur à l ordinateur et installation du pilote USB 101 Ac...

Page 63: ... scénarios créés sont mémorisés dans la carte mémoire voir page 84 Projection d un scénario Le scénario envoyé à la carte mémoire peut être projeté ce qui permet de n utiliser que le projecteur pour effectuer la présentation sans avoir à le raccorder à un ordinateur voir page 88 Modification d un scénario L ordre dans lequel les pages d un scénario sont projetées peut être modifié Il est également...

Page 64: ...62 Présentation des fonctions ...

Page 65: ...on explique la préparation nécessaire pour utiliser EasyMP et présente ses fonctions élémentaires Configuration requise 64 Retrait et insertion de la carte mémoire 65 Installation et désinstallation d EasyMP Software 68 Démarrage d EasyMP Software 70 ...

Page 66: ...S il faut davantage de cartes mémoires veillez à utiliser les cartes mémoires de TYPE II compatibles ATA suivantes Carte CompactFlash il faut un adaptateur pour cartes PC pour monter la carte Carte flash ATA Barre de mémoire il faut un adaptateur pour cartes PC pour monter la carte Smart Média il faut un adaptateur pour cartes PC pour monter la carte Micro unité il faut un adaptateur pour cartes P...

Page 67: ...vec cet appareil Lors de l utilisation de cartes mémoire vendues dans le commerce veuillez vous reporter à la notice accompagnant la carte mémoire Pour plus de détails sur l insertion et le retrait de la carte mémoire dans le logement pour cartes PC de l ordinateur veuillez vous reporter au manuel d utilisateur de l ordinateur Retrait de la carte mémoire 1 Appuyez sur le bouton d éjection au desso...

Page 68: ...l arrière elle ne pourra pas s enfoncer complètement Ne tentez pas de l insérer en forçant Le témoin de fonctionnement de l emplacement pour carte du projecteur indique l état actuel comme suit Eteint Pas d accès à la carte mémoire ou pas de carte mémoire insérée Allumé en orange Accès en cours ne retirez pas la carte mémoire Allumé en rouge Impossible d utiliser la carte mémoire insérée Le projec...

Page 69: ... adaptateur pour cartes PC Tenez la carte CompactFlash comme sur l illustration ci dessous et retirez la de l adaptateur pour cartes PC Insertion de la carte CompactFlash dans l adaptateur pour cartes PC Insérez la carte CompactFlash dans l adaptateur pour cartes PC le logo EPSON dirigé vers le haut Insérez la carte mémoire horizontalement dans l emplacement pour carte du projecteur le logo EPSON ...

Page 70: ...jecteur Le programme d installation démarre automatiquement 2 Sélectionnez la langue et cliquez sur le bouton OK L installation commence Suivez les instructions affichées à l écran Remarque Si le programme d installation ne démarre pas cliquez sur Démarrer et sélectionner Exécuter pour ouvrir la boîte de dialogue Exécuter Dans la zone Ouvrir entrez l emplacement du CD ROM EasyMP Software Indiquez ...

Page 71: ...guration puis Ajout Suppression de programmes Sélectionnez ensuite EMP SlideMaker et cliquez sur le bouton Ajouter Supprimer Remarque Même après la désinstallation d EMP SlideMaker le dossier EMP SlideMaker n est pas supprimé Veillez à ce que le dossier EMP SlideMaker ne contienne aucun fichier de scénario dont vous pourriez avoir besoin et supprimez le s il est inutile ...

Page 72: ...raîtra lors de la prochaine mise sous tension Si le projecteur était utilisé par le biais d un ordinateur ou d un appareil vidéo démarrez EasyMP comme suit Démarrage d EasyMP Quand le projecteur est sous tension appuyez sur la touche EasyMP de la télécommande pour démarrer EasyMP L écran EasyMP d affichage de la liste des fichiers apparaît Ecran EasyMPd affichage de la liste des fichiers ...

Page 73: ...tre fin à la projection appuyez sur la touche Power de la télécommande ou deux fois sur le panneau de commande du projecteur même si EasyMP est en cours d utilisation L alimentation du projecteur est alors coupée Remarque S il n y a pas de carte mémoire insérée le message Il n y a pas de carte mémoire apparaît et il est impossible d utiliser les fonctions d EasyMP Si la carte mémoire contient un s...

Page 74: ......

Page 75: ...présentation Cette section explique comment créer des scénarios et les envoyer à un PC pour pouvoir les utiliser dans une présentation Fichiers pouvant être fusionnés en un fichier de scénario 74 Création d un scénario EMP SlideMaker 75 ...

Page 76: ...ion Remarque Microsoft PowerPoint ppt PowerPoint 97 SR 2 ou ultérieur 2000 Image bmp dib BMP DIB jpg Toutes les versions conviennent Cependant il est impossible de projeter des images de format mode couleur CMYK ou de format progressif Remarque Tous les effets définis dans le menu Diaporama de PowerPoint deviennent caducs Cependant les mêmes paramètres choisis pour les options Transition et Masque...

Page 77: ...lez prendre connaissance des points suivants Créez à l avance les fichiers source ex les données PowerPoint et les fichiers d image qui seront fusionnés pour former un scénario Il est impossible d utiliser des fichiers autres que les fichiers répertoriés à la rubrique Fichiers pouvant être fusionnés en un fichier de scénario Veuillez noter que les scénarios créés avec EMP SlideMaker sont incompati...

Page 78: ... sélectionné l image dans chaque cellule est stockée sous forme de fichier d image en format BMP Les images projetées en format BMP sont de haute qualité mais la taille du fichier sera importante puisque les images ne sont pas compressées De plus la projection de ces images prend plus de temps par rapport à celle des images de qualité Standard De toutes les options la qualité d image Sans compress...

Page 79: ...liquez sur l icône du fichier Toutes les pages du fichier PowerPoint apparaissent dans la fenêtre des vues miniatures Double cliquez sur la vue miniature de la page souhaitée La page sélectionnée apparaît dans la fenêtre du scénario Pour incorporer toutes les pages d un fichier PowerPoint dans un scénario double cliquez dans la fenêtre des fichiers sur l icône du fichier PowerPoint souhaité Remarq...

Page 80: ...ter Quand la couleur de cette cellule passe au jaune double cliquez sur le fichier ou la page à ajouter Pour supprimer un fichier ou une page cliquez à droite sur la cellule à supprimer Sélectionnez Couper dans le menu contextuel qui apparaît Pour modifier l ordre faites glisser la cellule à déplacer et déposez la à l endroit souhaité dans la fenêtre du scénario Ou faites apparaître le menu contex...

Page 81: ...la durée de projection d une page de scénario ou pour ajouter des effets cliquez à droite sur la cellule souhaitée et sélectionnez Propriétés de la cellule Pour appliquer le même paramétrage à plusieurs cellules sélectionnez chaque cellule tout en maintenant enfoncée la touche Maj ou Ctrl du clavier puis cliquez à droite et sélectionnez Propriétés de la cellule 8 La boîte de dialogue Paramètres ce...

Page 82: ...effets de transition entre diapositives dans PowerPoint s appliquer au passage d un écran à un autre durant une projection Voici quelques exemples d effets Les effets d affichage peuvent être définis pour plusieurs cellules à la fois Pour sélectionner plusieurs cellules cliquez sur chaque cellule tout en maintenant enfoncée la touche Maj ou Ctrl du clavier Balayage gauche droite Passe d un écran à...

Page 83: ...é par le pointeur sera utilisé pour créer le scénario Aucun autre fichier ne sera incorporé dans le scénario créé Le scénario simplifié est créé à partir de toutes les pages du fichier PowerPoint sélectionné Masquer les pages qui ne sont pas à projeter en utilisant l option Propriétés de la cellule après avoir créé le scénario simplifié Note Le scénario créé recevra le nom SCNxxxx xxxx sont des no...

Page 84: ...inis au moment de la création du scénario ils sont disponibles quand vous projetez le scénario 1 Cliquez à droite sur la cellule pour laquelle il faut définir des effets et sélectionnez Effet 2 La boîte de dialogue Effet apparaît Il est possible d effectuer le même paramétrage en sélectionnant Effet dans le menu du projecteur Définissez les paramètres souhaités en vous reportant au tableau ci dess...

Page 85: ...e 6 Forme 7 Forme 8 Rectangle Indiquez le profil des bords et la couleur que doit prendre le rectangle quand la touche 2 de la télécommande est enfoncée tandis qu un scénario est projeté Spot Indiquez la taille que doit prendre le spot quand la touche 3 de la télécommande est enfoncée tandis qu un scénario est projeté Avec l utilisation du spot seule une partie de l image est éclaircie tandis que ...

Page 86: ...placez la carte mémoire dans l adaptateur et insérez ce dernier dans l ordinateur 2 Sélectionnez Option scénario puis Envoyer le scénario 3 La boîte de dialogue qui apparaît permet de sélectionner le lecteur destinataire du scénario Sélectionnez le lecteur dans lequel la carte mémoire est insérée et cliquez sur le bouton OK Remarque Il est impossible d envoyer un scénario créé qui n a pas été enre...

Page 87: ...ner 6 Modifiez les paramètres et cliquez sur le bouton OK Tous les fichiers de scénario stockés sur la carte mémoire figureront dans la liste des scénarios à gauche Pour projeter automatiquement un scénario au démarrage d EasyMP définissez son exécution automatique Autorun en sélectionnant le scénario en question dans la liste des scénarios puis cliquez sur le bouton Le scénario choisi figurera da...

Page 88: ...l exécution automatique il est également possible de sélectionner Option scénario puis Modifier ExécutionAuto avant d envoyer le scénario Remarque L exécution automatique ne peut être définie en utilisant le projecteur S il y deux ou plusieurs scénarios à exécution automatique leur projection se fera dans l ordre dans lequel ils ont été enregistrés dans la liste des scénarios Autorun ...

Page 89: ...Français Réalisation d une présentation Cette section explique comment projeter des fichiers et des scénarios transmis à la carte mémoire du projecteur Projection de scénarios et de fichiers EasyMP 88 ...

Page 90: ...nt sur la touche EasyMP de la télécommande La liste des fichiers EasyMP apparaît dans laquelle figure le contenu de la carte mémoire insérée dans le projecteur 2 En inclinant la touche Enter de la télécommande amenez le curseur sur le scénario à projeter et appuyez sur la touche Enter Le scénario sélectionné est projeté Une fois que toutes les images du scénario ont été projetées l affichage revie...

Page 91: ...pparaît Appuyez sur la touche Enter pour arrêter Appuyez sur la touche Esc pour poursuivre la projection Pause Freeze Quand vous enfoncez la touche Freeze de la télécommande la projection est arrêtée relancée A V Mute Quand vous enfoncez la touche A V Mute de la télécommande la projection et le son sont arrêtés relancés Si un logo utilisateur a été défini par l intermédiaire du menu Réglage du pro...

Page 92: ...à gauche est activé 2 Placez le curseur sur l icône Mod scénario et appuyez sur la touche Enter de la télécommande 3 L écran d édition ci après apparaît Indiquez l ordre des pages du fichier de scénario et précisez pour chaque page si elle doit être affichée ou cachée Pour modifier l ordre des images placez le curseur sur l image souhaitée et appuyez sur la touche Enter de la télécommande Amenez e...

Page 93: ...l icône Retour et appuyez sur la touche Enter de la télécommande Les modifications apportées au scénario sont enregistrées et la liste des fichiers apparaît Pour annuler les modifications apportées au scénario placez le curseur sur l icône Annuler et appuyez sur la touche Enter de la télécommande Note Si le curseur est placé sur l icône Exécuter et que la touche Enter de la télécommande est enfonc...

Page 94: ...G et BMP enregistrés pendant la création d un scénario Fichiers Bitmap BMP de résolution SXGA 1280 x 1024 ou moins Fichiers JPG de résolution SXGA 1280 x 1024 ou moins sauf certains formats JPG spéciaux Pour exécuter la fonction Capture sélectionnez Capture puis Capture d image dans le menu du projecteur Fichiers pouvant être projetés avec la fonction Aperçu Remarque Seuls les fichiers BMP couleur...

Page 95: ...e dans le projecteur 2 Placez le curseur sur le fichier d image à visualiser et appuyez sur la touche Enter de la télécommande Le contenu du fichier d image sélectionné est projeté Aperçu des fichiers d image Note Lorsque vous manipulez des fichiers de la carte mémoire depuis un ordinateur via une connexion USB l actualisation de l affichage se fait en appuyant sur la touche EasyMP Fichier image à...

Page 96: ...ge à visualiser et appuyez sur la touche Esc de la télécommande Lorsque vous sélectionnez le dossier le curseur se déplace sur le menu à gauche Note Pour visualiser le fichier d image vous pouvez placer le curseur sur le fichier souhaité et appuyer sur la touche Esc de la télécommande Vous pouvez aussi placer le curseur sur l icône Exécuter et appuyer sur la touche Enter de la télécommande Aperçu ...

Page 97: ...une appuyez sur la touche Esc de la télécommande placez le curseur sur l icône Exécuter et appuyez sur la touche Enter de la télécommande Une vue agrandie de la première image apparaît En mode aperçu agrandi il est possible de passer à l affichage du fichier d image suivant revenir au fichier d image précédent ou annuler l aperçu agrandi voir page 89 Remarque Si certains fichiers ne peuvent pas êt...

Page 98: ...nce de défilement des écrans l ordre de l affichage et la couleur de fond 1 Placez le curseur sur le fichier ou le dossier de scénario pour lequel vous souhaitez définir des conditions d affichage et appuyez sur la touche Esc de la télécommande Quand vous sélectionnez le fichier ou dossier de scénario le curseur se déplace sur le menu à gauche 2 Placez le curseur sur l icône Option et appuyez sur ...

Page 99: ... sont expliquées dans le tableau ci dessous Re exécuter Précise si oui ou non la projection du scénario ou l aperçu agrandi des fichiers d images d un dossier est exécuté de manière répétitive Si vous avez sélectionné un fichier de scénario seule cette option s affiche Fréquence de défilement Définit le temps écoulé avant de passer à l écran suivant Si la fréquence est Non spécifié appuyez sur la ...

Page 100: ......

Page 101: ...Français Paramétrage avancé Cette section explique comment raccorder le projecteur à un ordinateur à l aide d un câble USB Raccordement du projecteur à un ordinateur à l aide d un câble USB 100 ...

Page 102: ...utilisé Voir ci dessous Sous Windows 98 En vous reportant à la rubrique Raccordement du projecteur à l ordinateur et installation du pilote USB voir page 101 installez le pilote USB contenu dans le CD ROM EasyMP Software livré avec le projecteur Sous Windows Me Installez soit le pilote USB standard fourni avec le système d exploitation soit le pilote USB contenu dans le CD ROM EasyMP Software livr...

Page 103: ...sous tension mettez le sous tension et démarrez Windows L assistant Ajout de nouveau matériel démarre 4 Quittez l assistant Ajout de nouveau matériel en cliquant sur le bouton Annuler 5 Insérez le CD ROM EasyMP Software dans le lecteur CD ROM de l ordinateur Le programme d installation démarre 6 Cliquez sur le bouton Annuler pour quitter le programme d installation 7 Cliquez sur Démarrer puis séle...

Page 104: ...omme une des unités de l ordinateur et le PC peut alors y avoir accès 1 Démarrez EasyMP en appuyant sur la touche EasyMP de la télécommande La liste des fichiers EasyMP apparaît dans laquelle figure le contenu de la carte mémoire insérée dans le projecteur 2 Double cliquez sur Poste de travail sur le bureau La fenêtre Poste de travail apparaît 3 La carte mémoire apparaît sous la forme d un Disque ...

Page 105: ...Français Annexe Cette annexe décrit les problèmes qu il est possible de rencontrer lors de l utilisation du projecteur et les façons de les résoudre Types de problèmes rencontrés 104 Index 107 ...

Page 106: ...e mémoire dans l emplacement pour carte dans l unité principale du projecteur Le message Aucun fichier affichable apparaît Vérifiez que la carte mémoire ne contient pas de fichiers ne pouvant être affichés EasyMP peut afficher les fichiers de scénario sit les fichiers JPEG JPG et les fichiers bitmap BMP Il est impossible d utiliser d autres formats de fichier Les fichiers JPEG d extension JPEG son...

Page 107: ...EG de résolution dépassant SXGA 1280 x 1024 Il est impossible d afficher les fichiers JPEG ou bitmap dont les résolutions dépassent SXGA 1280 x 1024 Réglez la résolution en utilisant EMP SlideMaker ou un autre utilitaire Le message Couleurs de fichier image insuffisantes apparaît Vérifiez que le mode point spécifié est bien couleur 24 bits Les modes points 256 couleurs 16 couleurs etc autre que le...

Page 108: ...7 ou PowerPoint 2000 avant de les utiliser Impossible de coller des fichiers PowerPoint ppt dans un scénario ou d afficher des vues miniatures Il se peut que le convertisseur JPEG de MS Office ne soit pas installé Affichez l option Filtre graphique de Convertisseurs et filtres dans le programme d installation Office 97 sélectionnez tous les filtres ou le filtre JPEG puis installez le convertisseur...

Page 109: ...e des fichiers 70 Effet 80 82 EMP SlideMaker 75 Envoyer le scénario 84 Exécution automatique 71 ExécutionAuto 84 E Zoom 89 F Format mode couleur CMYK 74 Format progressif 74 Freeze 89 H Haute qualité 76 I Installation 68 J JPG 74 M Micro unité 64 P Paramètres de répétition 85 Pause 89 PowerPoint 74 Q Qualité de l image 76 R Rectangle 83 S Sans compression 76 Scénario 75 88 Smart Média 64 Spot 83 S...

Page 110: ......

Page 111: ...Deutsch EasyMP Benutzerhandbuch Deutsch ...

Page 112: ...ung wird der sichere Betrieb des Projektors erklärt und außerdem sind die weltweiten Garantiebedingungen und ein Fragebogen für die Fehlersuche vorhanden Vor der Inbetriebnahme des Projektors müssen Sie die Anleitung sorgfältig durchlesen EMP 715 505 Benutzerhandbuch Dieses Handbuch beschreibt dem Installationsverfahren und der grundlegenden Verwendung sowie der Anschlussmethode wenn der Projektor...

Page 113: ...gemeine Informationsymbole Hinweis Zeigt Einschränkungen oder andere zugehörigen wichtigen Informationen an Bitte gründlich durchlesen Memo Weist auf hilfreiche Informationen hin die der Anwender wissen sollte Tastename Weist auf einen Tastennamen hin der am Bedienfeld an der Fernbedienung oder am Bildschirm angezeigt wird Beispiel Enter Siehe Seite Weist auf eine Referenz hin wo man zugehörige In...

Page 114: ...s Ablaufs von EasyMP Funktionen z B beim Umschalten zwischen Bildern oder während die Betriebskontrollanzeige des Kartenschlitzes orange leuchtet den Stecker des Netzkabels herausziehen Der Projektor könnte sonst beschädigt werden oder möglicherweise nicht in der Lage sein auf den EasyMP Bildschirm umzuschalten Keinesfalls die Speicherkarte herausziehen während noch Daten auf sie geschrieben werde...

Page 115: ...yMP Software benutzt werden 118 Verwendbare Speicherkarten 118 Herausnehmen und Einschieben der Speicherkarte 119 Wie man die Speicherkarte herausnimmt 119 Wie man die Speicherkarte einschiebt 120 Wie man die CompactFlash Karte aus dem PC Kartenadapter herausnimmt 121 Wie man die CompactFlash Karte in den PC Kartenadapter hineinschiebt 121 Installieren Deinstallieren der EasyMP Software 122 Instal...

Page 116: ...142 Projizieren von Szenarien 142 Operationen während der Präsentation 143 Bearbeiten von Szenarien 144 Dateien anzeigen 146 Einstellen der Anzeigebedingungen 150 Fortgeschrittene Verwendung 153 Anschließen des Projektors mit einem USB Kabel an den Computer 154 Bedingungen von Computern die angeschlossen werden können 154 Anschließen des Projektors an den Computer und Installieren des USB Treibers...

Page 117: ...eines Szenarios Erstellte Szenarien werden auf der Speicherkarte gespeichert siehe Seite 138 Projizieren eines Szenarios Das auf die Speicherkarte übertragene Szenario lässt sich projizieren welches gestattet die Präsentation nur mit dem Projektor ohne dessen Anschließen an einen Computer vorzunehmen siehe Seite 142 Bearbeiten eines Szenarios Die Reihenfolge in der Szenarioseiten projiziert werden...

Page 118: ...116 Einleitung bezüglich Funktionen ...

Page 119: ...genden Operationen beschreibt dieser Abschnitt die für die Verwendung der Funktion EasyMP nötigen Vorbereitungen Arbeitsumgebung 118 Herausnehmen und Einschieben der Speicherkarte 119 Installieren Deinstallieren der EasyMP Software 122 Starten der EasyMP Software 124 ...

Page 120: ...artenschlitz des Projektors Wenn mehr Speicherkarten benötigt werden achten Sie darauf nur die folgenden ATA kompatiblen TYP II Speicherkarten zu verwenden CompactFlash Karte Ein PC Kartenadapter ist erforderlich ATA Flash Karte Memory Stick Ein PC Kartenadapter ist erforderlich SmartMedia Ein PC Kartenadapter ist erforderlich Microdrive Ein PC Kartenadapter ist erforderlich Betriebssystem Windows...

Page 121: ...uszunehmen bzw einzuschieben ist Bei Verwendung handelsüblicher Speicherkarten beziehen Sie sich bitte auf die mit der Speicherkarte gelieferte Gebrauchsanweisung Für Informationen wie die Speicherkarte in den PC Kartenschlitz des Computers einzuschieben bzw aus diesem herauszunehmen ist beziehen Sie sich bitte auf das mit dem Computer gelieferte Bedienungshandbuch Wie man die Speicherkarte heraus...

Page 122: ... sie sich nicht voll hineinschieben Versuchen Sie sie keinesfalls mit Gewalt hineinzuschieben Die Betriebskontrollanzeige des Projektorkartenschlitzes zeigt den aktuellen Status wie folgt Aus Off Kein Zugriff auf die Speicherkarte im Gange oder es wurde keine eingeschoben Leuchtet orange Zugriff im Gange Speicherkarte keinesfalls herausnehmen Leuchtet rot Eine nicht verwendbare Speicherkarte wurde...

Page 123: ...dem PC Kartenadapter herausnimmt Halten Sie die CompactFlash Karte wie unten gezeigt und ziehen Sie sie aus dem PC Kartenadapter heraus Wie man die CompactFlash Karte in den PC Kartenadapter hineinschiebt Mitnach oben zeigendem EPSON Logo ist die CompactFlash Karte in den PC Kartenadapter zu schieben Schieben Sie die Speicherkarte horizontal in den Kartenschlitz des Projektors wobei das EPSON Logo...

Page 124: ...mm startet automatisch 2 Wählen Sie die gewünschte Sprache und klicken Sie dann auf die OK Taste Die Installation beginnt Befolgen Sie die auf dem Bildschirm erscheinenden Anweisungen Hinweis Wenn das SETUP Programm nicht startet klicken Sie auf Start und wählen Sie dann Ausführen um das Diaglogfeld Ausführen zu öffnen Geben Sie im Kasten Öffnen die Speicherstelle der EasyMP Software CD ROM ein Ge...

Page 125: ...inzufügen Entfernen zu wählen Wählen Sie anschließend EMP SlideMaker und klicken Sie auf die Taste Hinzufügen Entfernen Hinweis Selbst nach dem Deinstallieren von EMP SlideMaker ist der EMP SlideMaker Ordner nicht gelöscht Überprüfen Sie dass der EMP SlideMaker Ordner keine erforderlichen Szenario Dateien enthält Löschen Sie ihn anschließend wenn er nicht benötigt wird ...

Page 126: ...er Dateilisten Bildschirm von EasyMP Wurde der Projektor mittels Anschluss an einen Computer oder ein Videogerät verwendet ist EasyMP gemäß folgender Vorgehensweise zu starten Starten von EasyMP Wird die EasyMP Taste der Fernbedienung bei eingeschaltetem Projektor gedrückt startet EasyMP und der Dateilisten Bildschirm vonEasyMP erscheint EasyMP Dateilisten Bildschirm ...

Page 127: ...tion EasyMP in Gebrauch ist zweimal zu drücken Der Strom zum Projektor wird dann abgeschaltet Hinweis Wenn die Speicherkarte nicht eingeschoben worden ist erscheint die Meldung Keine Speicherkarte und die Funktion von EasyMP läßt sich nicht verwenden Speichert man ein Szenario mit einer AutoRun Einstellung automatische Ausführung einer Einstellung auf einer Speicherkarte startet die Projektion des...

Page 128: ......

Page 129: ...beschreibt die Vorgänge für das Erstellen von Szenarien und deren Übertragen auf den Personalcomputer so dass sie sich für Präsentationen benutzen lassen Dateien die sich mit einer Szenario Datei verbinden lassen 128 Erstellen von Szenarien EMP SlideMaker 129 ...

Page 130: ...tar Microsoft PowerPoint ppt PowerPoint 97 SR 2 oder später 2000 Bild bmp dib BMP DIB jpg Jede Version ist verwendbar Doch können Dateien im Format CMYK Farbmodus oder des fortschreitenden Formats nicht projiziert werden Hinweis Alle im Menü Dia Schau von PowerPoint eingestellten Effekte werden ungültig Doch lassen sich dieselben Einstellungen für Dia Übergang und Dia Ausblenden ausführen wenn Sze...

Page 131: ...folgende Punkte zu beachten Erstellen Sie zuerst die Quelldateien z B die PowerPoint Daten und die Bilddateien die zum Szenario kombiniert werden Andere Dateien als jene die unter Dateien die sich mit einer zu einer Szenario Datei verbinden lassen auf der vorherigen Seite aufgeführt sind können nicht verwendet werden Beachten Sie bitte dass die mit EMP SlideMaker erstellten Szenarien nicht mit Sze...

Page 132: ... die Bildqualität aus die während der Konvertierung in Bilddateien zu verwenden ist Wenn man Nicht Komprimiert wählt wird das Bild in jeder Zelle als eine Bilddatei im BMP Format gespeichert Bilder in BMP Format lassen sich mit hoher Qualität projizieren doch wird die Dateigröße groß sein da sie nicht komprimiert sind Außerdem dauert es im Vergleich zur Standard Bildqualität länger sie zu projizie...

Page 133: ... Seiten der PowerPoint Datei werden im Miniaturansichtsfenster angezeigt Doppelklicken Sie die Miniaturansicht der gewünschten Seite Die gewählte Seite wird im Szenariofenster angezeigt Doppelklicken Sie das gewünschte PowerPoint Dateisymbol im Dateifenster um alle Seiten einer einzelnen PowerPoint Datei für ein Szenario zu verwenden Memo Jede Einstellung lässt sich ändern indem man zuerst das Dat...

Page 134: ...e auf Gelb geändert hat ist die hinzuzufügende Datei oder Seite mit Doppelklick anzuklicken Eine Datei oder Seite ist durch Rechtsklicken der betreffende Zelle löschen Wählen Sie Ausschneiden im erscheinenden Menü Schnellmenü Um die Reihenfolge zu ändern ist die Zelle innerhalb des Szenariofensters durch Ziehen und Auslösen zu verschieben Oder Sie können das Schnellmenü aufrufen Ausschneiden wähle...

Page 135: ...gezeigt lässt sich aber mit Zelleneigenschaften im Schnellmenü ändern 7 Zur Änderung der Projektionszeit für eine Szenarioseite oder um Anzeigeeffekte hinzuzufügen ist die gewünschte Zelle mit der rechten Maustaste anzuklicken und Zelleneigenschaften zu wählen Um diesselbe Einstellung auf mehrfache Zellen anzuwenden ist jede Zelle bei gedrückter Umschalt oder Strg Taste der Tastatur zu wählen und ...

Page 136: ...st sich ebenso ausführen indem man Aktivieren Nicht aktiv im Menü wählt das nach Rechtsklicken der Zelle erscheint Effekt Effekte lassen sich beim Umschalten zwischen Bildschirmen während der Projektion auf dieselbe Weise anwenden wie sie mit dem Dia Übergangseffekt von PowerPoint ausgeführt werden Folgende sind einige Beispiele von Effekten Anzeigeeffekte können für mehrfache Zellen gleichzeitig ...

Page 137: ...ellt Es werden keine Szenarien aus irgendeiner der anderen Dateien erstellt Nach dem ein vereinfachtes Szenario erstellt worden ist wird das Szenario aus allen Seiten in der festgelegten PowerPoint Datei erstellt Blenden Sie Seiten die Sie nicht projizieren möchten mit Hilfe von Zelleneingenschaften nach dem Erstellen des vereinfachten Szenarios aus Memo Das erstellte Szenario wird SCNxxxx genannt...

Page 138: ...mbild jedoch eingestellt während das Szenario erstellt wird so stehen die Effekte während der Szenarioprojektion zur Verfügung 1 Rechtsklicken Sie die Zelle für die Sie Effekte einstellen möchten und wählen Sie dann Effekt 2 Das Dialogfeld Effekt erscheint Dieselben Einstellungen sind verfügbar wenn man Effekt im Menü für die Haupteinheit des Projektors wählt Geben Sie die gewünschten Einstellunge...

Page 139: ...m4 Form5 Form6 Form7 Form8 Rechteck Legen Sie die Kantenform und Farbe des angezeigten Rechtecks fest wenn man die Taste 2 an der Fernbedienung drückt während die Projektion eines Szenarios läuft Spotlight Legen Sie die Größe des Spotlights fest wenn man die Taste 3 an der Fernbedienung drückt während die Projektion eines Szenarios läuft Bei Verwendung eines Spotlights ist nur ein Teil des Bilds e...

Page 140: ...e Speicherkarte in den Kartenadapter gesteckt und dieser in den Computer eingeschoben 2 Wählen Sie Szenariooption und dann Szenario senden 3 Ein Dialogfeld zur Angabe des Ziellaufwerks erscheint Wählen Sie das Laufwerk in das die Speicherkarte eingeschoben ist und klicken Sie dann auf die Taste OK Hinweis Das Senden erstellter Szenarien ist nicht möglich wenn sie nicht mit der Funktion Speichern o...

Page 141: ...ndern Sie die Einstellungen und klicken Sie dann auf die Taste OK Alle auf der Speicherkarte gespeicherten Dateien werden in der Szenario Dateiliste auf der linken Seite angezeigt Um ein Szenario beim Starten der Funktion EasyMP automatisch zu projizieren ist AutoRun durch Wählen des gewünschten Szenarios aus der Szenario Dateiliste einzustellen Klicken Sie dann auf die Taste Das Szenario für das ...

Page 142: ...Seite 142 Memo Die AutoRun Einstellungen können außerdem durch Wählen von Szenariooption und dann AutoRun ändern festgelegt werden bevor man ein Szenario sendet Hinweis Die AutoRun Einstellungen lassen sich nicht mit dem Projektor festlegen Wenn zwei oder mehr Dateien für AutoRun eingestellt worden sind werden sie in der Reihenfolge projiziert in der sie in der Szenario Dateiliste von AutoRun regi...

Page 143: ...Deutsch Präsentationen halten Dieser Abschnitt erläutert wie auf Speicherkarten im Projektor übertragene Szenarien und Dateien zu projizieren sind Projizieren von Szenarien und Dateien EasyMP 142 ...

Page 144: ... Fernbedienung Die Dateiliste EasyMP wird projiziert und zeigt den Inhalt der in den Projektor eingeschobenen Speicherkarte 2 Durch Kippen der Taste Enter an der Fernbedienung ist der Cursor zu bewegen um ihn auf die zu projizierende Szenariodatei zu positionieren Danach ist die Taste Enter zu drücken Die gewählte Datei wird projiziert Nach dem alle Bilder im Szenario projiziert worden sind kehrt ...

Page 145: ...mit der Projektion fortzufahren Unterbrechung Fixieren Bei jedem Drücken der Taste Freeze an der Fernbedienung wird zwischen Unterbrechung Wiederanlauf der Projektion geschaltet A V Mute Mit jeder Betätigung der Taste A V Mute an der Fernbedienung ist es möglich zwischen Stoppen Wiederanlauf der Projektion einschließlich Ton zu schalten Wurde ein Anwenderlogo durch das Menü Einstellung der Hauptei...

Page 146: ...iviert 2 Positionieren Sie den Cursor auf das Symbol Szen bearb und drücken Sie dann die Taste Enter an der Fernbedienung 3 Der folgende Bearbeitungsbildschirm erscheint Geben Sie die Reihenfolge der Seiten in der Szenariodatei an und ob die Seite anzuzeigen oder auszublenden ist Um die Reihenfolge von Bildern zu ändern ist der Cursor auf das gewünschte Bildschirmbild zu positionieren und das die ...

Page 147: ...or auf das Symbol Zurück zu positionieren und dann die Taste Enter an der Fernbedienung zu drücken Das Szenario wird mit den Änderungen gespeichert und die Dateiliste angezeigt Um die Änderungen des Szenarios zu stornieren ist der Cursor auf das Symbol Abbrechen zu positionieren und dann die Taste Enter an der Fernbedienung zu drücken Memo Wenn der Cursor auf dem Symbol Ausführen positioniert ist ...

Page 148: ... Erfassung gespeicherte JPG Dateien Während der Erstellung eines Szenarios gespeicherte JPG und BMP Dateien Bitmap BMP Dateien von SXGA 1280 x 1024 oder weniger JPG Dateien von SXGA 1280 x 1024 oder weniger ausgenommen gewisse spezielle JPG Formate Die Funktion Erfassung lässt sich durch Wählen von Bild danach Bild im Menü des Projektors ausführen Dateien die sich mit der Funktion Vorschau projizi...

Page 149: ...benen Speicherkarte 2 Positionieren Sie den Cursor auf die Bilddatei die zur Vorschau ansteht und drücken sie dann die Taste Enter an der Fernbedienung Die Inhalte der ausgewählten Bilddatei werden projiziert Vorschau auf Bilddateien Memo Beim Manipulieren von Dateien auf der Speicherkarte über einen USB Anschluss wird die Anzeige durch Drücken der Taste EasyMP auf die neuesten Inhalte aktualisier...

Page 150: ...d drücken Sie dann die Taste Esc an der Fernbedienung Während der Wahl des Ordners bewegt sich der Cursor auf das linksseitige Menü Memo Positionieren Sie den Cursor auf die gewünschte Datei und drücken Sie dann die Taste Esc an der Fernbedienung um die Bilddatei im Vorschaumodus zu betrachten Oder aber Sie positionieren den Cursor auf das Symbol Ausführen und drücken die Taste Enter an der Fernbe...

Page 151: ...ößert ist die Taste Esc an der Fernbedienung zu drücken der Cursor auf das Symbol Ausführen zu positionieren und dann die Taste Enter an der Fernbedienung zu drücken Es erscheint eine vergrößerte Ansicht des ersten Bilds Im vergrößerten Vorschaumodus können Sie die nächste Bilddatei zeigen auf die vorhergehende Bilddatei zurückspringen oder den vergrößerten Vorschaumodus abbrechen siehe Seite 143 ...

Page 152: ...und Hintergrundfarbe ein 1 Positionieren Sie den Cursor auf die Szenariodatei oder den Ordner für die bzw den die Anzeigebedingungen eingestellt werden soll und drücken Sie dann auf die Taste Esc an der Fernbedienung Während der Wahl der Szenariodatei bzw des Ordners bewegt sich der Cursor auf das linksseitige Menü 2 Positionieren Sie den Cursor auf das Symbol Option und drücken Sie dann auf die T...

Page 153: ...orschaumodus betrachten Die Einzelheiten jeder Anzeigebedingung sind nachstehend aufgeführt Neu ausführ Stellt ein ob Szenarioprojektion und vergrößerte Vorschau von Bilddateien in einem Ordner wiederholt ausgeführt werden soll oder nicht Bei Wahl einer Szenariodatei wird nur dieser Punkt angezeigt Bildschirmumschaltzeit Stellt die Zeit für die umschaltung zum nächsten Bildschirm ein Falls Nicht f...

Page 154: ......

Page 155: ...Deutsch Fortgeschrittene Verwendung Dieser Abschnitt erläutert wie der Projektor mit einem USB Kabel an den Computer anzuschließen ist Anschließen des Projektors mit einem USB Kabel an den Computer 154 ...

Page 156: ...ezugnahme auf Anschließen des Projektors an den Computer und Installieren des USB Treibers siehe Seite 155 ist der USB Treiber zu installieren der sich auf der EasyMP Software CD ROM befindet die mit dem Projektor mitgeliefert wurde Bei Verwendung von Me Installieren Sie entweder den standardmäßigen mit dem Betriebssystem gelieferten USB Treiber oder den USB Treiber der sich auf der EasyMP Softwar...

Page 157: ...sem Fall ist mit Schritt 4 fortzufahren 2 Falls der Projektor noch nicht eingeschaltet worden ist jetzt einschalten 3 Falls der Computer noch nicht eingeschaltet worden ist jetzt einschalten und Windows starten Der Assistent Wizard Neue Hardware hinzufügen startet 4 Beenden Sie den Assistent Wizard Neue Hardware hinzufügen durch Anklicken der Taste Abbrechen 5 Schieben Sie die EasyMP Software CD R...

Page 158: ...sen und der erforderliche USB Treiber laut den oben beschriebenen Schritten installiert worden ist wird die in den Projektor eingeschobene Speicherkarte als eines der Computerlaufwerke angezeigt und Zugriff ist dann vom Personalcomputer aus möglich 1 Starten Sie die Funktion EasyMP durch Drücken der Taste EasyMP an der Fernbedienung Die Dateiliste EasyMP wird projiziert und zeigt die Inhalte der i...

Page 159: ...abel an den Computer 157 Deutsch 3 Die Speicherkarte erscheint als eine Wechseldatentäger Dateimanipulationen wie beispielsweise Kopieren und Verschieben lassen sich auf die selbe Weise wie bei normalen Dateimanipulationen in Windows ausführen ...

Page 160: ......

Page 161: ...Deutsch Anhang Dieser Anhang beschreibt potentielle beim Betrieb des Projektors auftretende Probleme zusammen mit Maßnahmen zu deren Behebung Wenn ein Problem auftritt 160 Index 163 ...

Page 162: ...eine Speicherkarte in den Kartenschlitz in der Haupteinheit des Projektors Keine Dateien zum Anzeigen vorhanden wird angezeigt Überprüfen Sie ob nicht anzeigbare Dateien auf der Speicherkarte gespeichert sind oder nicht Mit EasyMP anzeigbare Dateien schließen Szenariodateien sit JPEG Dateien JPG und Bitmap Dateien BMP ein Sonstige Dateiformate sind nicht verwendbar JPEG Dateien mit der Dateierweit...

Page 163: ...t ist die SXGA 1280 x 1024 überschreitet JPEG oder Bitmap Dateien mit Auflösungen die SXGA 1280 x 1024 überschreiten können nicht angezeigt werden Stellen Sie die Auflösung mit EMP SlideMaker oder einem anderen Programm Nicht genügend Bilddateifarben wird angezeigt Überprüfen Sie ob eine andere Bitmap als eine von 24 Bit Farben festgelegt ist Bitmaps 256 Farben 16 Farben etc anderer als 24 Bit Far...

Page 164: ...ppt lassen sich nicht in ein Szenario einfügen bzw Miniaturansichten können nicht angezeigt werden Das JPEG Konvertierungsprogramm bzw der JPEG Umsetzer von MS Office ist möglicherweise nicht installiert worden Rufen Sie die Option Graphikfilter von Umsetzer und Filter ab dem Office 97 Installationsprogramm auf wählen Sie Alles oder wählen Sie den JPEG Filter und installieren Sie dann das JPEG Kon...

Page 165: ...DIB 128 E Effekt 134 136 EMP SlideMaker 129 E Zoom 143 F Format CMYK Farbmodus 128 Fortschreitendes Format 128 Freeze 143 H Hohe Qualität 130 I Installation 122 J JPG 128 K Konvertieren 137 M Memory Stick 118 Microdrive 118 Miniaturansicht 131 N Nicht Komprimiert 130 P PC Kartenadapter 118 121 PowerPoint 128 R Rechteck 137 S SmartMedia 118 Speicherkarte 118 Spotlight 137 Standard 130 Szenario 129 ...

Page 166: ...164 Index W Wiederholungseinstellungen 139 Z Zelle 132 Zoomen des Bilds 143 ...

Page 167: ...accident misuse or abuse of this product or unauthorized modifications repairs or alterations to this product or excluding the U S failure to strictly comply with SEIKO EPSON CORPORATION s operating and maintenance instructions SEIKO EPSON CORPORATION shall not be liable against any damages or problems arising from the use of any options or any consumable products other than those designated as Or...

Page 168: ...User s Guide ...

Reviews: