


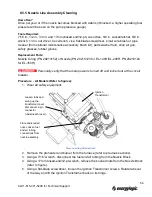


Compressor Vanes
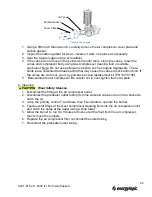
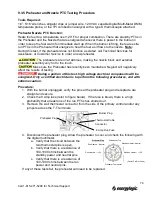
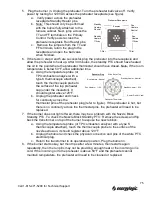
1. Using a 9/64 inch Allen wrench, carefully remove the air compressor cover plate and
carbon gasket.
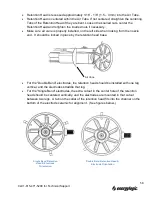
2. Inspect the carbon gasket for wear—reverse if worn or replace as necessary.
3. Spin the squirrel cage using a screwdriver.
4. If the vanes do not move in their slots as the rotor turns, clean the vanes. Clean the
vanes and compressor body using Gast compressor cleaning fluid or suitable
equivalent. Note: Do not use petroleum solvents, such as engine degreasers. These
fluids leave unwanted residues behind that may cause the vanes to stick and/or bind. If
the vanes are worn out, you may purchase a vane replacement kit (PN 10013106).
5. Reassemble the air compressor. Be careful not to over-tighten the cover plate.
C. Cleaning
Wear Safety Glasses.
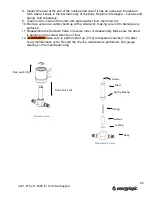
1. Disconnect the fitting at the air compressor outlet.
2. Disconnect the preheater outlet tubing from the solenoid valve and run into a bucket to
catch the oil.
3. Jump the primary control T-terminals, then F-terminals to operate the burner.
4. Feed several drops of the Gast compressor cleaning fluid into the air compressor inlet
and catch the spray at the outlet using a shop towel.
5. Allow the burner to run 3-4 minutes to flush out all the fluid from the air compressor,
then remove the jumpers.
6. Replace the air compressor filter, reconnect the outlet tubing.
7. Reconnect the preheater outlet tubing.
Cover Plate
Carbon Gasket
(4) Vanes
62
Call 1-615-471-5290 for Technical Support
Summary of Contents for EL-140H
Page 2: ......
Page 51: ...45 Call 1 615 471 5290 for Technical Support ...
Page 90: ...10 2 Carlin 50200E Primary Control 84 Call 1 615 471 5290 for Technical Support ...
Page 91: ...85 Call 1 615 471 5290 for Technical Support ...
Page 93: ...87 Call 1 615 471 5290 for Technical Support ...
Page 94: ...88 Call 1 615 471 5290 for Technical Support ...
Page 95: ...89 Call 1 615 471 5290 for Technical Support ...