


possible (refer to figure).
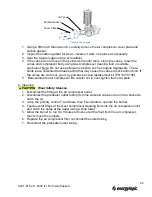
Beware of falling parts that may create a crush
hazard.
7. Tape the opening of a trash bag to the Drip Leg with duct tape, so ash will fall into the
trash bag.
8. Accessing the interior of the heat exchanger through the burner opening, use the
furnace cleaning tool or brush to push the ash to the opposite end of the exchanger, out
the clean out port, and into the trash bag. A shop vacuum may also be used to remove
ash.
9. Gently tap the flue pipe and allow ash to fall into the trash bag.
10. Remove the trash bag and insert the chimney brush into the flue.
11. Reattach the trash bag, then reach through the bag, grab the brush and clean the ash
from the flue pipe by running it through the flue pipe. Clean all flue pipe from other
access points if extension rods do not reach from the bottom of the furnace.
12. Remove the trash bag/brush and properly dispose of the ash.
13. Inspect the cleaned heat exchanger and flue. If damaged, replace damaged parts.
14. Inspect the Drip Cap gasket. If damaged, replace the gasket (PN 20933118).
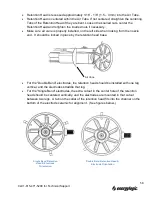
15. Reattach the Drip Cap. Make sure that the baffle is facing the burner (refer to figure).
Use existing screw holes and replace screws.
16. Inspect Burner Gasket. If damaged, replace the gasket (PN 20910103).
17. Swing the burner over the four studs to close and reinstall the nuts.
18. Reinstall the fuel tubing on the preheater and open the hand valve.
19.
Make sure to perform start up (7.4.2) and system checks (7.4.3) after
every maintenance cycle. Record the checks, maintenance performed, and gauge
readings in the maintenance log.
Procedure for Heat Exchanger Cleaning, EL-350H:
1.
If furnace is hot, allow it to cool before cleaning. Wear all safety
equipment.
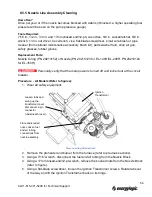
2. Unplug the burner at the cabinet wiring box.
3. Close the hand valve on the bottom of the preheater.
4. Disconnect the 3/8 in. copper fuel tubing at the bottom of the preheater.
5. Remove the four burner mounting nuts and swing burner open.
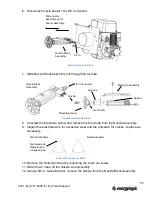
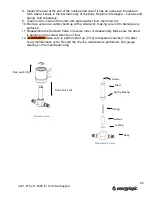
6. Remove the two screws from the Drip Cap (located on the bottom of the unit away from
the burner) and slowly lower the cap off of the clean out port, keeping as much ash in
the cap as possible.
7. Tape the opening of a trash bag to the clean out port, so ash will fall into the trash bag.
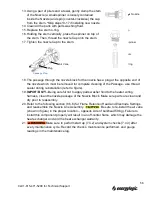
8. Accessing the interior of the heat exchanger through the burner opening, use the
furnace cleaning tool (optional accessory – part # 04000223) or brush to push the ash
to the opposite end of the exchanger into the trash bag. A shop vacuum may also be
47
Call 1-615-471-5290 for Technical Support
Summary of Contents for EL-140H
Page 2: ......
Page 51: ...45 Call 1 615 471 5290 for Technical Support ...
Page 90: ...10 2 Carlin 50200E Primary Control 84 Call 1 615 471 5290 for Technical Support ...
Page 91: ...85 Call 1 615 471 5290 for Technical Support ...
Page 93: ...87 Call 1 615 471 5290 for Technical Support ...
Page 94: ...88 Call 1 615 471 5290 for Technical Support ...
Page 95: ...89 Call 1 615 471 5290 for Technical Support ...