


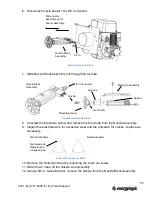
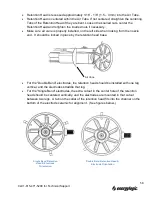


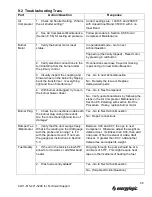
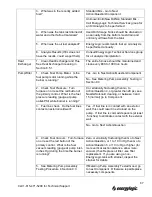
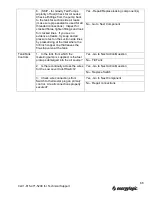

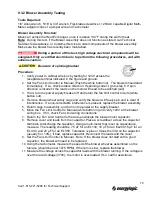

8. Inspect the seal at the end of the nucleus and note if it has an excessive impression
from where it seals in the internal cavity of the body. Replace if damaged – nucleus and
spring, sold separately.
9. Clean out the inside of the stem with parts washer fluid, then blow dry.
10. Remove excessive carbon build up with a small pick, making sure not to damage any
surfaces.
11.
Reassemble the Solenoid Valve in reverse order of disassembly. Make sure the arrow
is pointing in the correct direction of flow.
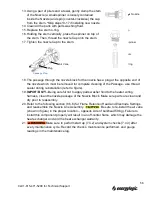
12.
Make sure to perform start up (7.4.2) and system checks (7.4.3) after
every maintenance cycle. Record the checks, maintenance performed, and gauge
readings in the maintenance log
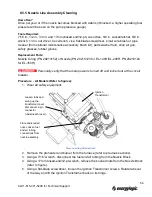
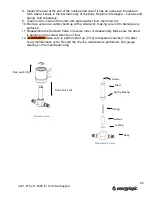
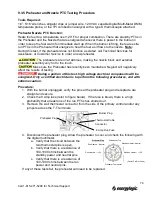
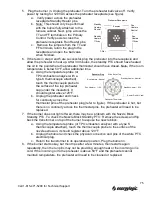
Remove E-Clip
Slide Valve out
Body
O-Ring
Nucleus
Spring
Spring Washer
Stem
Rotate
Remove Valve.
Disassemble Valve
60
Call 1-615-471-5290 for Technical Support
Summary of Contents for EL-140H
Page 2: ......
Page 51: ...45 Call 1 615 471 5290 for Technical Support ...
Page 90: ...10 2 Carlin 50200E Primary Control 84 Call 1 615 471 5290 for Technical Support ...
Page 91: ...85 Call 1 615 471 5290 for Technical Support ...
Page 93: ...87 Call 1 615 471 5290 for Technical Support ...
Page 94: ...88 Call 1 615 471 5290 for Technical Support ...
Page 95: ...89 Call 1 615 471 5290 for Technical Support ...