


H1_Construct multi-dispense working point
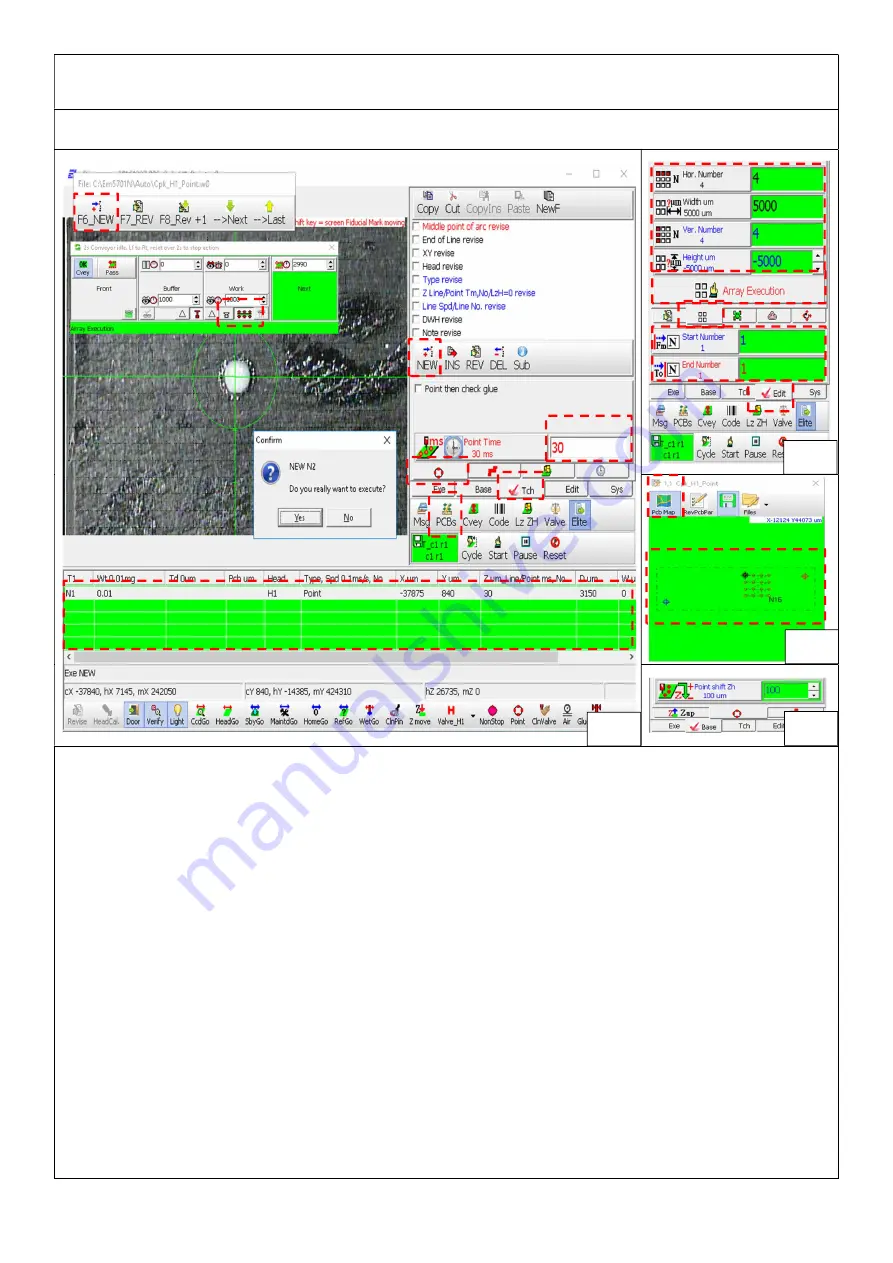
Step 3: Construct dispense point and array expand dispense working point
1.
Conveyor belt empty clamp, Pic. 1
2.
Working point column, Pic. 1
3.
Select teach, Pic. 1
4.
Select dispense, Pic. 1
5.
Input single dispense, stop seconds(initial 30ms start testing glue), Pic. 1
6.
CCD move to dispense platform’s left up position, press F6 on keyboard or click new interface. Construct glue working
point, Pic. 1
7.
Select edit,. Pic. 2
8.
Select array, Pic. 2
9.
Input amount and distance, according to first dimension as pvalue(can use this parameter), Pic. 2
10.
Input starting point N1 working point, N1 end working point, Pic. 2
11.
Expand array function button, Pic. 2
12.
Select connecting PCBs, Pic. 3
13.
Switch working diagram, Pic. 3
14.
Blue dot is base B0, Red dot is B1, Black dot is current CCD position, Red dot is dispense workign point, Pic. 3
15.
Select base, set dispense height(height will impact dispense residue amount), Pic. 4
2
3
4
5
5
6
7
8
9
11
10
Pic.2
Pic.3
Pic.4
Pic.1
1
12
13
14
Summary of Contents for 5701N
Page 3: ...Pic 1 3 ...
Page 6: ...Pic 1 3 ...
Page 11: ...Pic 1 ...
Page 13: ...Pic 1 3 ...
Page 16: ...12 Red disk will show click left key of mouse to save system file ...
Page 18: ...Pic 1 ...
Page 20: ......
Page 24: ...3 Check if valve is clogged 4 Check if needle is clogged ...
Page 43: ...Plastic Needle head specifications When to use Choose needle size according to glue amount ...


