Eizo DuraVision FDF2711W-IP Installation Manual Download Page 55

55

Chapter 4 Management of Network Cameras

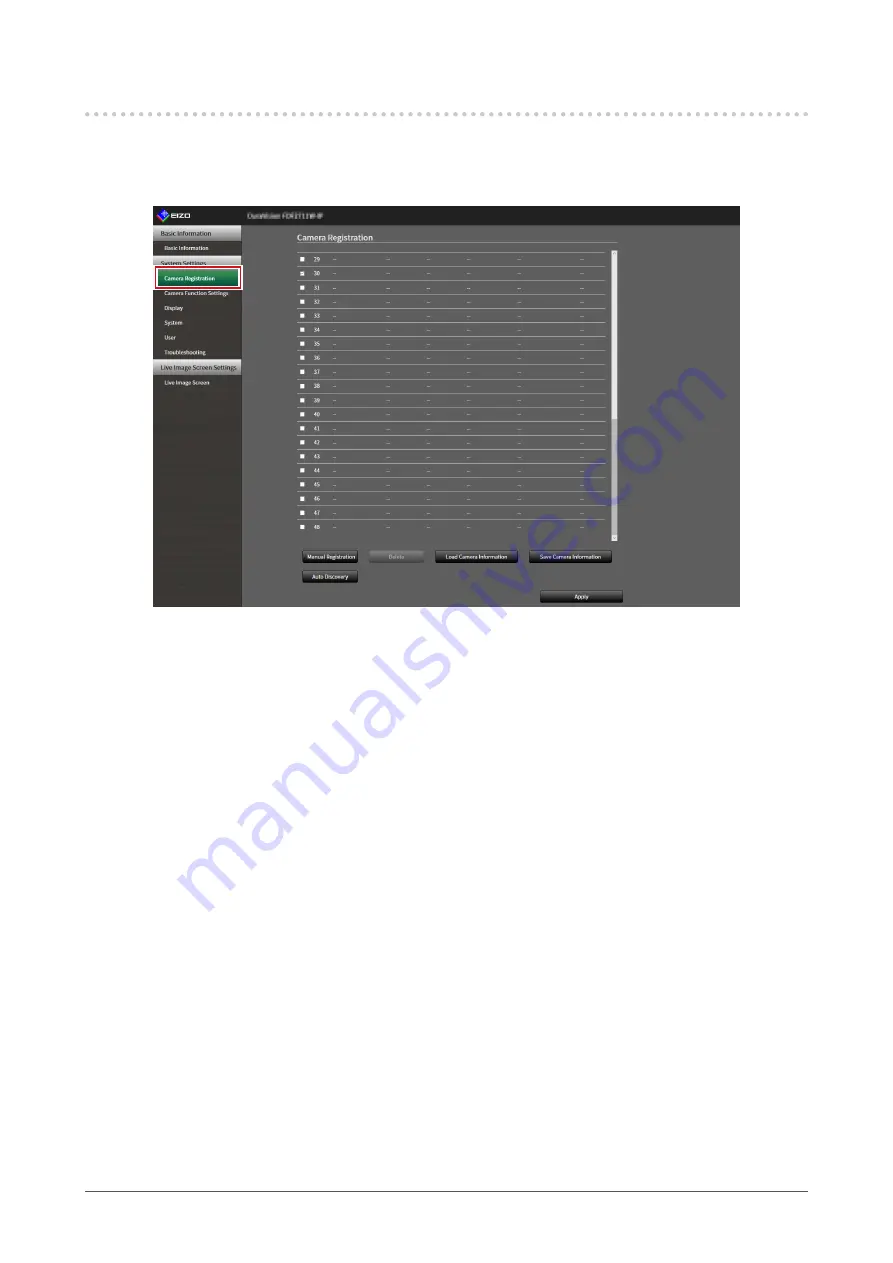
4-2.  Registering a Network Camera Manually

1. 

Select “

Camera Registration”.

A screen is displayed to show a list of camera registration information.

2. 

Select a position where the camera is to be registered.

Place a check mark on the check box of the position number where the camera is to be registered.

3. 

Select “

Manual Registration” in the lower part of the screen.

The “Camera Information Settings” dialog box is displayed.

Summary of Contents for DuraVision FDF2711W-IP

Page 1: ...Manual and Setup Manual carefully to familiarize yourself with safe and effective usage For the latest product information including the Installation Manual refer to our web site www eizoglobal com C...

Page 2: ...lobal com Installation of Adobe Acrobat Reader is required This product has been adjusted specifically for use in the region to which it was originally shipped If operated outside this region the prod...

Page 3: ...0 3 21 Performing Camera Connection Confirmation 51 3 22 Confirming Network Connection Status 52 Chapter 4 Management of Network Cameras 53 4 1 Registering a Network Camera Using Auto Discovery 53 4 2...

Page 4: ...of 48 network cameras can be registered Allows a free layout of video images 1 Screen 3 Screens 4 Screens 9 Screens 16 Screens 32 Screens 8 Screens and Custom Screen from multiple network cameras Supp...

Page 5: ...d frame alert message on the live image screen within a few seconds when communication with network cameras is lost Lock function Disables USB devices front key operation and remote control operation...

Page 6: ...splay video on the monitor and operate cameras Network camera 1 Network hub Product main unit PC 2 Network cable Network cable Network cable Network cable 1 Up to 48 network cameras can be registered...

Page 7: ...k the software version of the monitor you are using then check our website www eizoglobal com for details on supported network cameras For information on how to check the software version refer to 2 2...

Page 8: ...ed that you log out after completing the setup so as to prevent a third party from operating the network camera or altering the settings When the Auto Login settings are configured it is possible to l...

Page 9: ...nd Password Note When the Account Type is set to LDAP you can temporarily change the account type when logging in by checking Allow choosing of account type on the login dialog under LDAP in advance 4...

Page 10: ...ng from a web browser Attention Web browser Microsoft Edge 79 or later is recommended When configuring from the web browser the power supply must be connected to this product 1 Start the web browser o...

Page 11: ...rmation Displays the current status Model Name S N Software Version Edition Extensions Resolution Display mode MAC Address Communication Speed Security Level Enterprise Edition only System Status Came...

Page 12: ...s changing the live image screen layout are performed Logout Logout from the system Attention The Logout button is displayed only when displayed on the Web browser When displaying on the application s...

Page 13: ...d with either method 3 1 Performing Network Settings Perform network settings such as IP address DNS and NTP Attention When any one of the IP address settings IP address subnet mask gateway is changed...

Page 14: ...address is 192 168 0 150 2 If the environment does not include a gateway it is not necessary to set Gateway Leave either as default setting or blank DNS Settings Item Detail Setting range DNS Only wh...

Page 15: ...r message is displayed On Off Web Interface Enables operation and setting of the product over the network from a web browser On Off 1 Protocol Select protocol for communication with the web server 2 H...

Page 16: ...e setting complete screen is displayed 4 Select OK Attention When Web Interface is set to Off the settings cannot be configured from the web browser When Web Interface is set to Off and Apply is selec...

Page 17: ...set the account setting using the Reset button 1 Select Date and Time of System The Date and Time screen is displayed 2 Set the current date and time Date Time Display Settings Item Detail Setting ran...

Page 18: ...nize with PC is selected for Procedure the current date and time information of the computer is transmitted to this product If the system is not connected to the power supply for one week or longer th...

Page 19: ...or the system output video when Orientation is Portrait Note You cannot set Rotate as Primary Left Right Key Lock Locks operations by the buttons on the front of this product On Off USB Lock 1 2 Locks...

Page 20: ...n logs the current time time zone settings license activation information and the software version 1 Select Maintenance of System The Maintenance screen is displayed 2 Select Start under Factory Reset...

Page 21: ...3 System Settings 3 6 Restarting the System 1 Select Maintenance of System The Maintenance screen is displayed 2 Select Start under Restart A confirmation message is displayed 3 Select OK The system w...

Page 22: ...n using the web browser 1 Select Maintenance of System The Maintenance screen is displayed 2 Select the upgrade file Select Browse under Software Update and set the file Attention The software will no...

Page 23: ...er 3 System Settings 4 Select OK A Software is being updated message is displayed 5 Select OK Note It takes approximately five minutes to update the software The red LED blinks while the software is u...

Page 24: ...een is displayed 2 Select Save Settings Data under Settings Data Migration The Save Settings Data dialog box is displayed 3 Specify the Password 4 Select Execute 5 Specify the saving destination The s...

Page 25: ...s function can be used only when using the web browser Does not load settings that use server certificates and client certificates 1 Select Maintenance under System The Maintenance screen is displayed...

Page 26: ...e check box Attention Camera Registration Display includes camera settings registered in failover 6 Select Execute When loading is completed a message is displayed 7 Select OK Attention If the environ...

Page 27: ...tion This function can be used only when using the web browser 1 Select Maintenance of System The Maintenance screen is displayed 2 Click Activate for License Activation and select the license file Wh...

Page 28: ...ed when Alert request received Timer expired and Video output status change events occur Note A total of 16 individual Event Rules can be set 1 Select Event Rules of System The Event Rules screen is d...

Page 29: ...s triggers Setting Range of Event Event Conditions Situation Alert request received 3 Received HTTP alert command Timer expired Timer set in Action has expired Video output status change The HDMI conn...

Page 30: ...aracters Execute Performs a confirmation test in order to access the specified URL Selecting Start a timer as an Action Item Detail Setting range Timer No Select the number of the timer 1 to 8 Duratio...

Page 31: ...ing Request CSR cannot be created with this product CA Signed Certificate registration is only possible via web browser Select Type and the select Apply Self Signed Certificate Press the Generate butt...

Page 32: ...lowing situations Connecting HTTP to network cameras Connecting LDAPS to LDAP servers IEEE802 1X activation Attention Root Certificate registration is only possible via web browser A Root Certificate...

Page 33: ...ID is 0 it will operate even if the product ID and remote control ID does not match The factory value of the remote control is 0 Setting the product ID 1 Select Remote Controller of System The Remote...

Page 34: ...ter the ID 0 to 99 you want to set with the number buttons Note If the ID you want to set is a single digit number enter 0 before it Ex To set 3 enter 03 3 Release Note When confirming the ID of the r...

Page 35: ...ve image screen using the buttons on the USB device excl mouse keyboard Hinweis Supported USB devices are shown below AXIS T8311 Joystick 1 In System select Hotkeys The Hotkeys screen is displayed 2 S...

Page 36: ...e displayed on the live image screen to the next page Page Down Switches the camera images to be displayed on the live image screen to the previous page Preset 1 1 Changes the layout of the live image...

Page 37: ...n This function is only available in the Enterprise edition For more information regarding software editions see 3 10 Performing License Activation page 27 This product operates using EAPOL version 2...

Page 38: ...n Root Certificate of Certificate of this product Off On Identity Enter a username Alphanumerics and symbols Up to 32 characters Selecting EAP TLS in Authentication Select Register in Client Certifica...

Page 39: ...mmunity Enter the read community Alphanumerics and symbols Up to 32 characters Trap Address Enter the SNMP trap notification address of the Event Rule 0 0 0 1 to 255 255 255 254 Trap Community Enter t...

Page 40: ...1 decoderNoti cations 1 decoderNoti cationPre x 0 eventAction 1 eventName 1 eventMessage 2 decoderConformance 2 decoderGroups 1 decoderEventObjectGroup 1 decoderNoti cationGroup 2 decoderCompliance 2...

Page 41: ...ed 2 Set the following items Item Description Range IP Address Filter Select whether to enable or disable the function Off On Permitted IP Address Settings Enter the IP addresses of the computers perm...

Page 42: ...er displays in yellow Attention This function is only available in the Enterprise edition and when the extension Failover is enabled For more information regarding software editions see 3 10 Performin...

Page 43: ...detection is performed only for the camera currently displayed Cameras that are not displayed are not applicable Failure with all cameras Failure with any camera Detection Sensitivity Sets the time r...

Page 44: ...s displayed 2 Register the camera while browsing the following items 4 1 Registering a Network Camera Using Auto Discovery page 53 4 2 Registering a Network Camera Manually page 55 4 3 Changing Networ...

Page 45: ...preset position 1 Select Camera Function Settings under Failover The Camera Function Settings screen is displayed 2 Configure the camera by referring to the following 4 7 Setting Network Camera Time p...

Page 46: ...ct Display Position Settings under Failover The Display Position Settings screen is displayed Note Check the Show Standard Cameras to activate the display of the name of the network cameras usually us...

Page 47: ...e failover network camera 1 Select Overlay Settings under Failover The Overlay Settings screen is displayed Note After selecting Camera Name you can load settings of the network cameras that are usual...

Page 48: ...as 1 Select Preset Settings under Failover The Preset Settings screen is displayed Note Check the Show Standard Cameras to activate the display of the name of the network cameras usually used 2 Config...

Page 49: ...m logs They can be used to check the current or past conditions of the system or to find out the cause when a problem occurs 1 Select Log Display of Troubleshooting The Log Display screen is displayed...

Page 50: ...cause when a problem occurs Attention This function can be used only when using the web browser 1 Select Log Display of Troubleshooting The Log Display screen is displayed 2 Select Operation Log Disp...

Page 51: ...work cameras can be confirmed Attention This function can be used only when using the web browser 1 Select Connection Confirmation of Troubleshooting The Connection Confirmation screen is displayed 2...

Page 52: ...1 Select Network Connection Status of Troubleshooting The Network Connection Status screen is displayed 2 Select Current Status The connection status is displayed in the lower area Note Select Reconn...

Page 53: ...r explains the procedure using the web browser However except for a few functions the same functions can be used with either method 4 1 Registering a Network Camera Using Auto Discovery Network camera...

Page 54: ...gement of Network Cameras 4 Enter the network camera Username and Password and select OK Displays the detection results 5 Place a check in the camera to register and select Add The camera is registere...

Page 55: ...splayed to show a list of camera registration information 2 Select a position where the camera is to be registered Place a check mark on the check box of the position number where the camera is to be...

Page 56: ...to control cameras Panasonic AXIS ONVIF DirectUri SRT 6 Username 7 Enter the user name to be used to access the network camera Alphanumerics and symbols Up to 32 characters Password 7 Enter the passw...

Page 57: ...XIS ONVIF or DirectUri 11 In the following cases it is only possible to set RTP over UDP In the case where Protocol is set to ONVIF and Transmission Mode is set to Multicast When Protocol is set to Di...

Page 58: ...the information again 4 3 Changing Network Camera Information 1 Select Camera Registration A screen is displayed to show a list of camera registration information 2 Select the position number of the...

Page 59: ...reen in step 1 Note For details refer to step 3 under 4 2 Registering a Network Camera Manually page 55 5 Select Apply A confirmation message is displayed 6 Select OK Note If there is a failure in obt...

Page 60: ...ormation 2 Select the camera to be deleted Place a check mark on the check box of the position number of the camera to be deleted 3 Select Delete in the lower part of the screen A confirmation message...

Page 61: ...camera information Attention This function can be used only when using the web browser 1 Select Camera Registration A screen is displayed to show a list of camera registration information 2 Select Sav...

Page 62: ...ser 1 Select Camera Registration A screen is displayed to show a list of camera registration information 2 Select Load Camera Information A file selection dialog box opens 3 Select the CSV file that c...

Page 63: ...box is displayed 6 Select OK Note Up to 255 candidate cameras can be read The CSV files that can be read are as follows CSV files exported from the web browser CSV files created by the user For detai...

Page 64: ...ONVIF during camera registration 1 Select Camera Function Settings The Camera Function Settings screen is displayed 2 Select a network camera to be set from Camera Name Information on the selected net...

Page 65: ...F only video compression formats Attention When devices such as recorders are connected to a network camera the display and recording of such devices may be affected Cannot be set if Protocol of the n...

Page 66: ...SRTP over UDP 3 Transmission Mode Select the transmission mode Unicast Multicast 3 2 Multicast Address 2 Set the Multicast address for Multicast transmission 224 0 0 0 to 239 255 255 255 3 2 Multicast...

Page 67: ...etwork camera is set to DirectUri or SRT The following settings are possible in Other when Protocol is Panasonic during camera registration Pan Tilt flip Upside down Lamp Display 4 Select Apply The se...

Page 68: ...tings are only possible on the application screen and when Protocol is set to ONVIF during camera registration 1 Select Camera Function Settings The Camera Function Settings screen is displayed 2 Sele...

Page 69: ...amera brightness Focus Adjusts the network camera focus PTZ Adjust Adjusts the display magnification horizontal position pan vertical position tilt and PTZ operation quantity of the network camera 1 D...

Page 70: ...can switch the display positions of the source and destination camera images by dragging and dropping the camera name Note It is possible to set all the display positions of the registered network ca...

Page 71: ...4 screen layout 1 Select Display Position 1 for page 1 2 Drag and drop it at Display Position 5 on page 2 The Display Position 1 camera and Display Position 5 camera are switched Only the camera name...

Page 72: ...nes to text On Off Background Set whether or not to add a semi transparent background for text On Off Position Set the text display position Upper left Upper right Lower left Lower right Sequence Inte...

Page 73: ...e screen will change to a layout with the selected number of columns and rows 3 Drag a camera image display position and drop it on the display position you want to couple with The selected display po...

Page 74: ...ivation page 27 1 Select Icon Arranger in Display The Icon Arranger screen is displayed 1 2 No Description 1 Icon Registration Area 2 Icon Selection Area 2 Drag the icon you wish to change and drop it...

Page 75: ...be used with the Enterprise software edition For more information regarding software editions see 3 10 Performing License Activation page 27 NOTE Up to seven presets can be saved 1 Select Preset Sett...

Page 76: ...t the number of Row s or Column s from the list box The screen will change to a layout with the selected number of columns and rows 5 Select the camera image display position and drag and drop it on t...

Page 77: ...the camera location area Note Click a camera to be set from the camera selection area to put it in an open position in the camera location area If another camera is already registered at the destinat...

Page 78: ...screen is displayed 2 Select a network camera to be set from Camera Name The camera settings screen of the selected network camera is displayed Note Check Show grid to display a grid on the camera ima...

Page 79: ...y items Item Description Range Check box Switches between displaying hiding the overlay Color Select a color from the color palette Opacity 1 Select opacity 0 to 100 Weight 2 Select line weight 1 to 1...

Page 80: ...item from the list box Item Detail Setting range Full Screen Display Set to display or hide the menu on the live image screen On Off Layout Set the layout to be displayed on the live image screen 1 S...

Page 81: ...on It is not possible to change Current Status in the Setting Screen It is possible to change to other statuses from the Setting Screen Note The Camera Mode option is enabled when the failover functio...

Page 82: ...itions see 3 10 Performing License Activation page 27 This function can be used by up to two users simultaneously This function has a display frame rate of 1 fps This function does not work if the web...

Page 83: ...e Camera Image of the Live Image Screen to the Latest Status Update the camera image of the Live Image Screen to the latest status Attention This function can be used only when using the web browser 1...

Page 84: ...Suspend While in Background 1 When set to On only communication with the camera displayed on the Live Image Screen is maintained and communication with the non displayed cameras is disconnected each...

Page 85: ...of the circle displayed in the upper right of the screen Black Default status Red Packet lost detection Yellow No packet reception for a certain period of time Gray Frame rate decrease due to high loa...

Page 86: ...me that is the same as an already registered user account cannot be registered It is necessary to register at least one user with a user level of ADMIN Note User levels include LIVE CAMERA CONTROL and...

Page 87: ...following characters The following cannot be used in usernames and auto login User Level Select LIVE CAMERA CONTROL and ADMIN The operable range of this product differs by each level Password Specify...

Page 88: ...count For details refer to 6 5 Performing LDAP Settings page 91 1 Select Local User of User The Local User screen is displayed 2 Select a user to be changed from User List 3 Select Change A dialog box...

Page 89: ...ils refer to 6 5 Performing LDAP Settings page 91 1 Select Local User of User The Local User screen is displayed 2 Select a user to be deleted from User List 3 Select Delete The Are you sure you want...

Page 90: ...91 Once the Auto Login settings are configured unauthorized operation becomes easy for a malicious third party Restrict the configuration to the application in an environment where sufficient security...

Page 91: ...o LDAP it is not possible to login as a local user Access via web browser is only possible when the user level of the account is ADMIN It is not possible to login to this product if the LDAP settings...

Page 92: ...mbols up to 255 characters SSL Insert a check when performing SSL communication LDAPS Certificate Validation Insert a check when performing certificate validation Attention When performing certificate...

Page 93: ...network cables are appropriate for handling the amount of information transmitted Move to the setting screen and return to the live image screen 3 The camera images are not displayed properly on the...

Page 94: ...s product may have been exceeded Reduce the resolution and or bit rate set for the network camera Refer to 4 8 Setting Quality of Transmission Video Images page 65 When in Incompatible resolution E04...

Page 95: ...Chapter 6 Management of the User Account page 86 5 Cannot delete a user There must be at least one user with a level of ADMIN A user cannot be deleted if the user is the only one registered with a lev...

Page 96: ...m Scr Settings page 73 Overlay Settings page 78 Icon Arranger 1 page 74 Preset Settings 1 page 75 System Date and Time page 17 Network page 13 Communication page 15 Certificate page 31 802 1X 1 page 3...

Page 97: ...page 51 Connection Confirmation page 51 Network Connection Status page 52 Live Image Screen Settings Live Image Screen Live Image Screen Settings page 78 System Status Settings page 81 Livestream Vie...

Page 98: ...registered trademarks of Microsoft Corporation in the United States and other countries Adobe Acrobat and Reader are registered trademarks of Adobe in the United States and other countries Apple macOS...

Page 99: ...products that include LGPL software licensed under the LGPL in the same manner as stated above Contact information www eizoglobal com contact index html Contact your local EIZO representative Except f...

Page 100: ...Copyright 2019 2022 EIZO Corporation All rights reserved 03V28079F1 IM FDF2711W IP 6th Edition March 2022...

Reviews: