4 | eddyfi.com
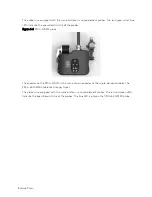
Rear
Figure 1-2
Rear view
1.
Instrument stand
This stand retracts outward to hold Lyft at an angle, preventing the instrument from
falling over horizontally.
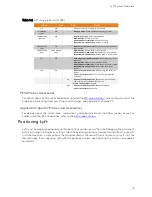
Right
Figure 1-3
Right side view
1.
I/O connector
Used to communicate with the probe’s
encoder, for example
2.
PEC connector
Connect your PEC probes to this
connector.
1
Summary of Contents for LYFT
Page 1: ...i EDDYFI LYFT Corrosion Assessment Redefined User s Manual...
Page 11: ...General Precautions and conventions xi General Precautions and conventions...
Page 17: ...Lyft System Overview 1 Chapter 1 Lyft System Overview...
Page 30: ...14 eddyfi com...
Page 31: ...Software overview 15 Chapter 2 Software overview...
Page 47: ...Workflow overview 31 Chapter 3 Workflow overview...
Page 48: ...32 eddyfi com TYPICAL Inspection Workflow Figure 3 1 Typical inspection workflow...
Page 68: ...52 eddyfi com...
Page 69: ...Lyft PRO software 53 Chapter 4 Lyft PRO software...
Page 73: ...Lyft PRO software 57...
Page 74: ...58 eddyfi com Chapter 5 Preferences...
Page 78: ...62 eddyfi com...
Page 79: ...Keypad and Keyboard Functions 63 Chapter 6 Keypad and Keyboard Functions...
Page 81: ...Maintenance and Troubleshooting 65 Chapter 7 Maintenance and Troubleshooting...
Page 90: ...74 eddyfi com...
Page 91: ...Specifications 75 Chapter 8 Specifications...
Page 94: ...78 eddyfi com...
Page 95: ...Connector reference 79 Appendix A Connector reference...
Page 99: ...Using the Optional Harness 83 Appendix B Using the Optional Harness...
Page 109: ...Setting Up the Extension Pole 93 Appendix C Setting Up the Extension Pole...
Page 113: ...Using the array probe straps 97 Appendix D Using the array probe straps...
Page 119: ...License management 103 Appendix E License management...
Page 121: ...License management 105 Today Two weeks later YourComputerID...


