background image


  User Manual |  58


  NOTIFY 

Enable sensor notification via a buzzer sound and/or a pop-up warning. 


Note 

When “Camera pop-up” is enabled, in a multi-screen mode, the system will switch to single-

channel mode automatically when the alarm is triggered.


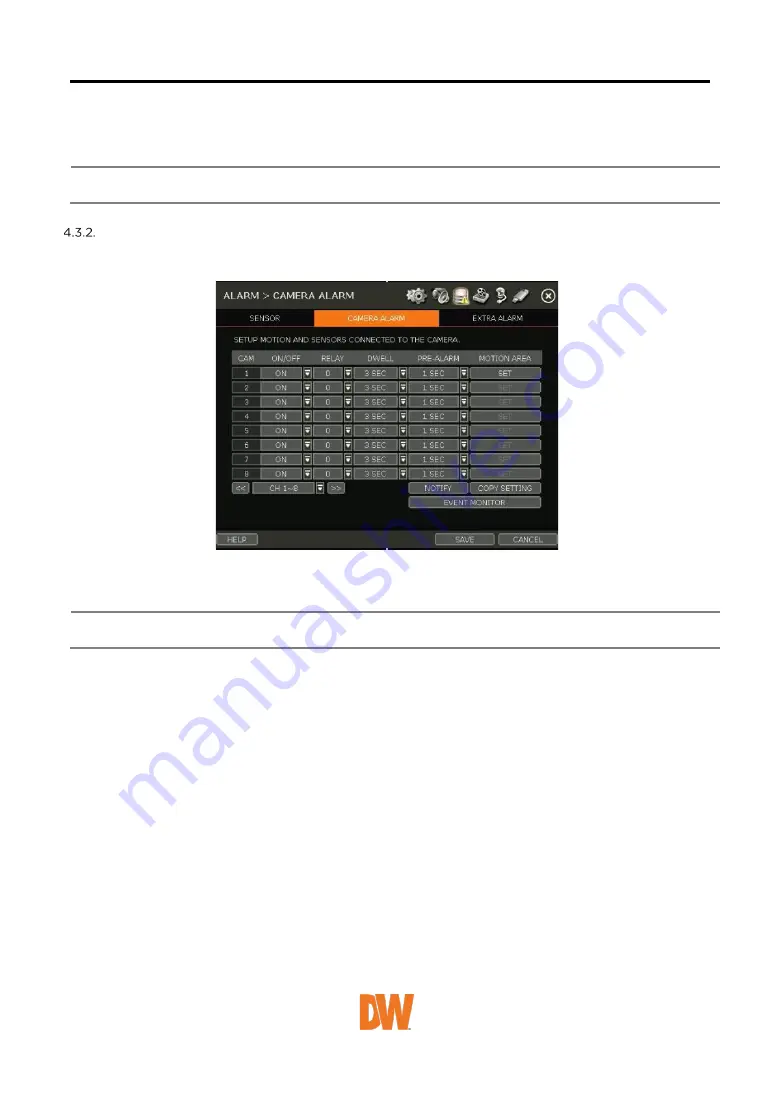
Camera Alarm 

Setup the NVR to start recording when motion is detected. The system can also trigger an alarm signal 

via the selected sensor-out channel.   


RELAY 

Select related output. 


Caution 

Relay contacts can bear up to 24V 1A other devices. If it is connected to a power source 

of more than 24V 1A, the system may have a problem with it. 

DWELL 

Set sensor operation time between 1 and 15 seconds. 

PRE-ALARM 

Set a recording period in seconds just before motion is detected. Input up to 5 seconds. The pre-

alarm recording mode is always “continuous” at the recording speed that the user sets in the 

“Record” menu. 

MOTION AREA 

Set the camera’s motion area and sensitivity. The area can be selected by clicking on a specific block 

or dragging the mouse’s cursor across the screen to select multiple blocks. Areas, where motion 

detection is activated, will appear with a green border. Unselected areas will be shown with a grey 

border. 


Click [SET] in the ‘MOTION AREA’ section to set the area. 

Select the motion detection area and click [SAVE] and then [EXIT] to save the changes. 

Clicking on SELECT ALL will enable motion detection in the entire camera’s FoV.   

Summary of Contents for VMAX ip PLUS DW-VP1212T8P

Page 1: ...ng to the specification and model Contents of this user manual are protected under copyrights and computer program laws Rev 06 22 Before operating the system please read this User Manual and retain it...

Page 2: ...VMAX IP Plus 2 WARNING TO REDUCE FIRE OR SHOCK HAZARD DO NOT EXPOSE THE UNIT TO RAIN OR MOISTURE The installation should be made by a qualified service person and conformed to all local codes...

Page 3: ...ended by the supplier The internal fan rotates at high speed and may cause an accident 2 Do not drop give strong vibration or shock the product It may cause malfunction 3 The air inhaler of the front...

Page 4: ...25 3 6 PTZ OPERATION 29 3 7 PLAYBACK RECORDED IMAGES 30 3 8 SEARCH RECORDED IMAGE 32 3 10 SPECIAL CAMERA SEARCH 37 3 11 DST SETTING AND IMAGE PLAYBACK 38 3 12 MEGAPIX IVA ANALYTICS 39 4 SETTING 43 4 1...

Page 5: ...h your NVR If any of these items are missing or damaged notify your vendor immediately Keep the packing utilities for moving or storage purposes afterward Items Photo Quantity Quick setup guide and do...

Page 6: ...or Account configurable in the NVR It is assigned with an unchangeable User ID marked as admin The administrator account has full access to the NVR and its configurable parameters and can also create...

Page 7: ...assword and click OK to shut down the system Click YES to confirm shutdown Note Users can input passwords by the virtual keyboard IR remote control or front numeric buttons if available 1 4 System Exp...

Page 8: ...g to the model The model shown in the diagram above is the 16CH DW VP16xT16P NVR The audio input port in the NVR is disabled by default For audio recording use an audio input supported IP camera Note...

Page 9: ...cy Recording Button 15 Auto Sequence Button in Live mode 16 Screen Mode Button 17 Backup Button Note Users can control multiple NVRs with one IR remote controller To control multiple NVRs each NVR mus...

Page 10: ...e channel view of a specific channel by pressing the corresponding number Emergency Recording The system records all channels with the full frame rate at the maximum resolution regardless of the recor...

Page 11: ...the previous date or the next date to search Playback Controls Playback speed control x32 x16 x8 x4 x2 Move backward one frame Stop button Play button Move forward one frame Playback speed control x2...

Page 12: ...ote Only the ADMIN user can access the startup wizard 2 1 Language Select the language according to the country or user s preference If DISPLAY ON SYSTEM STARTUP is selected Startup Wizard will pop up...

Page 13: ...ime Sync Server in SYNC SERVER The NVR s time clock will be synchronized with the server by interval time set in the TIME SYNC CYCLE NTP Mode pool ntp org is the recommended NTP Server To activate set...

Page 14: ...en try to format again AUTO DELETE Set the period when the HDD will automatically delete all recorded data Select from None default up to 366 days Note 1 It may take a few minutes to format HDD 2 When...

Page 15: ...need to input another valid port number ex 9020 WEB PORT Input the port number to use when connecting from the Web Browser The default is 80 If your ISP blocks port 80 you need to input another valid...

Page 16: ...y In a case where there are multiple NVRs on the network it is recommended to use the Drag Drop or advanced configuration options to avoid a camera being connected to multiple NVRs Drag Drop Configura...

Page 17: ...2 6 Product Registration Finish Register the NVR and user information for technical support and maintenance When the setup wizard is completed click FINISH to close and go to the live view screen...

Page 18: ...having its password set from the IP Finder the NVR will automatically assign it a new password If the camera then needs to be connected to another NVR or system users will need to reset the camera s s...

Page 19: ...nd manually adding cameras select SEARCH 3 2 2 1 Auto Configuration 1 Select a recording mode for the cameras This recording option will be applied to all cameras registered to the NVR 2 Click START T...

Page 20: ...ist and click GET STREAM to read the streams of the camera 3 When GET STREAM is selected the NVR will assign a channel number to the selected camera Users can also select a specific channel number fro...

Page 21: ...he search results Selected cameras will be highlighted in green 4 When the APPLY button is clicked cameras will be registered one by one starting from the top Cameras that are already registered will...

Page 22: ...button to get stream information 5 Click the APPLY button to register the camera 3 3 Deleting Cameras Go to Advanced Configuration by clicking ADVANCED in Camera Management Menu Record 1 Non PoE Camer...

Page 23: ...available drop down options FRAMES PER SECOND Set the stream s frames per second speed from 0 to 30 BITRATE The maximum bitrate that the camera used for image transmission QUALITY Image quality for re...

Page 24: ...frame will be about 3 7fps It is useful for extending the recording period without dropping of live monitoring frame rate Note CCIP Encryption Option CCIP Closed Circuit Internet Protocol System Encr...

Page 25: ...in the pop up menu window Note Only the ADMIN user can change the channel allocation 3 5 Live Display Mode Channel Selection The live image can be seen by easy button operation after power up The ima...

Page 26: ...us Motion Alarm Recording Warning for exceeding temperature Continuous Sensor Activated Recording Sequence mode is enabled Motion Detection Sensor Activated Recording Digital zoom is enabled Emergency...

Page 27: ...Please refer to 4 2 1 Camera Users can adjust images such as brightness contrast color etc The available options depend on the camera s ONVIF integration See the camera s manual for more information P...

Page 28: ...s Recording Period Daily Recording Size Average Recording Days and Remaining Recording Days SYSTEM STATUS See the system status network condition the number of clients currently connected to the NVR P...

Page 29: ...and select PTZ in the pop up menu When in PTZ mode will appear on the right button corner of the screen PTZ Control In PTZ mode the user can control the PTZ camera using the USB mouse While pressing t...

Page 30: ...positions in order To turn the tour off right click on the screen and select Tour GUARD TOUR When enabled the camera will automatically switch positions according to the sequence of presets set in th...

Page 31: ...nnel Digital zoom Enable or disable digital zoom available in a single channel view Backup Open the backup window Add Bookmark Add a bookmark to the current image Search Search recorded data by variou...

Page 32: ...utton in the Toolbar at the bottom of the screen Calendar Search To search for data for a specific date and time select the date and time Move the white vertical line to the time you want to search Th...

Page 33: ...ata Go to the last screen of the recorded image This is the latest image recorded System Log Find system log information such as System Setup or network events 1 Select a date to search 2 Select log t...

Page 34: ...earch results in the list 4 Click EXPORT to copy the list to an external device such as a USB flash drive as a txt file Note 50 records will be shown on one page Click the arrow buttons to search the...

Page 35: ...nel date time keyword and then click SEARCH to view search results Enter a keyword to filter the results Click PLAY to go to playback video and transaction data Bookmark Bookmark search allows you to...

Page 36: ...ack the recorded image of that moment The number of thumbnail images and the size of each image can be increased decreased and the maximum no is 196 14 x 14 depending on the resolution In the preview...

Page 37: ...ing and face detection NOTE To view the special camera search users must be in single channel view mode NOTE The camera must support video analytics capabilities 1 Select a date to search 2 Select the...

Page 38: ...d restore the time clock to normal after DST ends DST Setting To enable DST on the NVR go to SYSTEM INFORMATION and click DATE TIME Select USE DST to apply the DST time change Select the proper Time Z...

Page 39: ...occurs an event notification icon will appear on the top right of the camera s display IVA rules can be created and managed from the camera s Web Client accessible through a web browser To create edi...

Page 40: ...ECT TRAIL This shows the trail when a detected object is moving SHOW OBJECTED ID This shows the ID of a detected object SHOW EVENT AREA When checked the event area is displayed only when an event occu...

Page 41: ...alarm event type Set the channel on which the alarm is displayed Alarms can be set for channels other than the channel to which the camera is connected Set alarm type Set whether to use pop up buzzer...

Page 42: ...ics events go to the popup menu SPECIAL CAM SEARCH IVA EVENT Select IVA EVENT from the drop down list options Use the date and type filters to narrow down search results Double click the event from th...

Page 43: ...Sub Classification SYSTEM INFORMATION USER DISPLAY HDD SETTINGS DEVICE CAMERA AUDIO PTZ TRANS VERI KEYBOARD EVENT SENSOR CAMERA ALARM EXTRA ALARM RECORD CAMERA MANAGEMENT RECORDING SCHEDULE QUICK SETU...

Page 44: ...ting of the IR remote controller if the user wants to use it to control NVR DATE TIME Using the available options manually adjust the date and time select the display mode for the time and the date an...

Page 45: ...d update it to a newer version via DVD CD USB Memory Stick FTP server VIDEO SIGNAL Check the right video signal NTSC or PAL This setting should match the NTSC PAL Selection Switch located on the rear...

Page 46: ...ns under Method 2 Enter the FTP s address FTP dwcc tv and enter the username and password these should be filled out automatically Username vmaxipplus password vmaxipplus NOTE The FTP server address i...

Page 47: ...e box next to the corresponding functions d In Live and Playback mode only the selected channels are visible to the user e To change the setting select the user and click Edit 2 Delete User a Select a...

Page 48: ...oper resolution per the monitor resolution OSD Select what information will appear over the display by checking the corresponding boxes SCREEN SAVER The Screen Saver features to protects the screen an...

Page 49: ...m to release system resources and then try to format again Check the box next to the HDD name to select it Press the format button to format the HDD AUTO DELETE Set the period when the HDD will automa...

Page 50: ...ecorded video will not be deleted EXPORT IMPORT Save the system settings from this NVR or copy them to another NVR Export Copy the settings of this system to a USB memory device Import apply settings...

Page 51: ...d of View FoV in live and playback mode Please check that your camera supports this feature 1 Click SET to get into the setup mode 2 Using the popup menu on the bottom right select where to place the...

Page 52: ...eo with audio PTZ Full control of the PTZ camera is available on this menu Please refer to the 3 6 PTZ Operation for more information on operating a PTZ camera 1 If the camera is connected to the NVR...

Page 53: ...ve the changes by clicking SET Preset ADD Move the camera s position and zoom to the desired position Select the preset number using the button Press ADD to save the new preset The system supports pre...

Page 54: ...save the transaction data SHOW Enable or disable the NVR to display the transaction data SETUP 1 Transaction Verification Settings NO ID of Transaction Verification device CAMERA Select the camera to...

Page 55: ...r Time setting POSITION Designate the display position of transaction data FONT COLOR Select the font color which will be displayed on the screen It will be displayed with the color that is shown on S...

Page 56: ...saction Verification device PARITY Set the parity according to the connected device DATA BIT Set DATABIT according to the connected Transaction Verification device STOP BIT Set STOPBIT according to th...

Page 57: ...activated During this period the selected camera will record according to the record setting The recording stops and the alarm output is turned off when the set period is completed PRE ALARM Set a rec...

Page 58: ...ensor operation time between 1 and 15 seconds PRE ALARM Set a recording period in seconds just before motion is detected Input up to 5 seconds The pre alarm recording mode is always continuous at the...

Page 59: ...meras connected to the NVR click on the Copy Settings button 1 Select the channel to get the setting from 2 Select the property s to copy 3 Select the target channel s to apply the setting 4 Click OK...

Page 60: ...alarm signal when a camera signal is disconnected RECORDING FAILURE Trigger an alarm signal when the system does not record images due to an error in HDD or system DISK FULL Trigger an alarm signal wh...

Page 61: ...camera Please refer to 3 4 Camera Setup DEL Delete the camera 3 3 Camera Deletion DELETE PAGE 2 It deletes cameras on the current page Please refer to 3 3 Camera Deletion DELETE ALL 3 It deletes all c...

Page 62: ...hen the system will record when a sensor is triggered but the sensor alarm will not be activated SKY BLUE Continuous Motion Detection Recording The system records continuously as set by the RECORD CAM...

Page 63: ...recording schedule for those days The system supports up to 32 holidays Press the DATE button write a description and press ADD to save the data as a holiday Note Instant Recording Emergency Recording...

Page 64: ...2 When selecting Camera multi select the user can select the camera wanted to set If you set the desired camera to ON the user can setup the settings of the cameras set to ON 3 Click the GET STREAM bu...

Page 65: ...address will automatically adjust to match the network s requirements You can also manually change the IP address as needed SUBNET MASK Subnet Mask address classifies the subnet that the system belong...

Page 66: ...st five characters of the file name of a detected NVR represent the model number followed by the NVR s IP address Once the PC discovered the NVR double click on the icon to open the NVR s web client E...

Page 67: ...ccessing the NVR NOTE This function works only on the local network and will not work on web Login IP ADDRESS FILTER This function allows or blocks a specific IP address When the user registers a spec...

Page 68: ...e NVR s time zone must be set BEFORE generating the certificate The time on the NVR and network must match Skipping this step may impact the validity of the generated certificate and the application t...

Page 69: ...ssigned the message still pops up when you click CHECK The hostname can be automatically assigned by clicking AUTO GENERATE IP MAPPING and EXTERNAL IP If you are using IP Mapping and Port Forwarding e...

Page 70: ...be notified EMAIL NOTIFY The system can send a notification to an email address Select EMAIL NOTIFY to use this function and set email addresses and events ADD EDIT DELETE EMAIL Enter the email addre...

Page 71: ...unt of time SENDER Setting SMTP Enter the sender settings Need to set the sender to send an email notification Outgoing mail SMTP server Input SMTP server address PORT Input the port number that will...

Page 72: ...r in the Mobile Notify table in the DVR NOTE 1 The mobile Push Notification function is available with iPhone iPad Android devices 2 Registration for Mobile Push Notification is available when it is s...

Page 73: ...code menu PATHFINDER service is in use When users scan the QR code with DW s mobile application DW Mobile Plus they can easily register the system and monitor it Users can also check the PathFinder s...

Page 74: ...ust the following options as needed a Select the channels to be included in the backup file b Adjust the start and end times of the backup file c Select to include the Backup Viewer with the archived...

Page 75: ...ayback and drag it to the viewing area To playback multiple channels click the MULTI CH tab and Search to open the folder that keeps all SSF files You can print export an image and zoom by using the i...

Page 76: ...e SSF file in Single CH mode and click Pause 2 Click AVI Convert 3 Define the start and end times When the AVI file is played back in the BackupPlayer verify whether the file has been altered or not b...

Page 77: ...ce you are connected to the NVR you will be prompted to download and install the Active X file Active X Installation 1 If the P C doesn t have Active X installed an installation guide message will app...

Page 78: ...ction to improve image quality HIDE SHOW MENU To hide the menu bar press the HIDE MENU button To view the menu bar again press the SHOW MENU button POP UP MENU Right click to open additional options D...

Page 79: ...he date and time and click GO to view the video from the selected time PLAYBACK ICON Use the Fast Forward Rewind and Play Pause buttons to control the playback video PLAY DST Check this box to play ov...

Page 80: ...LOG SYSTEM LOG EVENT LOG ELEVATOR LOG VIDEO ANALYTICS LOG Note This NVR system has a built in web server Therefore this web CGI screen is directly supported by the built in web server of NVR regardle...

Page 81: ...login page appears enter the user ID and password 6 2 Web Monitoring After login the live view from the NVR will appear on the web page automatically Users can also select Playback Setup QSG Manual F...

Page 82: ...back mode Panoramic View Change to screen mode to horizontal vertical or quad screen mode Stream Type Set the stream type Auto 1st 2nd Show Text Set the information to display Channel title Mode Live...

Page 83: ...ENT SENSOR CAMERA ALARM EXTRA ALARM RECORD CAMERA MANAGEMENT REGISTRATION SCHEDULE NETWORK NETWORK DDNS NOTIFICATION P2P HTTPS CERTIFICATES CERTIFICATE GENERATION CERTIFICATE IMPORT LOG SYSTEM LOG EVE...

Page 84: ...he HDMI VGA cable connection with the NVR Remove all the cable connections except for the monitor cable and then apply power to the NVR again 3 In case the display screen is stopped at the logo screen...

Page 85: ...SB memory stick should be formatted by FAT or FAT 32 2 It is not allowed to use a partitioned or password encoded USB memory 9 Time sync through the NTP server does not work The NTP server requires a...

Page 86: ...odes Continuous C M C S scheduled sensor and motion detection recording Pre alarm recording emergency recording quick backup Playback and search Speed x1 x2 x4 x8 x16 x32 Function Intelli search by ti...

Page 87: ...ower budget 5 5A 18 75W per PoE channel simultaneous 300 W total power budget 5 5A 9 37W per PoE channel simultaneous Total PoE power budget 76W 150W 150W Maximum power per port 30W 30W 30W Operating...

Page 88: ...s failures due to defects in materials and workmanship which arise during normal use This warranty does not cover damages that occur in shipment or failures which are caused by products not supplied b...

Page 89: ...tes do not allow the exclusion or limitation of incidental or consequential damages or limitations on how long an implied warranty lasts so the above exclusions or limitations may not apply to you Thi...

Page 90: ...220 Bloomfield Ave Cerritos CA USA 90703 PH 866 446 3595 FAX 813 888 9262 www Digital Watchdog com technicalsupport digital watchdog com Technical Support PH USA Canada 1 866 446 3595 International 1...

Reviews: