


MAINTENANCE
SECTION 5
Page 21
DRESSTA
OM515C520C99/1E
BRAKES
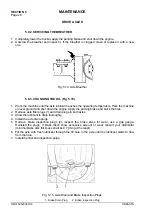
5.7.4. FILLING AND VENTING THE SYSTEM
1. Reassemble all lines (if disconnected). Do not assemble the brake system warning light switch.
2. Fill the master cylinder with brake fluid.
3. “Pump” the brake pedal and add more fluid until the fluid level is 6 [mm] below the top edge of
the master cylinder.
4. If the system is aerated (“soft“ pedal), vent the system in the following way:
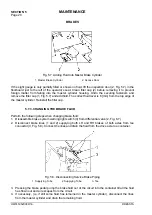
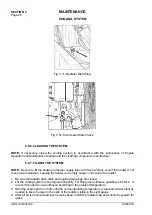
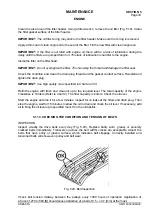
a). loosen the axle bleeder screws, connect a transparent plastic tube on the valve. Put the other
end of the tube in a small amount of oil in a clear container (Fig. 6.9).
b). depress the brake pedal (air bubbles should escape through the plastic tube dipped in the
brake fluid),
c). when clear fluid without air bubbles starts flowing out, turn on the bleeder screws and release
the pedal,
d). repeat the above steps for each of the four bleeder screws,
e). assemble the brake system warning light switch.
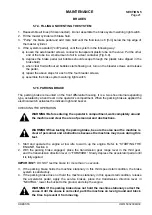
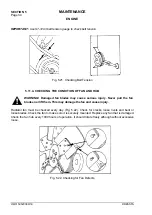
5.7.5. PARKING BRAKE
The parking brake is mounted on the front differential housing. It is a two shoe internal expanding
type, actuated by a hand lever in the operator’s compartment. When the parking brake is applied the
electrical switch activates the indicator light and buzzer.
CHECKING THE OPERATION
WARNING! Before entering the operator’s compartment, walk completely around
the machine and clear the area of personnel and obstructions.
WARNING! When testing the parking brake, be sure the area near the machine is
clear of personnel and obstructions because the machine may move during this
test.
1. Start and operate the engine at low idle to warm up the engine. Refer to “STARTING THE
ENGINE”, Section 4.
2. With the parking brake engaged, place the transmission gear range lever in the third gear,
and the transmission direction lever in “FORWARD”. Slowly depress the accelerator pedal until
it is fully applied.
IMPORTANT:
DO NOT test the brake for more than 1o seconds.
3. If the parking brake holds the machine stationary in this third speed stall condition, the brake
system is satisfactory.
4. If the parking brake dose not hold the machine stationary in this speed stall condition, release
the accelerator pedal, apply the service brakes, place the transmission direction lever in
“NEUTRAL”, lower the bucket to the ground, and stop the engine.
WARNING! If the parking brake does not hold the machine stationary correct the
cause. Until the cause is corrected, park the machine on level ground and block
the tires to prevent it from moving.
Summary of Contents for 515C
Page 3: ...OM515C520C99 1E DRESSTA ...
Page 5: ......
Page 7: ......
Page 10: ...SECTION 1 INTRODUCTION ...
Page 12: ......
Page 17: ...SECTION 2 SAFETY PRECAUTIONS ...
Page 19: ......
Page 37: ...SECTION 3 MACHINE TRANSPORT AND STORAGE ...
Page 39: ......
Page 49: ...SECTION 4 OPERATING ...
Page 51: ......
Page 107: ...SECTION 5 MAINTENANCE ...
Page 165: ...SECTION 6 SPECIFICATIONS ...
Page 167: ......
Page 181: ...SECTION 6 SPECIFICATIONS Page 16 OM515C520C99 1E DRESSTA WIRING DIAGRAMS ...
Page 182: ...SPECIFICATIONS SECTION 6 Page 17 DRESSTA OM515C520C99 1E WIRING DIAGRAMS ...
Page 187: ...SECTION 6 SPECIFICATIONS Page 22 OM515C520C99 1E DRESSTA WIRING DIAGRAMS ...