background image

Page 49


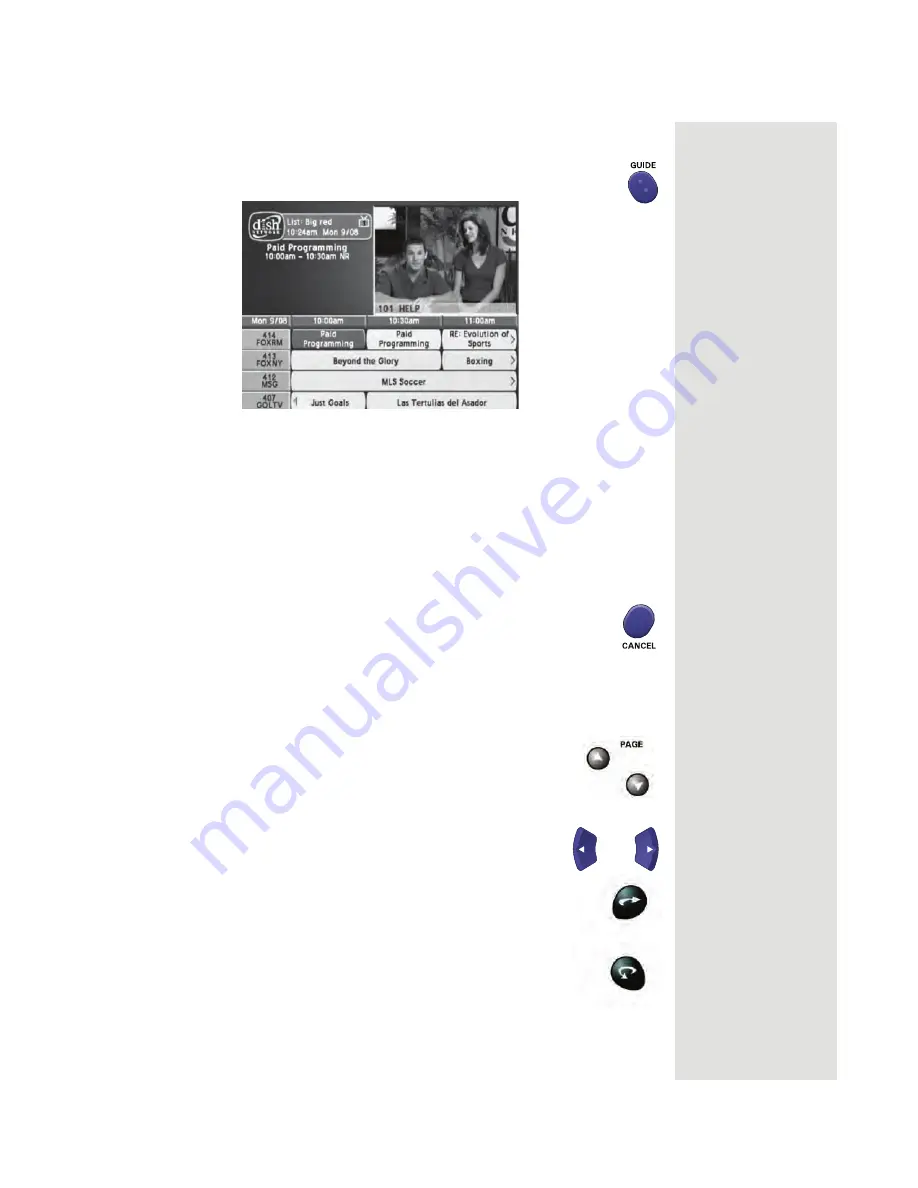
Using the Program Guide

Changing the Channel in the Program Guide

1. Press 

GUIDE

 to open the 

Program Guide

.


2. Choose a channel using either of the following:

Use the 

NUMBER PAD

 buttons to enter the channel number.

The 

Program Guide

 displays a channel block that includes the channel 

number you just entered.

Use the 

ARROW

 buttons to move the highlight to the chosen channel.

3. Press the 

SELECT

 button to change to the new channel.

4. If you haven’t pressed SELECT, then you can press the 

CANCEL


button to close the 

Program Guide

 without changing  channels.

Scrolling Through the Program Guide

There are two ways to scroll through the 

Program Guide

:

Scroll by channel - Press the 

PAGE UP

 or 

PAGE 

DOWN

 button to scan, page by page, through the listing 

of channels.

Scroll by time - Enter the number of hours that you want 

to skip, using the 

NUMBER PAD

 buttons. Then, press 

the 

LEFT

 or 

RIGHT ARROW

 button. 

Scroll by day - Press 

SKIP FWD

 to scroll ahead in the 

Program Guide

 24 hours each time you press the button 

(until you reach the end of your Guide data). After you 

skip ahead at least one day in the 

Program Guide

, press 

SKIP BACK

 to scroll back 24 hours each time you press 

the button (until you are reach the current date).

Tip: When using the 

Program Guide, do 

you want to know 

more information 

about a program or 

event, like who 

stars in the movie 

you’re about to 

watch? Press the 

INFO button to find 

out. When you’re 

finished, press the 

CANCEL button to 

return to the 

Program Guide.

Tip: Selecting a 

program that is 

not on yet will 

open the Timers 

menu. See page 54 

for information on 

setting timers.

Summary of Contents for DP512

Page 1: ...all software controlled products unexpected behavior could arise if the user tries to perform operations in a non routine manner This product like almost any other high tech product is subject to bugs...

Page 2: ...ramming the Recover Button 26 Changing the TV1 Output Channel 27 Connecting the Receiver to the Phone Line 27 Connecting the Receiver to a Dish Antenna System 29 Optional Connecting VCRs to the System...

Page 3: ...th the Remote Control 85 Testing the System 95 Chapter 4 Reference 97 Troubleshooting Tables 97 Device Codes 109 Appendix 115 Limited Warranty 115 What the Warranty Covers 115 What the Warranty Does N...

Page 4: ...ttons on the remote control or the front panel 12 Protect the power cord from being walked on or pinched particularly at plugs convenience receptacles and the point where they exit from the apparatus...

Page 5: ...e NEC requirements Do not locate the antenna near overhead light or power circuits or where it can fall into such power lines or circuits When installing the antenna take extreme care to avoid touchin...

Page 6: ...f the action or you can record a program to watch later without a VCR Important Information About This Receiver Always handle the satellite receiver carefully Avoid excessive shock and vibration at al...

Page 7: ...the diagrams and instructions in Chapter 2 A vital part of the installation is to set up the receiver to get the latest software from the satellite Afer you install a new system correctly following t...

Page 8: ...l IR UHF Pro remote control which can be used to control the receiver from a different room If a specific remote control must be used this guide will refer directly to it Fixed Images On some TVs the...

Page 9: ...ont panel to display the System Info screen Note The following screen is for example only Be sure to use the numbers on the System Info screen displayed on your own TV 4 Call the Customer Service Cent...

Page 10: ...is on 2 Press the UP or DOWN ARROW button on your remote control to change channels 3 Press the RECALL button to go back to the last channel you watched 4 Press the THEMES LEFT ARROW button to open t...

Page 11: ...watching at the top and information on two other programs at the bottom of the TV screen 10 Press the UP or DOWN ARROW button to change the channel information you see at the bottom of the TV screen 1...

Page 12: ...Menu 2 Press the 1 button to select the Program Guide option on the Main Menu This opens the Program Guide on the TV screen You can use the Program Guide to find and select a program to watch For now...

Page 13: ...stomer option This menu provides convenient access to your DISH Network account to review your statement pay your bill upgrade programming and more 7 Press the 0 button to go back to the Main Menu 8 P...

Page 14: ...ocks option on the Main Menu This menu allows you to apply password protected locks on programming based on rating or even on a channel by channel basis 11 Press MENU to go back to the Main Menu 12 Pr...

Page 15: ...option on the Main Menu This menu is used for creating and changing timers used to trigger automatic channel changes reminders or DVR recordings 15 Press MENU to go back to the Main Menu 16 Press the...

Page 16: ...the Favorites menu This menu allows you to set up lists of your favorite channels to make finding what you want to watch easier 18 Press MENU to go back to the Main Menu 19 Press the VIEW LIVE TV but...

Page 17: ...PAUSE button to pause the program Note The status bar at the bottom of your screen shows how long the program has been paused You can pause a live program for up to two hours On some TVs the presence...

Page 18: ...on once to reverse the program 1 4 the speed as normal play Press the BACK button twice to reverse at normal speed As you press the BACK button repeatedly the program reverses faster with each press u...

Page 19: ...Press the VIEW LIVE TV button to return right away to watching the program in progress 11 Press the RECORD button to start recording the program right now 12 When the Record Remainder of this Event di...

Page 20: ...verse the program Note Let the program reverse all the way to its start 17 Press the DVR button This opens the DVR Events menu on the TV screen 18 Use the remote control arrow buttons to highlight an...

Page 21: ...want to watch now Select that program You are now watching one program while recording another 6 Press RECORD and select OK when the pop up message displays You are now recording two programs at the s...

Page 22: ...n on the remote control The channel that was in the PIP window will now be displayed full screen 3 Press GUIDE on the remote Use the Program Guide to find a program that you want to watch now Select t...

Page 23: ...he weather condition has passed Solar Interference Twice a year the sun moves to a position behind the DISH Network satellite as it orbits the Earth The exact time of the year that this occurs varies...

Page 24: ...ctions Recording The red light indicates that the DVR is recording an event Buttons The buttons on the receiver give you some control of the receiver However most of the time you will want to use the...

Page 25: ...our TV has these connections Use RCA type cables to make this connection If the TV has only one monophonic input for this type of audio connect it to the right R phono plug audio output port on back o...

Page 26: ...separator Remote Antenna for optional accessory The REMOTE ANTENNA port receives UHF Pro signals from an optional IR UHF Pro remote control so that it can control menus and programming from another ro...

Page 27: ...objects blocking the lines of sight to them This remote control may be identified by a blank silver key or the green number 1 at the bottom of the remote OPTIONAL ACCESSORY Remote Control IR UHF Pro...

Page 28: ...e batteries take out all of the old batteries 3 Put the new batteries in Make sure you match the plus ends with the plus markings on the battery case 4 Slide the battery cover back into place Low Batt...

Page 29: ...the entertainment center by using a coaxial cable to connect the antenna to the receiver Try moving the receiver and or antenna to another location Move all nearby over the air antennas away from the...

Page 30: ...RCA audio cables red and white from the receiver TV1 output ports to your TV s audio inputs If the TV has only one mono input for this type of audio connect it to the right R phono plug RCA type audio...

Page 31: ...digit channel number For example if your remote TV is set to use channel 3 enter 0 0 3 or to use channel 4 enter 0 0 4 5 Press the POUND button The TV mode button flashes three times Programming the R...

Page 32: ...satellite programming place a channel sticker near or on your TV to indicate the correct channel Connecting the Receiver to the Phone Line You must keep the receiver connected to an active telephone...

Page 33: ...and set a telephone number prefix if you need to dial a prefix to make an outside call 1 Display the Phone System screen by pressing MENU 6 1 4 2 Select the Touch Tone or the Rotary Pulse option in t...

Page 34: ...system with DISH Pro LNBFs and or switches you can have as much as 200 feet of cable between the LNBF and the receiver However you must use only RG 6 coaxial cables rated for 950 to 2150 MHz These ca...

Page 35: ...o you should realign the dish antenna system 9 After you select Yes the receiver will begin downloading and installing a software upgrade You will see a Warning that Vital program information will now...

Page 36: ...as selected on page 27 5 Tune the nearby VCR and TV to Channel 3 or 4 as selected on page 27 6 You can place a TV1 channel sticker Channel 3 or 4 as selected in step 5 on or near the nearby TV This s...

Page 37: ...t panel SYSTEM INFO button to display the System Info screen The System Info screen shows the Secondary Remote Address Write down this address 3 Press and hold the SAT button on the UHF Pro remote con...

Page 38: ...e from a consumer electronics parts store Note This will help keep out stray UHF radio signals but also cut down on how far away you can use the remote control from the satellite receiver 1 Take the U...

Page 39: ...T mode button about three seconds until all the mode buttons light up and then release the SAT button The SAT mode button begins to blink b Use the NUMBER PAD buttons to enter any number from 1 to 16...

Page 40: ...en by pressing MENU 6 1 6 on the remote control b Select Disable from the TV1 UHF Pro Setup screen c Select System Info to open the System Information screen 2 Perform the following with an IR remote...

Page 41: ...Chapter 2 Page 36 Receiver Description and Installation...

Page 42: ...of the TVs connected to the receiver s outputs but provides dual tuner features like Picture In Picture PIP Using Picture In Picture Your dual tuner receiver lets you watch two program at once using P...

Page 43: ...The remote control must be in SAT mode for the buttons to control the satellite receiver You can also use the remote to control your DVD player VCR or other devices See Control Other Devices with the...

Page 44: ...tes List an Event Timers list a Search results list or a list of channels Mute Button Press the MUTE button to turn off the TV sound Press it again to restore the TV sound Note You must program the re...

Page 45: ...wse Banner Press the RIGHT ARROW button Show Themes Press the LEFT ARROW button Move around within the Program Guide menus and Browse Banner Press the UP DOWN LEFT and RIGHT ARROW buttons Delete Press...

Page 46: ...Pad Buttons When watching a program or with the Program Guide open use these buttons to enter a channel number to change to that channel When the Program Guide is open you can skip ahead and then bac...

Page 47: ...or video input source on your TV and cannot get the picture back from your satellite receiver When you press the RECOVER button as described below the remote control sends commands to your TV to chang...

Page 48: ...ite receiver If the RECOVER button is programmed to a specific channel see page 26 the RECOVER button will tune the TV to the specific channel DVR Buttons Use these buttons to record or for play back...

Page 49: ...enu then select any of the other menus to open from the Main Menu Use the associated buttons on the remote control for example Open the Program Guide When watching a program open the Themes and Search...

Page 50: ...on some computer menus Selecting Menu Options When you select a menu option that option takes effect right away You can select a menu option in either of two ways If the option has a number next to i...

Page 51: ...highlight Selecting a Choice in a Menu To select a choice in a menu list highlight the choice and then press the remote control SELECT button Make sure you select the Save or OK option to save your ch...

Page 52: ...the Number Pad Use the letters above the NUMBER PAD on the remote control while the highlight is in the field For example when looking for the channel and times to watch Rudy Fremmel Presents you pres...

Page 53: ...buy pay per view programs The Program Guide shows which Favorites List is active If the All Chan list is active the Program Guide shows all of the channels available from DISH Network If the All Sub...

Page 54: ...E DOWN button to scan page by page through the listing of channels Scroll by time Enter the number of hours that you want to skip using the NUMBER PAD buttons Then press the LEFT or RIGHT ARROW button...

Page 55: ...ms are available without changing the program that you are watching The receiver displays information on the program you are watching at the top and Browse Banner information at the bottom of the TV s...

Page 56: ...ighlight the next programs Press the LEFT ARROW button to return to the current program 4 Close the Browse Banner by doing one of the following Press the SELECT button to watch the program Press the V...

Page 57: ...10 Or all four lists could have 50 channels each When you make a Favorites List active the Program Guide and Browse Banner display only the channels in that list Also the receiver skips those channels...

Page 58: ...uttons on your remote 5 Press SELECT to add the highlighted channel to the Favorites List A dot indicating you have selected this channel to be on the list appears to the left of the channel 6 Using t...

Page 59: ...luding spaces If needed select the space option to insert a space in the name or the Back option to correct a letter Note A list name must contain at least one character Two lists cannot have the same...

Page 60: ...ies to a one time program The receiver deletes this timer when the timer operates Mon Fri Applies to a program that is scheduled for Monday through Friday on the same channel at the same time each day...

Page 61: ...Fri Daily or Weekly timer The timer will operate the next time it is scheduled to do so To stop all operations of such a timer you must delete the timer itself For a Reminder Event Timer instead of ha...

Page 62: ...requency option See Event Timer Frequency on page 55 Notice that a mark displays in the box next to your selection 3 Select a Timer Type See Event Timer Types on page 55 Again your selection is indica...

Page 63: ...k record feature see page 56 or go through the Program Guide to set up an automatic timer see page 57 Setting Up a DishPASS Timer DishPASS lets you create timers to record programs automatically based...

Page 64: ...PASS creates some may not be what you are expecting You can Pick selected events to Skip Review you Daily Schedule often Adjust your search terms and options Select Set Priority to change the priority...

Page 65: ...the screen 4 Select Done Maximum Number of Event Timers Although you can create timers for lots of your favorite programs and events there is a limit to the number of event timers you can create depe...

Page 66: ...e Date 8 Select the Create Timer option Deleting an Event Timer 1 Press the MENU button 2 Select the Timers option The receiver displays the Timers menu 3 Select an event timer s that you want to dele...

Page 67: ...lso watching one that you ve previously recorded 1 Press GUIDE to open the Program Guide Find a channel with a program or event that you want to watch now 2 Press SELECT to tune to that channel and wa...

Page 68: ...mer 1 Select a future program by using the Browse Banner the Themes menu or the Program Guide 2 Select a Timer Frequency option Note the mark to the left of your option 3 Select a Timer Type See Event...

Page 69: ...w or a program on in the future to watch later or you can keep your recording You can pause return to watching fast reverse skip back fast forward or skip ahead through a recorded program You can also...

Page 70: ...at normal speed Press the FWD FORWARD button once to go forward in the program four times as fast as normal playback speed Press the FWD button twice to forward at 15 times normal speed three times to...

Page 71: ...can record only the part of the program that comes after you tuned to it Stop Recording a Program Press the remote control s STOP button When you press the RECORD button the receiver stops recording...

Page 72: ...te If you record a locked program while you have the receiver locked you ll have to enter the password to play back that program There are several choices you can make from the DVR Events screen Sort...

Page 73: ...tion When you press the FWD button once the program advances at 1 15 the speed of normal playback Press the FWD button twice to forward at 1 4 the speed of normal play Press the FWD button three times...

Page 74: ...ding only you can set an event timer for program s of any length limited only by the amount of remaining free space on your DVR receiver s hard drive The receiver needs more room to record programs wi...

Page 75: ...to Videotape You may want to keep a videotape copy of a recording you made on the DVR receiver Or if the DVR hard drive is out of room to save new recordings maybe you ll want to move older recording...

Page 76: ...sports You can then quickly list programs based on that theme and choose the program you want from the list 1 Open the Themes and Search menu by doing one of the following While watching a program pr...

Page 77: ...d on the screen to type the information in the space provided by selecting each character You can use the letters above the NUMBER PAD buttons while in the Enter Search Criteria field For example when...

Page 78: ...iver tunes to that program If you select a program that is on in the future you will have to set an event timer See page 54 for more information on event timers Search History After you have searched...

Page 79: ...f you exit a locked item or close the Locks menu you must re enter the password to access the item or menu Locking and Unlocking the Receiver You must lock the receiver for any receiver Locks you have...

Page 80: ...enter this password to lock or unlock the receiver If you forget your password you will need to call and speak with a Customer Service Representative If you have a Personal Identification Number PIN y...

Page 81: ...o unlock a rating code highlight the code and press SELECT 8 Select the Done option to save your changes 9 If the receiver is not locked then you must lock it to put the locks you just created into ef...

Page 82: ...PAD buttons The receiver displays stars as you enter the digits of the password As soon as you enter the fourth digit of the password the receiver highlights the OK option Press the SELECT button 4 S...

Page 83: ...Chapter 3 Page 78 Using the System 4 Select the Lock PPV or Unlock PPV option 5 If the receiver is not locked the you must lock it to put the lock you just created into effect...

Page 84: ...using the NUMBER PAD buttons The receiver displays stars as you enter the digits of the password As soon as you enter the fourth digit of the password the receiver highlights the OK option Press the S...

Page 85: ...ssword 9 Enter your new password again for confirmation using the NUMBER PAD buttons The receiver displays stars as you enter the digits of the password As soon as you enter the fourth digit of the pa...

Page 86: ...you are authorized to make changes to your account Using Caller ID Caller ID displays on your TV the names of people as they call you if you subscribe to Caller ID from your local telephone company To...

Page 87: ...Chan and All Sub lists Note If you have set any locks on the receiver and the receiver is locked then these locks will be kept If the receiver is unlocked any such locks will be lost You cannot reset...

Page 88: ...es show at the start whether an alternate language is available An alternate language applies only to the audio portion of the program and does not change the language used in the menus displayed by t...

Page 89: ...ing 1 Press the MENU 8 5 to open the Updates screen 2 Highlight the Time Set option 3 Use the UP and DOWN ARROW buttons to highlight the time 4 Go to the AM PM option and use the UP and DOWN ARROW but...

Page 90: ...that mode Limited Mode You can program your remote control in limited mode to keep from accidentally changing the channel away from satellite programming on your TV or VCR When you use the remote to...

Page 91: ...for a second TV Press 1 for a second VCR or DVD player Press 2 for a tuner or audio amplifier This step is for programming the kind of device that is to be programmed in AUX mode If you re not program...

Page 92: ...and repeat this procedure 12 If you can t find a code that works then try the Scan for Device Codes that follows 1 Turn the device on Use the device s front panel buttons or its original remote contro...

Page 93: ...mode button flashes For example hold the TV mode button for a TV until all of the other mode buttons light When you let go the TV mode light will flash 2 Press the POUND button twice Watch the mode li...

Page 94: ...l the TV See Set Up the Remote to Control Other Devices beginning on page 85 Then you must press the TV mode button to set the remote to TV mode The TV mode button lights for two seconds to show you v...

Page 95: ...ol has been set to operate in limited mode Select Button The SELECT button works as the ENTER button for a TV Recall Button Press the RECALL button to go back to the last TV channel you watched Press...

Page 96: ...n VCR mode to use the buttons described here to control your VCR Note You can set up the remote to control a second VCR in AUX mode the same way it controls the first VCR in VCR mode See Set Up the Re...

Page 97: ...otape Press this button or the PLAY button to go back to playing the tape Press the FWD button to forward a videotape Press the STOP button to stop playing or recording on a videotape Press the RECORD...

Page 98: ...emote to AUX mode The AUX mode button flashes once to show you ve set the remote to AUX mode Make sure you keep the remote in AUX mode to use the buttons described here to control your auxiliary devic...

Page 99: ...volume 1 Press and hold the AUX mode button for three seconds and then release it The AUX mode button will blink 2 Press the POUND button 3 Press the plus side of the VOLUME button 4 Press the 0 numb...

Page 100: ...then the receiver displays a Phone Connection OK message If the receiver highlights the Done option then select the Dial Out option so the receiver can make a toll free call to the Customer Service C...

Page 101: ...Chapter 3 Page 96 Using the System Notes...

Page 102: ...in the following tables that relates to the problem Read the What s Happening column until you find the problem Read the information in the Possible Reason column Try each of the suggested solutions i...

Page 103: ...ble connections are tight and dry for outdoor cables If this does not work do the Check Switch test 005 The receiver may not yet have been authorized via the satellite signal The satellite dish may ha...

Page 104: ...green and displays the word Locked If not contact your installer to re aim the satellite dish If you have not authorized the receiver call the Customer Service Center for help 026 The receiver may hav...

Page 105: ...select the No option What Is Happening Possible Reason What to Do You cannot find the remote control N A Use the receiver front panel Control Buttons to control the receiver until you find the remote...

Page 106: ...on the extender that sends the signal to the receiver may not be right in front of the IR sensor on the receiver front panel You are using Remote Control 2 which does not transmit IR signals Make sur...

Page 107: ...TV is set up to display from the correct connected input s Check that the system has been installed correctly Make sure that all required coaxial cables are in place and check that all cable connector...

Page 108: ...ograms that have ended in the Program Guide or Browse Banner but find you cannot The Program Guide and Browse Banner can display only programs that have not yet ended These features cannot display a t...

Page 109: ...Do You press the remote Guide button while the Program Guide is displayed You find that you can apply only the All Chan list or the All Sub list If you have not added channels to any custom Favorite...

Page 110: ...telephone was busy it automatically disconnected You do not have to do anything You can always use your telephone line because the receiver automatically hangs up if it finds the line is busy The rec...

Page 111: ...for a showing of the program You may have set up a timer with an incorrect frequency Remember that a Once event timer operates just one time A Mon Fri event timer operates Monday through Friday on th...

Page 112: ...was not set up right See the Event Timers table for help Check the time Left on the DishDVR Recorded Events menu If you protect many recorded programs the receiver may not have enough room to record...

Page 113: ...Chapter 4 Page 108 Reference NOTES...

Page 114: ...oldstar 505 523 526 545 546 566 573 652 653 654 655 656 658 693 730 Granada 627 Grand 627 Grunpy 657 682 Hallmark 627 652 654 Harman Kardon 561 Harvard 657 Hinari 534 Hitachi 523 526 548 549 553 554 5...

Page 115: ...627 647 652 653 654 655 656 658 680 704 717 730 738 755 833 858 897 Sansui 754 834 Sanyo 542 590 652 683 SBR 566 Schneider 566 Scotch 654 Scott 526 534 537 541 600 652 654 655 657 662 682 696 701 Sear...

Page 116: ...95 Mitsubishi 512 562 567 568 570 595 Montgomery Wards 512 554 585 590 591 Motorola 678 MTC 544 588 675 Multitech 579 588 591 675 NAD 573 NEC 562 581 592 594 682 Nikko 676 Noblex 675 Olympus 678 Optim...

Page 117: ...7 878 879 880 Proscan 720 Qwestar 723 RCA 666 690 749 816 842 854 Sampo 724 Samsung 652 667 668 691 705 740 741 820 821 844 845 866 875 881 Sansui 725 754 Sanyo 643 Sharp 669 865 Sherwood 728 Sony 617...

Page 118: ...41 TV DVD Codes Apex 757 Broksonic 752 Cytron 904 Panasonic 734 765 RCA 749 Sansui 754 Sylvania 764 Toshiba 865 TV 814 DVD 866 TV 815 DVD Tuner Amplifier Codes DVD VCR Codes Go Video 692 693 822 JVC 6...

Page 119: ...Page 114 Chapter 4 Reference Notes...

Page 120: ...ment of any consumer electronic devices remote control batteries signal reception problems loss of use of the system or unused programming charges due to system malfunction This warranty does not cove...

Page 121: ...quipment after ten days you will receive a full refund less an administrative fee If your equipment is out of warranty and can be repaired your billing account or credit card will be charged the stand...

Page 122: ...programming selection at any time by notifying us A Transaction Fee as detailed in Section 2 D may apply to such programming changes unless you are receiving Services and or Equipment as defined in Se...

Page 123: ...payment in full we can accept them without waiving any of our rights including without limitation our rights to collect any other amounts owed by you notwithstanding your characterization of such paym...

Page 124: ...Services Restart Fee 25 00 We disconnect your Services for any reason and you wish to restart such Services unless you are receiving Services pursuant to a Pre Pay Promotion 5 00 If you are a Pre Pay...

Page 125: ...m commitment period certain early termination or cancellation fees may apply C Disconnection of Services In addition to all other rights that DISH Network may have to disconnect your Services DISH Net...

Page 126: ...are strictly prohibited and may result in the termination of this Agreement disconnection of your Services and or legal action H Software License You are licensed to use the software provided in your...

Page 127: ...ESSLY PROVIDED TO THE CONTRARY BY APPLICABLE STATE LAW NEITHER WE NOR OUR THIRD PARTY BILLING AGENTS NOR ANY OF OUR OR THEIR AFFILIATES MAKE ANY WARRANTY EITHER EXPRESSED OR IMPLIED REGARDING YOUR DIS...

Page 128: ...ices Partial payments on third party billing agent bills may be applied first to the balance due for other services billed on your third party billing agent bill including without limitation local tel...

Page 129: ...REN for this equipment 0 1B or 0 3B This equipment uses the following Universal Service Order Code USOC jacks RJ 11C A plug and jack used to connect this equipment to the premises wiring and telephon...

Page 130: ...o guarantee that interference will not occur in a particular installation If this equipment does cause harmful interference to radio or television reception which can be determined by turning the equi...

Page 131: ...Page 126...

Page 132: ...ng Locks 75 Customer 8 D Default Settings 82 Deleting Timers 61 Device Codes Tuner Amplifier 112 TV 109 TV DVD Combo 113 VCR 110 Dish Antenna System Connecting 29 Dish Home 8 DishPVR 69 Auto Record an...

Page 133: ...imer Conflict 60 Timers 10 54 Menus and Screens DVR Record Event 16 62 Program Guide 16 62 Modulator Setup 27 N Naming a Favorites List 54 Nearby TV Changing Output Channels 27 Coaxial Connections 24...

Page 134: ...howing Adult Channels 79 Smart Card Door 19 Staying Legal 124 Be Careful Recording Copyrighted Shows Films 70 S Video Out 20 System Info 19 System Setup 9 T Telephone Jack 21 Themes 71 Themes and Sear...

Page 135: ...Page 130 Index Notes...

Page 136: ...ing Your Program Packages on page 4 Remote Control Settings TV Channel Settings Purchase Location Name Purchase Location Telephone Number Receiver Serial Number Receiver Conditional Access Number Smar...

Reviews: