


Chapter 5: Pro Tools Movie Track
49
To spot the entire Movie track to a new frame
location:
1
Select Display > Time Code.
– or –
Select Time Code from the Main Location Indi-
cator pop-up menu.
2
Enable Spot mode by clicking the Spot button.
3
Shift-click the Movie track with the Grabber
tool.
4
In the Spot dialog that appears, specify a new
SMPTE frame number for the start of the Movie
track. In this dialog, you can press Plus (+) or Mi-
nus (–) on the numeric keypad, enter a number,
and press the Enter key to add or subtract that
number of frames from the currently selected
time field.
5
Click OK when you are done.
To spot a single video clip to a new frame location:
1
Select Display > Time Code.
– or –
Select Time Code from the Main Location Indi-
cator pop-up menu.
2
Enable Spot mode by clicking the Spot button.
3
Select the clip you want to move on the Movie
track with the Grabber tool.
4
In the Spot dialog, specify a new SMPTE frame
number for the start of the clip. In this dialog,
you can press Plus (+) or Minus (–) on the nu-
meric keypad, enter a number, and press the En-
ter key to add or subtract that number of frames
from the currently selected time field.
5
Click OK when you are done.
Copying Video Clips
You can copy video clips to a new SMPTE frame
location within the Movie track.
To copy a video clip to a new frame location:
1
Select Display > Time Code.
– or –
Select Time Code from the Main Location Indi-
cator pop-up menu.
2
Enable Spot mode by clicking the Spot button.
3
Alt-click the clip on the Movie track with the
Grabber tool.
4
In the Spot dialog, specify a new SMPTE frame
number for the start of the clip. In this dialog,
you can press Plus (+) or Minus (–) on the nu-
meric keypad, enter a number, and press the En-
ter key to add or subtract that number of frames
from the currently selected time field.
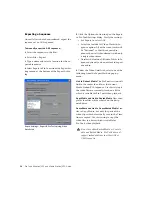
Spot dialog


