


Chapter 4: Media Station|V10 Software
35
Render All Effects
Though it is not possible to add or edit video or
audio effects in Media Station|V10, you may
need to create an export from a sequence that
was created on another Avid editing system. Be-
fore you can play or export the sequence, you
must render all effects. Media Station|V10 can
only render those effects which are currently in-
stalled. Media Station|V10 contains all of the
standard Avid video effects. All third party ef-
fects must be rendered by the video editor be-
fore opening or importing into
Media Station|V10.
To render all effects in Media Station|V10:
1
Drag the sequence to the Record Monitor. All
elements of the sequence can be viewed in the
Timeline. Unrendered effects appear in the
Timeline as small squares with blue or green
dots. Rendered effects appear in the Timeline as
a square with no colored dot.
2
If there are any audio effects to render, select
Tools > AudioSuite.
3
Click the Track Enable buttons on the left side
of the Timeline so that all audio and video
tracks in the Timeline are selected (purple).
4
Click anywhere in the Timeline, then press
the Home key. The cursor moves to the begin-
ning of the Timeline.
5
Click the Mark In button to mark an in point
at the beginning of the sequence.
6
Press the End key to move the cursor to the
end of the sequence.
7
Click Mark Out button to set an out point at
the end of the sequence. The entire sequence
should now be selected.
8
Select Clip > Render In/Out (if the command
appears grayed out, click in the Timeline again).
9
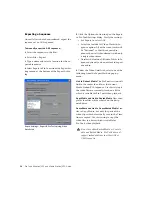
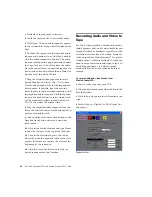
In the Render Effects dialog, select Effect
Source Drive. This will write the rendered effect
to the same drive as the original files.
10
Click OK.
11
To play the sequence with the rendered ef-
fects, press the Home key to move the cursor to
the beginning of the sequence, then press the
Spacebar to play.
For more information on rendering effects
in Avid products, see the Avid Effects
Guide.
Render Effects dialog
This selection keeps audio files on audio
drives and video files on video drives. If you
select a particular drive, both the rendered
audio and video files will be stored on the se-
lected drive, which could cause playback er-
rors.
If you open a sequence that has a third-party
video or audio effect that you cannot render,
you can remove the effect by clicking on the
effect in the Timeline so that the cursor is
placed over the small effect box. Click the
Track Enable button to the left of the Time-
line so that the appropriate tracks are purple.
Then click the Remove Effect button.
Remove Effect button


